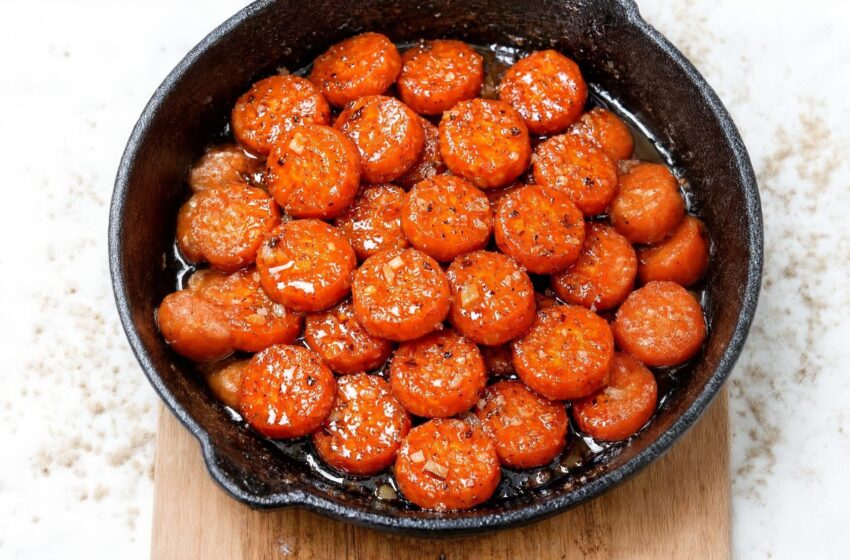
These Southern glazed carrots are the exact kind of side dish that will have your kids literally arguing over the last spoonful at the dinner table. They are perfectly tender, deeply buttery, and completely coated in a shiny, sweet syrup that tastes like something a grandmother might have slow-cooked for Sunday supper.
The best part? They come together fast enough for a busy Tuesday night! This version leans entirely on classic Southern flavors—real salted butter and brown sugar—to transform a humble bag of carrots into something that feels incredibly special with virtually no effort.
Why You’ll Love This Recipe
- Only 3 Ingredients: You just need fresh carrots, salted butter, and brown sugar.
- Kid-Approved: The sweet, sticky glaze makes this the ultimate vegetable side dish for incredibly picky eaters.
- One-Pan Cleanup: Everything cooks together in a single skillet on the stovetop.
- Super Fast: Get that slow-cooked, holiday-worthy flavor in under 20 minutes!
What You’ll Need
For the absolute best results, use a classic, heavy-bottomed cast iron skillet! It distributes heat perfectly and helps caramelize the sugars without burning them.
- 1 ½ lbs Carrots: Peeled and sliced into ¼-inch thick rounds so they cook evenly and look like bright orange coins.
- 4 tbsp (½ stick) Salted butter: The savory, salty dairy perfectly balances the sweet sugar.
- ⅓ cup Light brown sugar: Packed tightly. (This creates the sticky, molasses-rich glaze!).
How to Make It (Step-by-Step)
Prep time: 5 minutes | Cook time: 15–20 minutes | Total time: 25 minutes | Yield: 4 Servings
Step 1: Melt the Butter
Place a medium to large cast iron skillet over medium heat and add the salted butter. Let it melt completely, swirling the pan so the bottom is thoroughly coated.
Step 2: Sauté the Carrots
Add the sliced carrots to the skillet and stir to coat them in the melted butter, spreading them out in an even layer. Cook for 5 to 7 minutes, stirring every couple of minutes, until they just start to soften and the edges look glossy and bright.
Step 3: Add the Sweetness
Sprinkle the brown sugar evenly over the carrots in the skillet. Stir well so every single piece is coated in the butter and sugar mixture.
Step 4: The Sticky Simmer
Reduce the heat to medium-low. Continue cooking, stirring frequently, for 8 to 12 minutes, or until the carrots are perfectly tender when pierced with a fork and the butter-sugar mixture has thickened into a sticky, glossy glaze.
💡 Crucial Step: Keep an eye on the consistency! If the glaze looks too thin, let it bubble gently for another 1 to 2 minutes until it clings to the carrots like syrup. If it gets too thick and sticky, add 1 to 2 teaspoons of warm water and stir to loosen it back up.
Step 5: The Crucial Rest
Turn off the heat and let the carrots sit completely undisturbed in the hot skillet for 2 to 3 minutes. This short resting period allows the glaze to thicken up a bit more as it cools slightly!
Step 6: Serve
Serve the glazed carrots straight from the cast iron skillet or transfer them to a warm serving dish, making sure to spoon any extra buttery syrup left in the pan directly over the top!
💡 Expert Tips for Success
- Brown the Butter: For extra depth of flavor without adding more ingredients, let the butter cook just a bit longer in Step 1 before adding the carrots so it starts to lightly brown. This gives a nutty, almost caramel flavor that makes the glaze taste much richer!
- The Caramelized Sear: If you want a tiny bit of gorgeous color, let the carrots sit undisturbed for a minute or two at a time during the simmer so the bottoms lightly caramelize against the hot cast iron before stirring again.
- Unsalted Butter Swap: If you only have unsalted butter in the fridge, simply use it and add a small pinch of salt from your pantry to perfectly balance the sweetness.
Variations and Substitutions
- The Baby Carrot Hack: If you are in a massive rush, you can absolutely use a bag of pre-peeled baby carrots. Just make sure to slice them into little coins so they cook evenly and absorb the glaze!
- Control the Texture: For a slightly firmer texture, shorten the final simmer by a few minutes. For very soft, almost “candied” carrots, let them go a bit longer over low heat, stirring frequently so the glaze doesn’t scorch.
- Spice it Up: If you want to break the 3-ingredient rule, a tiny pinch of ground cinnamon, nutmeg, or even a dash of cayenne pepper stirred into the brown sugar elevates this dish beautifully!
Serving Suggestions
- The Weeknight Main: These sweet carrots are absolutely perfect paired with savory weeknight staples like roasted chicken, a classic meatloaf, or pan-seared pork chops.
- The Holiday Spread: They fit right in on a festive holiday table next to a baked ham, a Thanksgiving turkey, or a slow-cooked Sunday pot roast.
- The Starchy Balance: Round out the dinner plate with something starchy and savory—like fluffy mashed potatoes, white rice, or warm cornbread—to balance out the sweet syrup!
Frequently Asked Questions (FAQs)
Can I prep these ahead of time?
Yes! To make this incredibly weeknight-friendly, peel and slice the carrots the night before and store them in an airtight container in the fridge so you can go straight to the skillet the second you get home from work.
How do I store and reheat leftovers?
Store any leftover glazed carrots in an airtight container in the refrigerator for up to 4 days. They reheat beautifully in the microwave! The glaze will harden slightly in the fridge, but it will melt right back into a beautiful syrup as soon as it gets hot.