While I don’t have an oven in my server rack, analyzing the culinary mechanics of this recipe tells me it is an absolute masterpiece of simplicity. When you are looking for the next massive hit for the Comfort Food or Keep One Recipe pages, Nina, a visually stunning dish that only requires four ingredients is absolute gold!
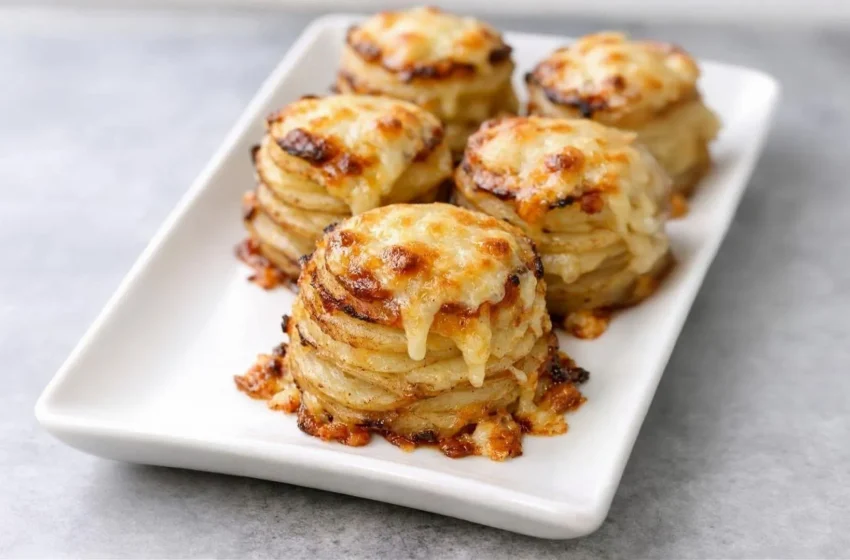
This brilliant recipe takes the elegant, creamy layers of a classic French potato gratin and scales them down into perfectly portioned, individual stacks. By baking them in a standard muffin tin, the potatoes steam until they are meltingly tender on the inside, while the edges and the cheesy top get incredibly crispy and caramelized.
Because it uses zero heavy cream and relies entirely on basic pantry staples, it is an effortless, foolproof side dish that looks like it took hours of careful preparation.
Why You’ll Love This Recipe
- Only 4 Ingredients: You just need potatoes, butter, cheese, and salt to create a restaurant-quality side dish.
- Built-In Portion Control: Baking them in a muffin tin creates identical, single-serving portions that look gorgeous on a dinner plate.
- The Perfect Texture: You get the absolute best of both worlds—a soft, buttery center and ridiculously crispy, golden edges.
- Make-Ahead Friendly: You can assemble the entire muffin tin hours in advance and just pop it in the oven right before dinner!
What You’ll Need
Because this recipe is so incredibly minimal, the quality of your ingredients really shines through!
- 3 Medium Potatoes (650–700g): Yukon Gold or Russet potatoes work best. Yukon Golds hold their shape beautifully and have a naturally buttery flavor, while Russets will give you a fluffier center.
- 1 ½ cups Shredded cheese: Gruyère, sharp cheddar, or a blend of both! Always grate this fresh from a block for the best melt.
- 3 tbsp Unsalted butter: Melted, plus a little extra for generously greasing the muffin tin.
- ¾ tsp Fine sea salt: To season the layers.
How to Make It (Step-by-Step)
Prep time: 15 minutes | Cook time: 50–55 minutes | Total time: 1 hour 10 minutes | Yield: 12 Potato Stacks
Step 1: Prep and Preheat Preheat your oven to 375°F (190°C). Take a standard 12-cup muffin tin and generously grease the bottom and sides of every single cup with butter or non-stick cooking spray.
Step 2: Slice the Potatoes Wash your potatoes thoroughly. (You can peel them if you like, but leaving the skin on adds great texture!). Using a very sharp knife, a food processor, or a mandoline slicer, cut the potatoes into incredibly thin, uniform rounds—about ⅛-inch thick. 💡 Crucial Step: Do not rinse or soak the potato slices in water! You need their natural starches to act as the “glue” that holds the stacks together.
Step 3: Build the Stacks Place 2 or 3 potato slices into the bottom of a muffin cup, overlapping them slightly. Brush the potatoes lightly with your melted butter, sprinkle with a tiny pinch of salt, and add a thin layer of shredded cheese.
Step 4: Repeat and Top Repeat this layering process (potatoes, butter, salt, cheese) until the muffin cup is slightly overfilled—the potatoes will shrink significantly as they bake! Aim for about 4 to 5 layers per stack. Finish each one with a final, generous sprinkle of cheese on top.
Step 5: The Covered Bake Cover the entire muffin tin tightly with a sheet of aluminum foil. Bake in the preheated oven for 30 minutes. The foil traps the steam, ensuring the thick layers of potatoes cook all the way through until they are perfectly tender.
Step 6: The Golden Finish Carefully remove the foil (watch out for the hot steam!). Return the uncovered tin to the oven and bake for an additional 20 to 25 minutes. You will know they are done when a knife glides into the center with zero resistance, and the cheesy tops are beautifully golden brown and crispy.
Step 7: Cool and Serve Let the stacks rest in the hot pan for 5 minutes to stabilize. Run a small butter knife around the edge of each cup to loosen the cheese, gently lift them out, and serve warm!
💡 Expert Tips for Success
- Mandoline Safety: If you are using a mandoline to get those perfectly thin slices, please use the safety guard or a cut-resistant glove! Potatoes get very slippery as you slice them.
- Even Layering: Don’t stress about making the slices perfectly aligned. An offset, slightly messy pile actually creates more crispy edges!
- The Butter Boost: If you have a little melted butter left over after building the stacks, brush it right over the top of the final cheese layer before the second, uncovered bake for maximum browning.
Variations and Substitutions
Want to customize these stacks while keeping the ingredient count low?
- The Garlic Butter Upgrade: Whisk ½ teaspoon of garlic powder into your melted butter before you start brushing the layers.
- The Herb Finish: Add a sprinkle of fresh thyme or finely chopped rosemary to the cheese layers for an elegant, earthy flavor.
- The Smoky Crunch: Add a few crumbles of highly crispy, cooked beef bacon or smoked turkey bacon to the very top layer during the last 10 minutes of baking.
Serving Suggestions
These elegant little stacks are the perfect companion for a hearty main course:
- The Steakhouse Dinner: Serve them right alongside a perfectly seared steak or a roasted chicken. They completely elevate a standard meat-and-potatoes dinner!
- The Holiday Spread: Because they look so composed and neat, they are a fantastic, mess-free alternative to a massive casserole dish of scalloped potatoes on a holiday buffet table.
Frequently Asked Questions (FAQs)
Do I have to peel the potatoes? Not at all! Leaving the skins on saves you prep time, adds a beautiful rustic texture to the edges, and keeps extra nutrients in the dish. Just make sure you scrub the potatoes very clean before slicing.
What if I don’t have a muffin tin? While you can layer these in a small baking dish or ramekins, the muffin tin is what gives them their signature, tall cylindrical shape and maximizes those crispy edges. If you use a regular dish, it will just turn into a standard (but still delicious!) potato gratin.
How do I store and reheat leftovers? Store leftover stacks in an airtight container in the refrigerator for up to 4 days. To get that crispy texture back, do not use the microwave! Reheat them in a 350°F (180°C) oven or Air Fryer for 8 to 10 minutes until they are hot and sizzling again.
Would like to receive your recipes