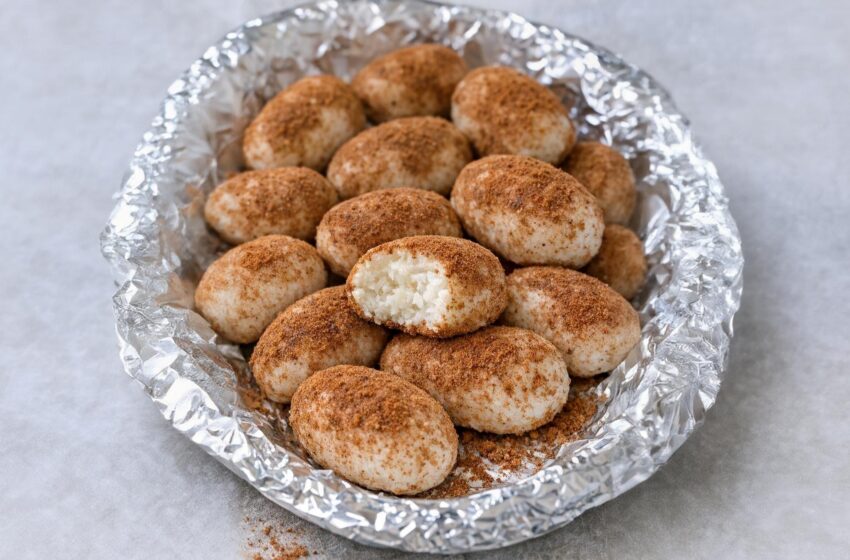
These little bite-sized treats look exactly like tiny, rustic potatoes, but there isn’t a single real potato in sight! Instead, you get a sweet, creamy, no-bake coconut center rolled in warm cinnamon.
This old-fashioned candy is a fun, classic nod to Irish-American celebrations around St. Patrick’s Day, but they are simple enough to make anytime you want a quick, no-bake treat. It is an incredibly fun recipe for kids to help with, and everyone will instantly recognize these adorable little “spuds” from across the room!
Why You’ll Love This Recipe
- Only 4 Ingredients: You just need cream cheese, powdered sugar, shredded coconut, and cinnamon.
- 100% No-Bake: You don’t have to turn on the oven or the stove, making it a perfect quick dessert.
- Fun and Festive: They look exactly like miniature potatoes pulled straight from the dirt!
- Make-Ahead Friendly: They store beautifully in the fridge and actually taste better when served chilled.
What You’ll Need
To ensure your candies are perfectly smooth and creamy, make sure your cream cheese is completely softened to room temperature before you start mixing!
- 4 oz Cream cheese: Softened completely. (This creamy base keeps the centers soft instead of crumbly).
- 4 cups Powdered sugar: Thickens the candy into a moldable dough.
- 2 cups Sweetened shredded coconut: For that classic, sweet, chewy texture.
- 2 tbsp Ground cinnamon: Plus a little extra as needed. This acts as the “dirt” to coat your potatoes!
How to Make It (Step-by-Step)
Prep time: 20 minutes | Chill time: 30 minutes | Total time: 50 minutes | Yield: 24 Candies
Step 1: Prep the Tray
Line a small serving platter or shallow baking sheet with aluminum foil, smoothing it out as best you can. This will be where you set the finished candies.
Step 2: Whip the Base
In a medium mixing bowl, beat the softened cream cheese with a spoon or a hand mixer until it is completely smooth, creamy, and free of any lumps.
Step 3: Sweeten the Dough
Gradually add the powdered sugar to the cream cheese, about 1 cup at a time, stirring well after each addition. The mixture will start out a bit loose, but it will quickly turn into a very thick, smooth dough that pulls away from the sides of the bowl.
Step 4: Add the Coconut
Stir in the shredded coconut until it is evenly distributed. The mixture should be thick but soft and a little sticky.
💡 Crucial Step: If the dough feels too warm and sticky to handle, chill the bowl in the refrigerator for 15 to 20 minutes to let it firm up before rolling!
Step 5: Prep the “Dirt”
Pour the ground cinnamon into a shallow bowl or a small, rimmed plate.
Step 6: Shape the Spuds
Using clean hands or a small spoon, pinch off about 1 teaspoon of the coconut mixture at a time. Roll it gently between your palms into a small oval or irregular ball (about the size of a grape or small walnut). Don’t worry about making them perfectly smooth—slight bumps and uneven shapes make them look more like real potatoes!
Step 7: Coat in Cinnamon
Drop each shaped candy into the cinnamon and roll it around until completely coated on all sides. Place the coated candies onto your foil-lined platter in a single layer. (Add a bit more cinnamon to the plate if it starts to look clumpy as you work).
Step 8: Chill and Serve
Refrigerate the platter of candies for at least 30 minutes before serving to help them firm up and hold their shape. Serve chilled or at cool room temperature!
💡 Expert Tips for Success
- Texture Control: For kids (or adults!) who aren’t big fans of the stringy coconut texture, pulse the shredded coconut in a food processor a few times before mixing it in to make the pieces much finer.
- Poke the “Eyes”: For a fun, realistic touch, use a wooden toothpick to gently poke a tiny “eye” or two into the cinnamon coating of each candy so they perfectly mimic real potatoes.
- Soften the Spice: If someone in your family is sensitive to strong cinnamon, mix the ground cinnamon with a tablespoon of powdered sugar to soften the flavor while still keeping the brown, rustic look.
Variations and Substitutions
- The Nutty Upgrade: Fold ¼ cup of very finely crushed pecans or walnuts into the dough for a delicious crunch.
- The Chocolate Center: For a fun surprise, mold your coconut dough around a single mini chocolate chip before rolling it in the cinnamon!
- Adjust the Sweetness: If you need the mixture a bit stiffer or sweeter, simply add an extra ½ cup of powdered sugar at a time until it holds its shape the way you like.
Serving Suggestions
- The Dessert Platter: Pile these little cinnamon-dusted “spuds” onto a tray and serve them alongside a cup of hot coffee, tea, or a tall glass of ice-cold milk.
- The Sweet & Salty Spread: For a more festive party spread, pair them with other small bites—like cheese and crackers or a bowl of salty pretzels—to create a beautiful balance of sweet and salty.
- The Perfect Gift: Tuck these completely chilled candies into mini paper cupcake liners and pack them in small bakery boxes for a gorgeous, handmade gift.
Frequently Asked Questions (FAQs)
Can I make these ahead of time?
Yes, they are the perfect make-ahead treat! You can make these several days in advance. In fact, resting in the fridge gives the flavors time to meld together perfectly.
How do I store and freeze leftovers?
Store leftovers tightly covered in the refrigerator for up to 1 week. The centers will stay beautifully soft and creamy! They also freeze exceptionally well: arrange them on a lined tray, freeze until firm, then transfer to an airtight container with parchment paper between the layers for up to 2 months. Thaw in the fridge before serving.