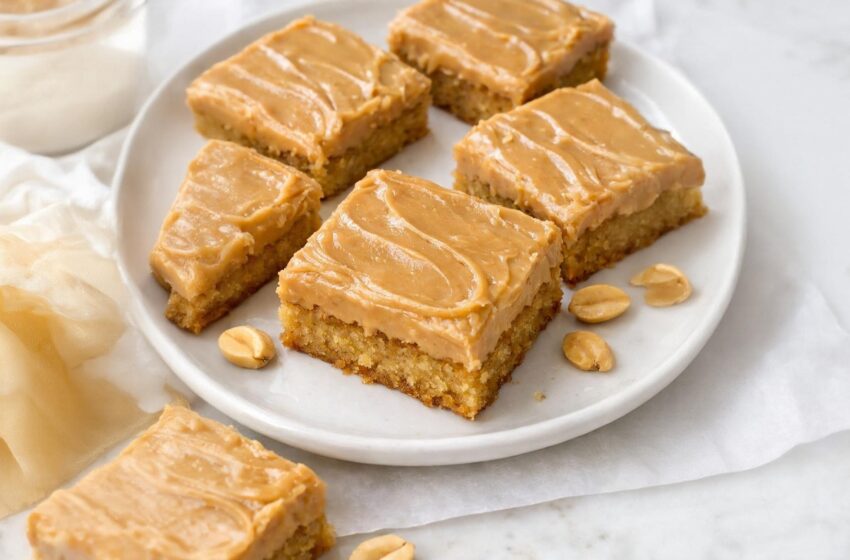
These 4-ingredient peanut butter bars are exactly the kind of dessert you reach for when you’ve promised to bring something to a potluck… and then completely run out of time. They are incredibly rich, perfectly chewy, and topped with a thick, creamy layer of warm peanut butter that makes them taste like you spent all afternoon baking!
The best (and slightly dangerous) part is how highly snackable they are. This foolproof recipe leans entirely on classic pantry staples and requires absolutely no mixer. With just a whisk, a bowl, and about 10 minutes of hands-on prep time, you can have a decadent, bakery-quality treat ready for the oven.
Why You’ll Love This Recipe
- Only 4 Ingredients: You just need peanut butter, butter, brown sugar, and eggs!
- Zero Fancy Equipment: Put the stand mixer away. Everything comes together in one bowl with a simple whisk.
- The Perfect Texture: The brown sugar gives the base an incredibly fudgy, chewy bite, while the melted peanut butter topping adds a silky, melt-in-your-mouth finish.
- Travel-Friendly: Once set, these bars slice beautifully and stack perfectly in Tupperware for potlucks, bake sales, or game nights.
What You’ll Need
For the absolute best, most classic texture, stick to a standard, sweetened “no-stir” creamy peanut butter (like Jif or Skippy) rather than natural, oil-separated brands!
- 1 cup Creamy peanut butter: Divided! (¾ cup goes into the batter, and ¼ cup is reserved for the topping).
- ½ cup (1 stick) Unsalted butter: Melted and allowed to cool slightly.
- 1 cup Light brown sugar: Packed tightly to guarantee that perfect, chewy blondie texture.
- 2 large Eggs: Brought to room temperature so they blend seamlessly into the batter.
How to Make It (Step-by-Step)
Prep time: 10 minutes | Bake time: 20–24 minutes | Cooling time: 1 hour | Yield: 16 Squares
Step 1: Prep and Preheat
Preheat your oven to 350°F (175°C). Lightly grease an 8×8-inch baking pan, or line it with parchment paper leaving a little overhang on the sides for easy lifting later.
Step 2: Whisk the Base
In a medium mixing bowl, whisk together the melted butter and the packed brown sugar until the mixture looks glossy and well combined (about 30 to 60 seconds). This helps dissolve the sugar and guarantees a chewy texture!
Step 3: Add the Eggs
Add both room-temperature eggs to the bowl and whisk until the mixture is smooth and slightly thickened. (Make sure your melted butter isn’t piping hot before adding the eggs, or they will scramble!).
Step 4: The Peanut Butter Batter
Scoop exactly ¼ cup of your peanut butter and set it aside in a small bowl for later. Add the remaining ¾ cup of peanut butter directly into the egg and sugar mixture. Stir with a rubber spatula until everything is fully blended into a thick, uniform batter.
Step 5: Spread and Bake
Pour the thick batter into your prepared pan and use your spatula to spread it into an even layer, gently pushing it into the corners. Bake in the preheated oven for 20 to 24 minutes.
💡 Crucial Step: You want to pull them out when the edges are set and golden, but the center still looks slightly soft. They will continue to firm up as they cool. Do not overbake them, or you will lose that fudgy texture!
Step 6: Warm the Topping
While the bars are finishing their bake, gently warm your reserved ¼ cup of peanut butter in the microwave in 10-second bursts, stirring in between, just until it is pourable and smooth.
Step 7: The Creamy Glaze
As soon as the hot pan comes out of the oven, immediately pour the warmed peanut butter directly over the surface of the bars. Use an offset spatula or the back of a spoon to spread it into a smooth, even layer. The residual heat from the bars will help it glide on perfectly!
Step 8: Cool and Slice
Let the bars cool completely in the pan at room temperature for about 1 to 1 ½ hours until the peanut butter topping is set. Use the parchment overhang to lift the bars out, slice into 16 squares, and enjoy!
💡 Expert Tips for Success
- The Swirl Finish: For a beautiful, rustic, bakery-style finish without any extra ingredients, drag the tip of a butter knife lightly through the warm peanut butter topping in a swirling pattern before it sets.
- Speed Up the Chill: If you are in a rush to serve these, you can move the pan to the refrigerator for 20 to 30 minutes after they have cooled slightly on the counter to speed up the setting process.
- Thicker Bars: If you want super thick, almost fudge-like bars, you can bake this in a standard loaf pan! Just increase the bake time by a few minutes and watch them closely.
Variations and Substitutions
- The Dark Caramel Flavor: Swap the light brown sugar for dark brown sugar. The extra molasses will give the bars an incredibly deep, rich, caramel-like flavor.
- The Nutty Crunch: If you love texture, simply swap the creamy peanut butter in the batter for crunchy peanut butter! (It is still recommended to use creamy for the topping so it spreads smoothly).
- The Natural PB Swap: If you prefer a stronger, roasted peanut flavor and a slightly firmer, less sweet bar, you can use a well-stirred natural peanut butter.
Serving Suggestions
- The Classic Combo: Serve these rich peanut butter bars slightly warm or at room temperature alongside a tall, ice-cold glass of milk or a hot cup of black coffee.
- The Ultimate Dessert Plate: For a truly indulgent dessert, cut them into larger squares, place them on a plate, and top with a massive scoop of vanilla bean ice cream!
- The Lunchbox Treat: Because these bars don’t require refrigeration and travel beautifully, they are the absolute perfect homemade treat to tuck into a kid’s lunchbox.
Frequently Asked Questions (FAQs)
Can I bake these in a 9×9-inch pan?
Yes! If you use a 9×9-inch pan, your bars will simply be a little bit thinner and will have slightly more chew around the edges. Keep an eye on them, as they may bake 2 or 3 minutes faster!
How do I store and freeze leftovers?
Store any leftover bars in an airtight container at room temperature for up to 3 days (or in the fridge if you like the topping extra firm!). To freeze them, place the sliced bars in a single layer in a freezer bag. They thaw incredibly fast on the counter for a quick grab-and-go treat!