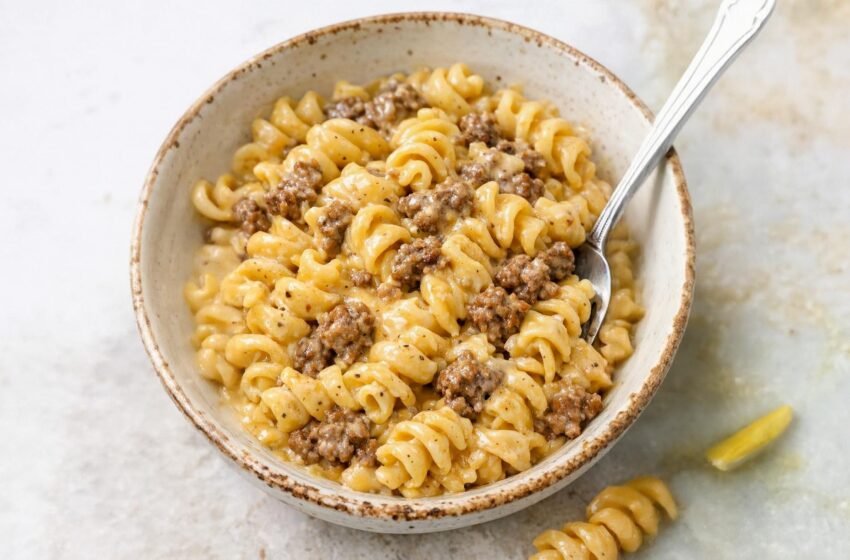
When you need a meal that tastes like it simmered all day but actually comes together in about half an hour, this stovetop beef pasta is the ultimate solution. It is the kind of rich, cozy, comforting food that warms you up on a chilly evening and makes everyone at the table ask for seconds.
The secret to this dish is how the savory beef broth and heavy cream reduce together to form a velvety base, which then gets blanketed in melted cheddar. The sauce clings beautifully to the curly noodles, delivering a hearty, deeply flavorful bite every single time—all with just 5 basic pantry ingredients!
Why You’ll Love This Recipe
- Only 5 Ingredients: You just need pasta, ground beef, beef broth, heavy cream, and cheddar cheese.
- Ready in 30 Minutes: It is a lightning-fast stovetop meal that saves you on busy weeknights.
- The Ultimate Comfort Food: It is thick, glossy, and incredibly cheesy, making it a guaranteed hit with kids and adults alike.
- No Artificial Additives: You get all the convenience of a boxed pasta dinner, but with 100% real, wholesome ingredients.
What You’ll Need
To get the absolute best texture for your cheese sauce, make sure you grate your cheddar cheese from a block! Pre-bagged shredded cheese is coated in starches that can make your sauce grainy.
- 12 oz Curly pasta: Cavatappi, rotini, or even medium shells work best. You want a shape with plenty of nooks and crannies to catch the thick sauce.
- 1 lb Ground beef: (80–90% lean).
- 2 cups Beef broth: Low-sodium is preferred so you can control the saltiness of the final dish.
- 1 cup Heavy cream: This provides the rich, stable base for the cheese sauce.
- 2 cups Shredded cheddar cheese: (About 8 oz). Medium or sharp, depending on your family’s preference.
How to Make It (Step-by-Step)
Prep time: 5 minutes | Cook time: 25 minutes | Total time: 30 minutes | Yield: 4 Servings
Step 1: Boil the Pasta
Bring a large pot of salted water to a boil. Add the curly pasta and cook according to the package directions until it is just al dente.
💡 Crucial Step: Before draining the pasta, carefully scoop out about ½ cup of the starchy, hot pasta water and set it aside. You may need this later to adjust the sauce! Drain the pasta and leave it in the colander.
Step 2: Brown the Beef
While the pasta cooks, heat a large, deep skillet or Dutch oven over medium-high heat. Add the ground beef and cook for 6–8 minutes, breaking it up with a wooden spoon until it is deeply browned and no pink remains. Spoon off most of the excess grease, leaving just a thin coating in the pan for flavor.
Step 3: Simmer the Broth
Pour the beef broth directly into the skillet with the browned beef. Stir well, making sure to scrape up all those delicious, caramelized brown bits from the bottom of the pan. Bring it to a gentle simmer and let it bubble for 3–4 minutes to reduce slightly.
Step 4: The Creamy Base
Reduce the heat to medium-low and stir in the heavy cream. Let the mixture simmer very gently (do not let it reach a hard boil) for 3–5 minutes. Stir it often until it looks slightly thickened and coats the back of your spoon.
Step 5: Melt the Cheese
Turn the heat all the way down to low. Add the freshly shredded cheddar cheese a small handful at a time. Stir constantly after each addition until the cheese is completely melted and smooth before adding the next handful. (Take your time here! If the heat is too high, the cheese will separate and become grainy).
Step 6: Toss and Serve
Add the cooked pasta directly into the skillet with the creamy beef and cheese sauce. Toss and fold everything together until every noodle is completely coated.
Step 7: The Final Adjustment
If the sauce seems too thick, splash in a tablespoon or two of your reserved pasta water and stir until it reaches a perfectly glossy consistency. Serve hot in deep bowls!
💡 Expert Tips for Success
- Brown is Flavor: Don’t rush the ground beef. Let it get truly dark and crusty in spots before adding the broth. Those caramelized bits are what give the sauce its deep, savory flavor.
- Patience with the Cheese: The most important rule for a smooth cheese sauce is low heat and gradual additions. Never dump all the cheese in at once!
- Stretch the Meal: If you have unexpected guests, you can easily stretch this dish by stirring in an extra half-pound of cooked pasta and thinning the sauce out with a little extra broth or your reserved pasta water.
Variations and Substitutions
- The Cheese Blend: You can use a mix of sharp cheddar and Colby Jack or Monterey Jack for a creamier, stretchier sauce, as long as the total amount remains 2 cups.
- The Lighter Swap: You can swap the heavy cream for half-and-half if you prefer a slightly lighter dish. The sauce will be a bit thinner, so just let it simmer for an extra minute or two before adding the cheese.
- The Hidden Veggies: Stir a cup of steamed peas or finely chopped broccoli florets into the skillet right at the end for a pop of color and extra nutrition.
Serving Suggestions
- The Fresh Contrast: Because this pasta is incredibly rich, serve it alongside a crisp green salad tossed in a sharp, tangy vinaigrette to balance the plate.
- The Sweet Side: Sliced cucumbers and onions marinated in a little vinegar and sugar make a classic, refreshing Midwestern side dish.
- The Dipper: Serve with a warm slice of garlic bread or a soft dinner roll to swipe up every last drop of that incredible cheese sauce.
Frequently Asked Questions (FAQs)
Can I make this ahead of time?
Like most cream and cheese sauces, this dish is at its absolute best when served immediately straight from the stove. The pasta will absorb the sauce as it sits.
How do I store and reheat leftovers?
Store any leftovers in an airtight container in the refrigerator for up to 4 days. To reheat, place it in a saucepan over low heat and add a generous splash of milk or cream. Stir gently until it is warmed through and the sauce becomes glossy and creamy again! (Microwaving can cause the cheese to separate and become oily).