This oven-baked spring pea pasta is the exact kind of weeknight recipe you lean on when you want something deeply cozy, creamy, and completely hands-off. The method is wonderfully simple: you scatter frozen green peas over raw dry shell pasta in a ceramic baking dish, add a few basic pantry ingredients, and let the oven do all the heavy lifting!
It’s a highly practical, modern twist on the baked pasta casseroles that home cooks have been making for generations. There is no massive pot of boiling water and no separate saucepan to scrub! Everything bakes together into a creamy, lightly sauced dish where the peas stay sweet and bright, the shells turn perfectly tender, and the top gets beautifully golden. It’s the one-pan dinner people inevitably ask for the recipe for because it feels incredibly special, but is almost embarrassingly easy.
Why You’ll Love This Recipe

- 🍝 No Boiling Required: The raw pasta cooks directly in the sauce right inside the oven!
- ⏱️ True “Dump & Go”: Prep takes under 5 minutes. No standing over a hot stove required.
- 🥣 Minimal Cleanup: Mixing and baking everything in a single ceramic dish means washing up is a total breeze.
- ✨ Bright & Creamy: The heavy cream and Parmesan create a luxurious sauce, while the green peas add the perfect pop of fresh sweetness.
- 🌿 Highly Versatile: It serves perfectly as a rich, comforting main course or a beautiful side dish alongside roasted meats.
What You’ll Need
- 8 oz Dry medium pasta shells: The shell shape is perfect because it acts like a tiny scoop for the creamy sauce and the peas!
- 1 ½ cups Frozen green peas: Do not thaw them! They must go in completely frozen to cook at the right speed.
- 2 cups Low-sodium vegetable or chicken broth: Using low-sodium broth allows you to control the saltiness, especially since the Parmesan is naturally salty.
- 1 cup Heavy cream: The secret to that luxurious, rich sauce.
- 1 cup Parmesan cheese: Finely grated, plus a little extra for serving.
- Salt and Black pepper: 1 teaspoon of kosher salt and ½ teaspoon of freshly ground black pepper.
How to Make It (Step-by-Step)
Prep time: 5 minutes | Bake time: 40–45 minutes | Total time: approx. 50 minutes | Yield: 4 Servings
Step 1: Prep and Preheat
Preheat your oven to 375°F (190°C). Lightly grease a medium ceramic baking dish (about a 2-quart capacity) with a little olive oil or butter to help prevent sticking and make your cleanup much easier.
Step 2: The Dry Base
Pour the dry pasta shells directly into the ceramic baking dish and spread them out into an even layer. The shells should mostly cover the bottom of the dish in a single, slightly overlapping layer.
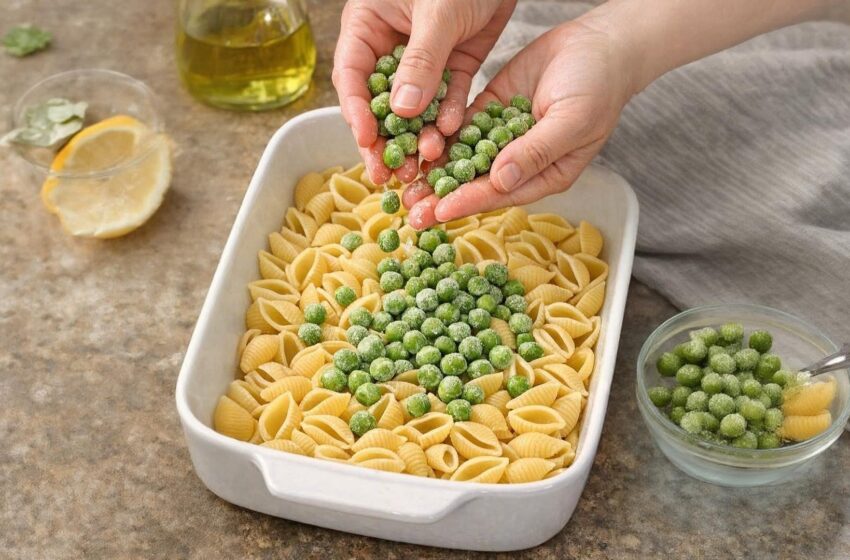
Step 3: Add the Peas
Scatter the frozen green peas evenly right over the dry pasta shells. This specific layering helps the peas gently steam and stay tender while the pasta below absorbs the hot liquid!
Step 4: Whisk the Cream Sauce
In a mixing bowl or large measuring cup, vigorously whisk together the broth, heavy cream, grated Parmesan, salt, and black pepper until the cheese is mostly dissolved and the mixture looks smooth.
Step 5: The Pour-Over
💡 Crucial Step: Slowly pour the cream-and-broth mixture completely over the pasta and peas in the ceramic baking dish, making sure the liquid seeps all the way down through the shells. Gently nudge any exposed pasta down so most of it is at least partially submerged! (A few pieces peeking out are totally fine and will brown beautifully).
Step 6: The Covered Bake
Cover the baking dish tightly with aluminum foil to trap the steam, which helps the dry shells cook perfectly. Place the dish on the middle rack of the preheated oven and bake, covered, for exactly 30 minutes.
Step 7: The Final Bake
Carefully remove the foil (watch for hot steam!) and check the pasta by stirring gently from the bottom. Return the dish to the oven, uncovered, and bake for another 10 to 15 minutes, until the pasta is fully tender and the sauce has thickened into a creamy coating. The top should have a few golden spots!
Step 8: Rest and Serve
Remove the dish from the oven and let the pasta rest for about 5 minutes. The sauce will magically continue to thicken slightly as it cools! Sprinkle with a little extra grated Parmesan before serving.
💡 Expert Tips for Success
- 💧 Adjust the Sauce: If the sauce looks a little too thick after the resting period, you can easily loosen it up with a tiny splash of warm broth or hot water and stir gently.
- 🧀 Grate Your Own Cheese: Pre-bagged Parmesan cheese contains anti-caking starches that will prevent your sauce from becoming perfectly smooth. Always grate it fresh from a block!
- 🥣 Use Ceramic or Glass: A thick ceramic or glass baking dish conducts heat differently than thin metal pans, which is essential for cooking raw pasta evenly in the oven without burning the bottom.
Variations and Substitutions
- 🥛 The Lighter Swap: For a lighter version, you can seamlessly swap half of the heavy cream for whole milk. The sauce will be a bit thinner, but still pleasantly creamy!
- 🍗 Add Protein: To add protein directly into the bake, tuck 1 to 1 ½ cups of shredded rotisserie chicken or diced smoked turkey over the pasta before scattering the peas. Keep the overall liquid amount exactly the same!
- 🥬 The Greens Boost: Stir a heavy handful of fresh baby spinach or chopped kale right into the pan during the absolute last 10 minutes of baking so it beautifully wilts into the sauce.
- 🍋 The Bright Finish: If you love a hint of freshness, finish the baked dish with a heavy squeeze of fresh lemon juice or a spoonful of lemon zest just before serving to brighten up the rich cream!
❓ Frequently Asked Questions (FAQs)
What is the best side dish to serve with this creamy pasta?
This rich, comforting pasta bake is perfectly balanced by a simple, crisp green salad dressed in olive oil and a squeeze of fresh lemon to echo the brightness of the peas! Add some warm, crusty garlic bread to scoop up the incredible cream sauce left at the bottom of the dish.
What should I drink with this meal?
To cut through the richness of the heavy cream and Parmesan, serve this with a cold glass of sparkling water with a heavy squeeze of fresh lemon, or a chilled glass of sweet iced tea!
How do I store and reheat the leftovers?
Store any leftover pasta in an airtight container in the refrigerator for up to 3 to 4 days. Because pasta continues to absorb liquid as it sits, the sauce will thicken in the fridge. When reheating in the microwave or on the stove, add a small splash of milk or broth to revive that creamy texture!
📊 Nutritional Information (Estimated per serving)
- Calories: 540 kcal
- Protein: 18 g
- Carbohydrates: 52 g
- Fat: 28 g
- Saturated Fat: 16 g
- Sodium: 850 mg
- Fiber: 5 g
Conclusion
This Oven-Baked Spring Pea Shell Pasta is the ultimate proof that creating a luxurious, restaurant-quality Italian dinner doesn’t require standing over a pot of boiling water or scrubbing multiple pans! By utilizing a clever baking technique, you get flawlessly tender pasta in a rich, velvety Parmesan sauce with practically zero hands-on effort.
Whether you need a foolproof, 45-minute dinner for a chaotic weeknight or a cozy, comforting meal for a lazy Sunday, this brilliant one-pan recipe will quickly become a highly requested staple in your home. Grab your baking dish, scatter those peas, and let the oven work its delicious magic!