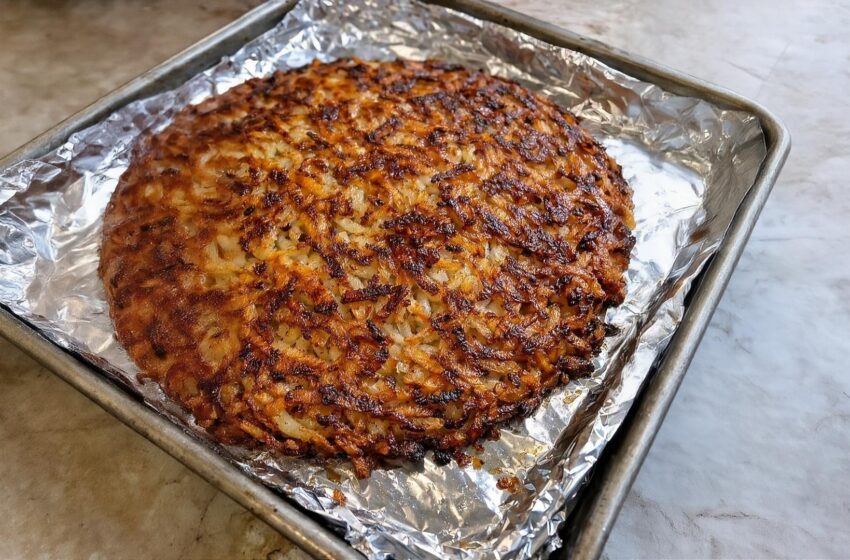
This oven-baked 3-ingredient potato pancake bake is a stripped-down, weeknight version of the classic shredded potato dish that families request for every birthday and holiday. It is inspired by European-style potato pancakes and Midwestern hash brown bakes, but instead of standing over a hot skillet flipping individual pancakes, you press everything into one big, beautiful slab and let the oven do all the work! The result is a giant, deep-golden potato pancake with incredibly crispy edges and a tender, soft center.
Why You’ll Love This Recipe
🥔 Unapologetically Simple: Requires only 3 basic pantry ingredients—potatoes, salt, and oil.
⏱️ Hands-Off Cooking: Skips the messy, time-consuming stovetop frying in favor of an easy, single-pan oven bake.
🤤 Texture Heaven: Delivers the ultimate contrast of a deeply golden, latticed crust and a soft, comforting center.
🍳 Highly Versatile: Perfect for dinner alongside roasted chicken, or as a hearty brunch base topped with a fried egg.
🎉 Family-Style Serving: Bakes into one large slab that is effortlessly sliced into squares or wedges to feed a crowd.
Recipe Overview
- Prep time: 15 minutes
- Cook time: 40–50 minutes
- Total time: 1 hour 5 minutes
- Yield: 6 Servings
What You’ll Need
- 3 lbs Russet potatoes: Peeled. (Russets have the perfect high-starch content for a fluffy interior and crispy exterior).
- 1 ½ tsp Fine salt: Plus a little extra to taste before serving.
- ⅓ cup Neutral oil: Such as canola, vegetable, or light olive oil. (Used to coat the pan, toss the potatoes, and brush the top).
How to Make It (Step-by-Step)
Step 1: Prep the Pan
Preheat your oven to 425°F (220°C). Line a large rimmed baking sheet with aluminum foil, then brush or rub a thin layer of the oil over the foil to coat it well. This prevents sticking and helps create those deeply crispy edges.
Step 2: Shred the Potatoes
Peel the potatoes and immediately place them in a large bowl of cold water to prevent browning. Using the large holes of a box grater (or a food processor fitted with a shredding disc), shred the potatoes. Return the shreds to the cold water as you go.
Step 3: Squeeze them Dry
Drain the shreds in a large colander and rinse briefly under cold running water. Shake off the excess water, then transfer the shreds to a clean kitchen towel (or a few layers of heavy-duty paper towels).
💡 Crucial Step: Gather the towel around the potatoes and twist firmly over the sink to wring out as much moisture as humanly possible! The drier the potatoes, the better they will brown and crisp in the oven.
Step 4: Season
Transfer the well-dried potato shreds to a large mixing bowl. Sprinkle the 1 ½ teaspoons of fine salt evenly over the potatoes and drizzle with about half of the remaining oil. Toss thoroughly with clean hands or tongs so the salt and oil are evenly distributed.
Step 5: Form the Slab
Spread the seasoned potatoes onto the prepared baking sheet in an even layer. Use your hands to press the potatoes into a compact rectangle or oval, about ½ inch thick. Drizzle or brush the remaining oil over the top of the pressed potatoes, focusing especially on the edges.
Step 6: The First Bake
Place the baking sheet on the middle rack and bake for 25 to 30 minutes, until the top starts turning light golden and the edges are sizzling. (Rotate the pan halfway through if your oven has hot spots).
Step 7: The Final Crisp
Increase the oven heat to 450°F (230°C) and continue baking for another 15 to 20 minutes, or until the top is deeply golden brown, the edges are very crisp, and the center feels tender when pressed.
Step 8: Rest and Slice
Remove from the oven and let the potato pancake rest for 5 to 10 minutes so the starches can set. Use a thin spatula to loosen the edges, cut into squares directly on the pan, and serve hot!
💡 Expert Tips for Success
🛑 Don’t Skip the Rinse: Rinsing the shredded potatoes removes the excess surface starch, which keeps the shreds separate and crispy instead of turning into a gummy, gluey mess.
🔥 Preheat the Pan: For an even crispier bottom crust, place your oiled, foil-lined baking sheet in the oven for 5 minutes to get it piping hot before pressing the potato mixture onto it.
🛡️ Protect the Edges: If the outer edges of your pancake are browning too quickly during the final high-heat bake, loosely tent just the outer rim with thin strips of aluminum foil.
Variations and Substitutions
🧅 Classic Latke Style: Stir a finely grated small onion (make sure to squeeze it completely dry first!) and a generous grind of black pepper into the potato shreds before baking.
🧀 Cheesy Twist: Sprinkle a light layer of shredded sharp cheddar or Gruyère over the top of the pancake during the final 5 to 10 minutes of baking.
🍠 Sweet Potato Swap: Swap out part of the Russets for shredded sweet potatoes for a caramelized flavor profile (just watch the pan closely, as the higher sugar content makes them brown much faster).
🌿 Fresh Garnish: Scatter chopped fresh chives, parsley, or dill over the finished bake right before serving.
❓ Frequently Asked Questions (FAQs)
What should I serve with this Potato Pancake Bake?
For a traditional sweet-savory contrast, serve it with a dollop of sour cream (or plain Greek yogurt) and a spoonful of applesauce. For dinner, it pairs beautifully with grilled sausages, roasted meats, and a sharp, vinaigrette-dressed green salad.
How do I store and reheat leftovers?
Leftovers store very well in an airtight container in the refrigerator for up to 3 days. To restore their crispiness, reheat them in a 400°F (200°C) oven for about 10 minutes, or pan-fry them in a hot skillet with a thin film of oil. (Do not microwave them unless you don’t mind a soft, soggy texture).
Can I make this ahead of time?
Potatoes oxidize and turn brown very quickly once exposed to air, so it is best to shred and bake the mixture immediately. However, you can bake the entire pancake ahead of time, let it cool, and simply reheat and re-crisp it in the oven right before serving.