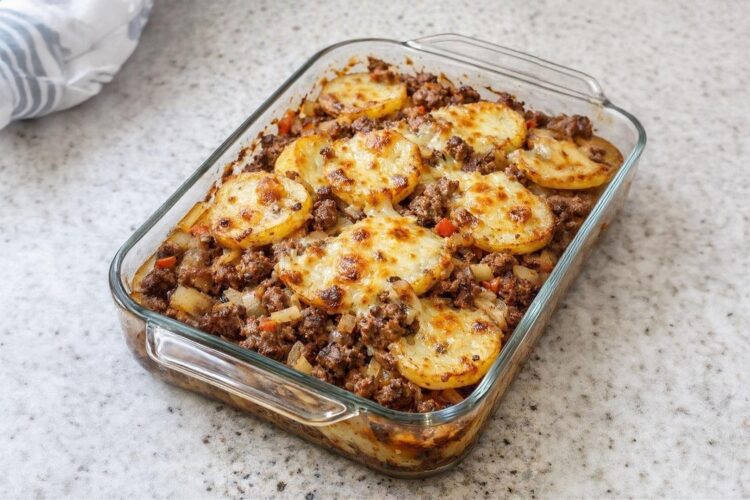
This oven-baked beef and potato bake is one of those cozy, all-in-one dinners that makes the whole house smell like home. It is a simple, hearty casserole that feels like a clever cross between a classic shepherd’s pie and scalloped potatoes.
Featuring alternating layers of thinly sliced potatoes, perfectly seasoned ground beef, and a velvety, cheese-infused cream sauce, it bakes together until bubbling and golden-brown. It is an amazing, budget-friendly option for busy weeknights or chilly weekends when you want to feed your family something deeply warm, comforting, and satisfying without any fuss.
Why You’ll Love This Recipe
- True All-in-One Comfort: Combines your protein, starch, and a rich cheese gravy into a single baking dish.
- Effortless Layering Prep: No advanced culinary skills needed—just brown the meat, whisk a quick sauce, assemble, and bake.
- 100% Pork-Free & Halal: A wholesome, clean family dinner built entirely around ground beef, fresh root vegetables, and premium dairy.
- Blistered Cheese Crown: Melting sharp cheddar across the top layer during the final stretch creates a beautiful, golden-flecked crust that looks stunning on the table.
Recipe Overview
- Prep time: 20 minutes
- Bake time: 1 hour
- Total time: ~1 hour 20 minutes
- Yield: 6 Servings
What You’ll Need
The Savory Beef Base:
- 1 ½ lbs (680 g) Ground beef: (80–90% lean ground chuck or ground beef works perfectly).
- 1 Medium onion: Finely chopped.
- 2 Cloves garlic: Minced.
- 1 tsp Dried Italian seasoning: (Or dried summer parsley).
- Seasonings: ½ tsp salt and ¼ tsp black pepper (for the skillet step).
The Potato Layers:
- 2 lbs (900 g) Russet or Yukon Gold potatoes: Sliced into uniform, paper-thin rounds roughly 1/8-inch thick.
- 2 tbsp Butter: Softened, specifically for greasing the baking pan walls.
The Cheesy Cream Sauce:
- 1 can (10.5 oz / 295 g) Condensed cream of mushroom soup: (Cream of chicken works beautifully as a seamless substitute).
- 1 cup Milk: Whole milk adds the best velvety texture, but 2% works well too.
- 1 ½ cups Cheddar cheese: Shredded (or a premium blend of Cheddar and Mozzarella), divided.
- Aromatics: ½ tsp paprika, ½ tsp garlic powder, ½ tsp onion powder, ½ tsp salt, and ¼ tsp black pepper.
Step-by-Step Instructions
Step 1: Ignite and Prepare
Preheat your oven to 375°F (190°C). Rub the 2 tablespoons of softened butter generously across the bottom and side walls of a large 9×13-inch (23×33 cm) baking dish. This creates a non-stick shield so your potato edges don’t scorch.
Step 2: Brown the Aromatic Beef
Place a large skillet over medium-high heat. Add your ground beef and finely chopped onion. Sauté for 7 to 9 minutes, breaking the meat apart into fine crumbles with a wooden spoon, until the beef is thoroughly browned and the onions are sweet and translucent. Stir in the minced garlic during the final 60 seconds of cooking.
Step 3: Season and Drain
Carefully tilt the skillet to drain off any excess pooled fat. Stir in ½ teaspoon of salt, ¼ teaspoon of black pepper, and your dried Italian seasoning or parsley. Toss the meat well to distribute the spices, remove from heat, and set aside.
Step 4: Whisk the Master Cheese Sauce
In a medium mixing bowl, combine your condensed cream of mushroom soup, milk, the remaining ½ teaspoon of salt, the remaining ¼ teaspoon of black pepper, paprika, garlic powder, and onion powder. Whisk vigorously until completely smooth and free of soup clumps. Stir in exactly 1 cup of your shredded cheese, reserving the remaining ½ cup in the fridge for the final topping.
Step 5: Layer the Casserole
Spoon 2 to 3 tablespoons of your whisked cheese sauce directly onto the bottom of the prepared 9×13 baking dish and spread it thin.
- Layer 1: Arrange half of your thinly sliced potato rounds in an even, slightly overlapping grid across the bottom.
- Layer 2: Spoon half of your seasoned ground beef mixture uniformly over the potatoes.
- Layer 3: Pour roughly half of your remaining cheese sauce over the beef, smoothing it out with a spatula.
- Layer 4: Repeat the process by adding the remaining potato slices, followed by the rest of the ground beef. Pour the final portion of the sauce evenly across the top, gently shaking the dish so the liquid seeps into the lower crevices.
Step 6: Tightly Foil and Bake
Cover the baking dish tightly with a sheet of aluminum foil to lock in the steam. Bake in the preheated oven for 45 to 55 minutes, or until the potato layers are soft and tender when pierced through the center with a fork.
Step 7: Crown with Cheese and Blister
Carefully lift off the aluminum foil (watch out for a sudden rush of hot steam!). Scatter your reserved ½ cup of shredded cheddar cheese evenly across the top surface. Return the uncovered dish back to the oven and bake for an additional 10 to 15 minutes until the cheese is completely molten, bubbling enthusiastically, and showing gorgeous golden-brown blisters.
Step 8: The Setting Rest
Remove the casserole from the oven and let it sit completely undisturbed on a wire rack for 10 full minutes. This brief rest lets the starch and dairy tighten up, making it incredibly easy to cut into neat, beautiful squares. Garnish with a sprinkle of chopped fresh parsley or green onions if desired, and serve warm!
💡 Expert Tips for Success
- Slice the Potatoes Ultra-Thin: Keep your potato rounds consistently around 1/8-inch thick. If the slices are cut too thick, they will take significantly longer to bake through, leaving you with crunchy pockets in your casserole. Utilizing a mandoline slicer is a fantastic shortcut to ensure uniform thickness!
- Dampen the Foil Attachment: Ensure your aluminum foil is wrapped exceptionally tight around the rim of your dish during Step 6. You want to trap 100% of the internal moisture released by the spuds, which creates a natural pressure-cook environment to soften the starches perfectly.
- The Balancing Side Pairs: Because this bake is beautifully rich, velvety, and filling, balance out the dinner plate by serving it alongside a crisp garden salad tossed in a sharp vinaigrette, or a side of simple steamed green beans or sweet peas.
Variations and Substitutions
- The Hidden Veggie Boost: To sneak some extra nutrition into dinner, layer thinly sliced sweet carrots, zucchini wheels, or bell peppers directly between the potato and beef layers, or fold a cup of sweet frozen corn kernels right into the hot skillet with the meat.
- The Lean Poultry Swap: You can seamlessly swap the ground beef for ground turkey or ground chicken to create a lighter, leaner variation of this comfort food staple without sacrificing an ounce of its cozy appeal.
- The Ultra-Cheesy Upgrade: For a more gooey, kid-pleasing texture, substitute the cheddar for a 50/50 mix of sharp cheddar and whole-milk mozzarella cheese to achieve an epic cheese-pull visual when scooping.
❓ Frequently Asked Questions (FAQs)
Can I assemble this casserole ahead of time?
Absolutely! This is a phenomenal make-ahead recipe. You can completely assemble all the layers in your baking dish earlier in the morning, cover it with plastic wrap, and store it inside the refrigerator. When dinner time rolls around, remove the plastic, seal it tightly with foil, and slide it into the preheated oven. Just add an extra 10 to 15 minutes to the foiled baking time to account for the refrigerator chill.
How should I store and reheat leftovers?
Keep any leftover portions stored inside an airtight container in the refrigerator for up to 3 to 4 days. Reheat individual squares in the microwave for 90 to 120 seconds, or pop them back into a 350°F (175°C) oven for 10 to 12 minutes to crisp the cheese layer right back up!
Should I peel the potatoes first?
It is entirely up to you and your family’s personal taste! If you are using thick-skinned Russet potatoes, peeling them is highly recommended to maintain a velvety mouthfeel. However, if you are using thin, delicate-skinned Yukon Golds, you can skip the peeling step entirely—just give them a thorough wash and scrub before slicing!