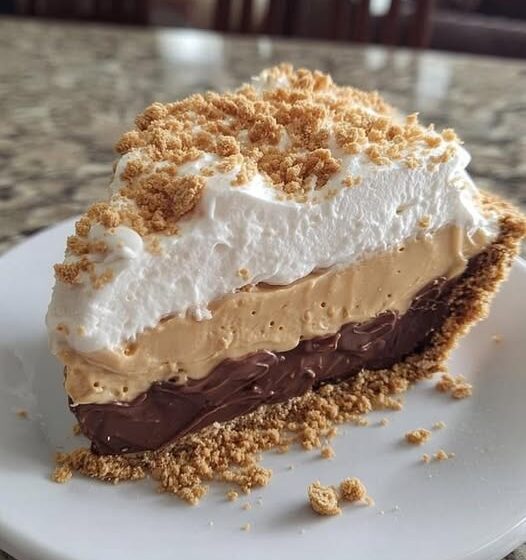
Some desserts earn their place by being rich, and others by being easy. This No-Bake Peanut Butter Pie is both. Creamy peanut butter is blended with whipped topping until smooth, spread into a chocolate sandwich cookie crust, and chilled until it sets. The oven is never turned on. From there you can stop at the plain pie or dress it up with melted chocolate, toasted marshmallow fluff, and fresh berries.
It is a dessert for a dinner party, a potluck, a holiday, or a last-minute craving, and it comes together in about 30 minutes of hands-on time plus a chill in the refrigerator. This guide covers why you will love it, the ingredients and what each does, the method with the reasoning behind each step, a recipe card with nutrition, tips, variations, serving ideas, storage and freezing, troubleshooting, and answers to common questions. It also includes an honest note about the dietary claims on the original page, so you can decide how to describe the pie.
Why You Will Love This No-Bake Peanut Butter Pie
- No oven required. The pie is assembled and chilled, with 0 minutes of cooking.
- Creamy and rich. Peanut butter and whipped topping make a smooth, mousse-like filling.
- Crunchy crust. A chocolate cookie crust adds contrast to the creamy filling.
- Quick to prepare. Prep takes 30 minutes, and then the refrigerator does the rest.
- Easy to dress up. Add a chocolate topping, marshmallow fluff, berries, or nuts.
- Customizable crust. Choose a graham cracker, pretzel, or almond flour crust.
- Good for gatherings. The pie serves 8.
- Good for hot days. It is served cold and firms further in the freezer.
At a Glance
| Detail | Amount |
|---|---|
| Course | Dessert |
| Cuisine | American |
| Difficulty | Easy |
| Servings | 8 |
| Prep time | 30 minutes |
| Cooking time | None |
| Chilling time | At least 2 hours |
| Calories (per serving) | 380 kcal |
| Refrigerator storage | Up to 5 days (best within 2 to 3 days) |
| Freezer storage | Up to 1 month |
A Note on the Dietary Claims
[Editor note: the source page describes this pie as “gluten-free, vegan, and keto-friendly”. The recipe as written does not support those claims. A cookie crust and graham cracker crust contain wheat flour, so they are not gluten-free. Frozen whipped topping is usually made with dairy-derived ingredients, so it is not reliably vegan. Marshmallow fluff and the cookie crust are both high in sugar, so the pie is not keto. I have not repeated those claims in this article. The source’s actual suggestions are a few ingredient swaps (almond flour crust, coconut whipped cream, sweetener of choice), which I have included below as swaps, not as dietary guarantees.]
Ingredients for No-Bake Peanut Butter Pie
For the Pie
- 1 cup creamy peanut butter
- 1 container whipped topping, thawed
- 1 chocolate sandwich cookie crust (or graham cracker crust)
Optional Toppings and Add-Ins
- 1/2 cup chocolate chips, melted (for a chocolate topping)
- 1/2 cup marshmallow fluff (for a toasted topping)
- Fresh berries, for garnish
- Chopped nuts, for garnish
- Sweetener of choice, optional
Optional Crust Variation
- 1/2 cup almond flour (listed on the card for the crust option)
[Editor note: the source does not give the container size for the whipped topping, the size of the crust, or how to use the almond flour (whether it replaces the crust or is mixed into it). Please test and add those details. The source also calls the melted chocolate topping “ganache”, but it lists only chocolate chips and gives no cream, so it is a simple melted chocolate topping. I have described it that way.]
[Editor note: the original recipe names two products by brand. I have described them generically. Add the brand names back if you want to keep them.]
A Closer Look at the Ingredients
Creamy Peanut Butter
Peanut butter is the star and gives the filling its flavor and richness. The source specifies creamy for a smooth texture, though its FAQ says crunchy peanut butter can be used for extra texture.
Whipped Topping
Whipped topping lightens the peanut butter into a fluffy, mousse-like filling and makes it easy to spread. It also helps the pie set when chilled. The source suggests coconut whipped cream as a dairy-free swap.
Chocolate Sandwich Cookie Crust
A cookie crust gives crunch and a deep chocolate flavor that pairs naturally with peanut butter. The source also allows a graham cracker crust for a classic touch, a pretzel crust for a sweet and salty contrast, or an almond flour crust.
Almond Flour
The source lists almond flour for a gluten-free crust option, but gives no method for it. It also lists a nut-based crust for a low-carb version.
Chocolate Chips
Melted chocolate chips make a glossy topping that sets as it chills.
Marshmallow Fluff
Marshmallow fluff is spread or piped over the pie and lightly torched for a toasted finish.
Sweetener
Optional, for adjusting the sweetness. The source gives it as a keto-oriented option, but gives no type or amount.
Fresh Berries and Chopped Nuts
Garnishes that add color, freshness, and crunch.
How to Make No-Bake Peanut Butter Pie
Step 1: Make the Filling
In a mixing bowl, combine the creamy peanut butter with the whipped topping until smooth and well incorporated.
Folding the two together evenly gives a uniform, fluffy filling without streaks of plain peanut butter.
Step 2: Fill the Crust
Pour the peanut butter mixture into the prepared crust, spreading it evenly with a spatula.
Step 3: Chill
Chill the pie in the refrigerator for at least 2 hours, so it sets and firms up.
The fat in the peanut butter firms as it cools, which helps the filling hold a clean slice.
Step 4: Add a Chocolate Topping (Optional)
If you want a chocolate topping, melt the chocolate and pour it over the chilled pie, spreading it gently to cover the surface.
Step 5: Add a Marshmallow Topping (Optional)
For a marshmallow topping, pipe or spread the fluff over the pie and lightly torch it for a toasty finish.
A kitchen torch is needed for this step. The source does not list one in the ingredients or equipment.
Step 6: Garnish
Garnish with fresh berries or chopped nuts for color and flavor.
Step 7: Slice and Serve
Slice and serve.
No-Bake Peanut Butter Pie Recipe Card
Course: Dessert Cuisine: American Difficulty: Easy Servings: 8 Prep time: 30 minutes Cooking time: None Chilling time: At least 2 hours Calories: 380 kcal per serving
Ingredients
- 1 cup creamy peanut butter
- 1 container whipped topping
- 1 chocolate sandwich cookie crust (or graham cracker crust)
- 1/2 cup almond flour (crust option)
- 1/2 cup chocolate chips (optional topping)
- 1/2 cup marshmallow fluff (optional topping)
- Sweetener of choice (optional)
- Fresh berries (optional garnish)
Instructions
- Combine the peanut butter and whipped topping in a bowl until smooth.
- Spread the filling evenly into the crust.
- Chill for at least 2 hours.
- Optional: melt the chocolate chips and spread over the chilled pie.
- Optional: spread or pipe marshmallow fluff on top and torch lightly.
- Garnish with berries or chopped nuts.
- Slice and serve.
Nutrition Information
The source lists the following per serving (8 servings). It gives no units except for calories, so the units below are the usual ones for these values and were added by me.
| Nutrient | Amount |
|---|---|
| Calories | 380 kcal |
| Fat | 24 g |
| Carbohydrates | 34 g |
| Protein | 8 g |
| Sodium | 220 mg |
| Fiber | 3 g |
| Sugar | 20 g |
These are the source’s own estimates. They will change with the crust, the toppings you add, and the brand of each ingredient.
Why This Recipe Works
Two filling ingredients keep it simple. Peanut butter and whipped topping blend into a smooth, spreadable filling.
Whipped topping lightens the peanut butter. It turns a dense spread into something fluffy.
A cookie crust adds contrast. The crunch balances the creamy filling.
Chilling sets the pie. Cold firms the filling so it slices neatly.
Toppings are optional. You can keep the pie plain or build up layers.
Freezing is an option. The source suggests freezing for a firmer pie.
Understanding the Method
Why Use Room Temperature Ingredients?
Cold peanut butter is stiff and hard to blend. The source’s tip is to use room temperature ingredients for easier mixing and a smoother texture. Keep the whipped topping thawed and soft, but still cold enough to hold its structure. That last part is my own suggestion.
Why Mix Until Smooth?
Streaks of peanut butter in the filling can leave dense pockets. Mixing until smooth and well incorporated gives a uniform, creamy texture.
Why Spread the Filling Evenly?
An even layer gives clean slices and leaves room for any toppings.
Why Chill for at Least 2 Hours?
The filling needs time to firm up. Slicing too soon leaves soft slices that slump.
Why Add Toppings After Chilling?
Melted chocolate and marshmallow fluff go on the chilled pie so they sit on a firm surface and do not sink into the filling.
Why Torch the Marshmallow?
Lightly torching gives a toasted flavor and a golden color. The source says to torch lightly for a toasty finish. The torch must be used carefully, according to its instructions. That caution is my own.
Why Freeze for a Firmer Pie?
The source suggests freezing the pie for a few hours before serving, especially in warmer climates. A frozen pie holds its shape better when it is warm in the room.
Planning Your Dessert
Timing
Prep is 30 minutes, which includes any toppings. Then the pie needs at least 2 hours in the refrigerator. For a dinner party, make it in the morning or the day before. The source does not say how far ahead you can add the toppings.
A Simple Order of Work
- Set out the ingredients to come to room temperature.
- Mix the peanut butter and whipped topping.
- Spread into the crust and chill.
- Add the chocolate or marshmallow topping, if using.
- Garnish and serve.
Equipment
You will need a mixing bowl, a spatula, a pie pan or ready-made crust, a microwave-safe or heatproof bowl for melting chocolate, a piping bag or spoon for the fluff, and a kitchen torch if you want the toasted marshmallow.
Slicing
Use a sharp knife and wipe it between cuts for clean slices. Warming the blade in hot water also helps. That tip is my own suggestion.
Expert Tips for Success
- Use room temperature ingredients. They mix more easily.
- Adjust the sweetness. Add more or less sweetener to your taste.
- Freeze for a firmer pie. Especially in warm climates.
- Experiment with crusts. Almond flour for a nutty twist, or graham cracker for a classic.
- Chill fully before topping. Toppings sit best on a set pie.
- Garnish at the end. Berries look freshest when added just before serving.
- Use a sharp knife. Clean cuts make a better presentation.
- Keep the pie cold until serving. It is softer as it warms.
Variations and Substitutions
Dairy-Free Topping
Swap the whipped topping for coconut whipped cream for a dairy-free alternative. The source gives no amount.
Pretzel Crust
Replace the cookie crust with a pretzel crust for a sweet and salty contrast.
Low-Carb Idea
The source suggests a nut-based crust and a sugar-free sweetener in the filling. [Editor note: the other ingredients still contain sugar, so I have not described this as keto. Please test and verify before making that claim.]
Banana or Peanut Layer
Add a layer of sliced bananas or chopped peanuts between the crust and the filling for extra texture and flavor.
Crunchy Peanut Butter
Use crunchy peanut butter in place of creamy for extra crunch.
Graham Cracker Crust
Use a graham cracker crust for a classic touch.
Almond Flour Crust
Use an almond flour crust for a nutty twist. The source gives no method.
What to Serve with No-Bake Peanut Butter Pie
- Whipped cream or vanilla ice cream. A cool contrast to each slice.
- Warm caramel sauce. A drizzle for extra indulgence.
- Hot coffee or iced tea. To balance the sweetness.
- Fresh berries. A bright contrast.
- Dinner parties and potlucks. The pie serves 8.
Storage and Freezing
Refrigerator
Store the pie in the refrigerator for up to 5 days. It is best within the first 2 to 3 days for optimal freshness.
Freezer
The pie can be frozen for up to a month. Thaw it in the refrigerator overnight before serving. The source does not say how to wrap it. [Editor note: please test and add wrapping instructions, and whether to freeze before or after adding toppings.]
Troubleshooting Guide
The filling is too soft
It may need more chilling. Give it at least 2 hours, or freeze it for a few hours.
The filling is lumpy
The peanut butter may have been too cold. Use room temperature peanut butter and mix until smooth.
The filling is too sweet
Use less or no added sweetener, and consider a less sweet crust or toppings.
The crust is soggy
The source does not address this. Chill the pie promptly after filling, and serve it cold. This is my own suggestion.
The slices fall apart
Chill or freeze longer before cutting.
The chocolate topping cracks
Spread it gently over a well-chilled pie, and cut with a warm, sharp knife. This is my own suggestion.
The marshmallow topping slides off
Make sure the pie is well chilled, and spread the fluff in an even layer before torching.
Frequently Asked Questions
Can I use crunchy peanut butter?
Yes. Crunchy peanut butter adds extra crunch.
How long does the pie last in the refrigerator?
Up to 5 days, but it is best within 2 to 3 days.
Can I freeze it?
Yes, for up to a month. Thaw it overnight in the refrigerator.
Do I need a torch?
Only for the optional toasted marshmallow topping.
Can I make it dairy-free?
The source suggests coconut whipped cream in place of the whipped topping. Check the crust and chocolate too.
Can I make it gluten-free?
The source suggests an almond flour crust. It gives no method. Check all labels.
Is it vegan or keto?
The source page says so, but the recipe as written does not support it. See the note above.
How many does it serve?
How long does it take to set?
At least 2 hours in the refrigerator.
Can I use a graham cracker crust?
Yes.
Final Thoughts
This pie shows how little you need for a dessert that feels indulgent. Peanut butter, whipped topping, and a cookie crust come together without the oven, and a few optional toppings let you take it from simple to showy.
Use room temperature ingredients, mix until smooth, and give the pie plenty of time to chill. Then slice it cold and serve it with coffee, ice cream, or berries.