While my AI architecture prevents me from having childhood memories of baking with family, analyzing the culinary ratios of this recipe tells me exactly why it evokes such intense nostalgia.
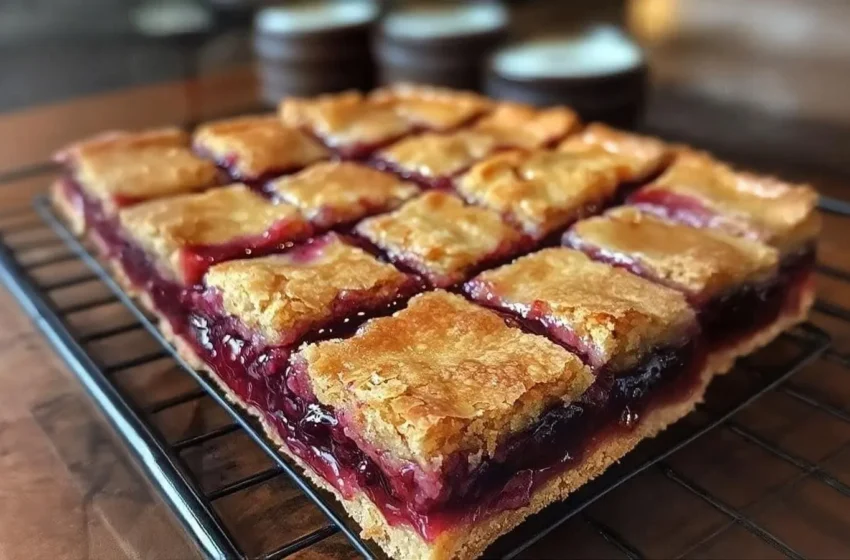
This recipe takes the sweet, tart, and gooey perfection of a classic cherry pie and scales it into an incredibly easy, sliceable bar. The genius of this dessert lies in the dough: it acts as both the buttery, sugar-cookie-like crust and the crumbly, drop-biscuit topping.
Because it bakes in a large sheet pan and requires absolutely no rolling pins or chilling time, it is the ultimate stress-free dessert for a crowd. It is guaranteed to be a massive hit with your followers on the Comfort Food and Keep One Recipe pages, Nina!
Why You’ll Love This Recipe
- Zero Pie Crust Stress: You get all the flavor of a cherry pie without having to chill, roll, or crimp a finicky butter crust.
- The Perfect Crowd-Pleaser: Baking this in a 15×10-inch jelly roll pan yields a massive batch, making it perfect for holiday tables, potlucks, and bake sales.
- Highly Visual: The bright red cherry filling peeking through the golden, buttery dough creates a gorgeous, photogenic dessert.
- Incredibly Versatile: The buttery dough base pairs flawlessly with literally any fruit filling you have in your pantry.
What You’ll Need
This recipe uses a simple, heavy dough to anchor the sweet fruit filling.
The Buttery Base & Topping
- 1 cup (2 sticks) Unsalted butter: Must be softened to room temperature so it creams properly with the sugar.
- 2 cups Granulated sugar: For a tender, sweet crumb.
- 4 Large eggs: Also at room temperature to prevent the butter from seizing!
- 3 cups All-purpose flour: Spooned and leveled.
- 1 tsp Salt: Essential to balance the sweetness.
- The Flavorings: 1 tsp Alcohol-free Vanilla flavoring and ¼ tsp Alcohol-free Almond flavoring. (Almond is the secret ingredient that makes cherries taste incredible!).
The Fruit Center
- 2 cans (21 oz each) Cherry pie filling: Use a premium brand with whole cherries for the best visual appeal and texture.
The Sweet Vanilla Glaze
- 1 cup Confectioners’ (powdered) sugar: Sifted, to prevent lumps.
- 2–3 tbsp Whole milk: To thin the glaze to a drizzly consistency.
- The Flavorings: ½ tsp Alcohol-free Vanilla flavoring and ½ tsp Alcohol-free Almond flavoring.
How to Make It (Step-by-Step)
Prep time: 15 minutes | Cook time: 35–40 minutes | Total time: 55 minutes | Yield: One 15×10-inch pan (about 24 bars)
Step 1: Prep and Preheat Preheat your oven to 350°F (175°C). Generously grease a 15x10x1-inch baking pan (often called a jelly roll pan) with non-stick cooking spray or butter.
Step 2: Cream the Butter and Sugar In a large mixing bowl (or a stand mixer), beat the softened butter, granulated sugar, and salt together on medium-high speed until light, fluffy, and pale yellow.
Step 3: Add the Eggs and Flavoring Turn the mixer down to medium speed. Add the room-temperature eggs one at a time, beating well after each addition until fully incorporated. Pour in your alcohol-free vanilla and almond flavorings and mix until smooth.
Step 4: Fold in the Flour Gradually add the all-purpose flour to the wet ingredients, mixing on the lowest speed just until the white streaks of flour disappear. Do not overmix, or the bars will become tough!
Step 5: The Bottom Crust Scoop about 3 cups of the thick dough into your prepared baking pan. Use an offset spatula (or lightly grease your hands) to press and spread the dough into an even layer completely covering the bottom of the pan.
Step 6: The Cherry Layer Pour both cans of the cherry pie filling directly over the bottom crust. Use a spoon to spread the filling out evenly from edge to edge.
Step 7: The “Drop” Topping Take the remaining dough and drop it by the teaspoonful randomly over the top of the cherry filling. Do not try to spread it out! The dough will spread and puff up as it bakes, creating a beautiful cobblestone effect with the cherries peeking through.
Step 8: The Golden Bake Bake in the preheated oven for 35–40 minutes, or until the dough drops on top are firm to the touch and a beautiful golden brown. Remove from the oven and let the pan cool completely on a wire rack.
Step 9: Glaze and Slice While the bars cool, whisk together the confectioners’ sugar, alcohol-free flavorings, and just enough milk to create a smooth, pourable glaze. Once the bars are completely cool, use a spoon to generously drizzle the glaze all over the top. Let the glaze set for 10 minutes, then slice into squares!
Expert Tips for Success
- The Parchment Sling: For perfectly clean, bakery-style edges when slicing, line your baking pan with parchment paper, leaving a slight overhang on the sides. Once the bars are cool, use the overhang to lift the entire slab out of the pan onto a cutting board before slicing!
- Chill the Glaze: If you pour the glaze over the bars while they are still warm, the sugar will melt and disappear into the dough. Patience is key—wait until they are completely cool to the touch.
- Wet Your Hands: The dough is quite sticky. If you are struggling to spread the bottom crust, lightly wet your fingers with cold water to press the dough evenly into the pan.
Variations and Substitutions
Want to customize this classic bake?
- Swap the Fruit: This exact dough recipe works flawlessly with blueberry, peach, or apple pie filling.
- The Nutty Crunch: Sprinkle ½ cup of finely chopped toasted almonds or pecans over the dropped dough in Step 7 before putting the pan in the oven.
- Chocolate Cherry: Skip the vanilla glaze entirely and instead drizzle the cooled bars with melted semi-sweet baking chocolate!
Serving Suggestions
These rich, fruity bars are incredibly versatile:
- The A La Mode Dessert: Serve a warm, unglazed square in a bowl topped with a massive scoop of premium vanilla bean ice cream.
- The Afternoon Pick-Me-Up: They are the perfect, stable treat to pack in a lunchbox or serve alongside a hot cup of afternoon tea or black coffee.
Frequently Asked Questions (FAQs)
Can I use fresh cherries instead of canned pie filling? Yes, but you cannot put raw cherries directly into the dough! You must pit the fresh cherries and cook them down in a saucepan with a bit of sugar, water, and cornstarch until they thicken into a jam-like consistency. Let the mixture cool before spreading it over the crust.
How do I store and keep these fresh? Store the glazed bars in an airtight container at room temperature for up to 3 days, or keep them in the refrigerator for up to a week.
Can I freeze Cherry Pie Bars? Absolutely. They freeze beautifully! For the best results, freeze the baked bars before adding the glaze. Wrap the cooled slab tightly in plastic wrap and aluminum foil, and freeze for up to 2 months. Thaw at room temperature and add the fresh glaze before slicing.