The Tender, Melt-In-Your-Mouth Bakery-Style Scones Bursting With Fresh Strawberries and a Crackling Sugar Crust
There is a version of a perfect morning that involves a warm scone, a cup of something hot, and absolutely nowhere to be. These Strawberry Scones are built for exactly that morning — and for every brunch table, every afternoon tea spread, and every occasion where you want to set something down that looks like it came from a proper bakery and watch people reach for it before they have even sat down. Tender, light, fragrant with vanilla, and studded throughout with juicy fresh strawberry pieces that turn soft and jammy in the oven, these scones deliver a bakery-quality result from a surprisingly short and simple ingredient list.
What makes this particular recipe stand out from the crowded field of scone recipes is a single, deliberate choice: no eggs, no butter. Instead, cold heavy cream carries all the work — providing the fat that creates tenderness, the richness that gives the crumb its extraordinary soft texture, and the moisture that brings the dough together without overworking the gluten. The result is a scone with a crumb so delicate and yielding that it genuinely melts on contact, while still being sturdy enough to hold a generous spread of butter and jam without falling apart. A final brush of cream and a generous sprinkle of granulated sugar before baking creates that irresistible crackling, golden sugar crust on top that makes the first bite a study in contrasting textures — crisp outside, cloud-soft inside.
🍓 Why These Strawberry Scones Are Worth Making Every Weekend
- 🧈 No Butter, No Eggs — Just Heavy Cream: The simplicity of this formula is deceptive. Heavy cream does the job of both fat and liquid simultaneously, creating a dough that comes together quickly, handles gently, and bakes into something extraordinary without requiring the cold-butter technique that intimidates many home bakers.
- 🍓 Fresh Strawberries in Every Bite: Diced into half-inch pieces and folded gently into the dough, the strawberries soften and become almost jammy during baking — pockets of bright, fruity sweetness distributed throughout the tender crumb that contrast beautifully against the rich, vanilla-scented base.
- ✨ That Crackling Sugar Crust: The reserved cream and sugar brushed and sprinkled over the tops just before baking creates a thin, golden, caramelized crust that shatters gently with each bite and adds a textural dimension that sets these scones apart from anything you would buy in a coffee shop.
- ⏱️ Ready in Under an Hour: Including the 15-minute freezer rest that ensures the scones hold their shape and bake up tall and defined, the entire process from first ingredient to finished scone takes less than one hour.
- 🎯 Foolproof Method: No pastry cutter, no cold butter anxiety, no complex technique. If you can whisk, pour, fold, and shape, you can make these scones perfectly on the very first attempt.
📖 The Art and Science of the Perfect Scone
Scones occupy a fascinating and somewhat underappreciated place in the world of baked goods. They are neither bread nor cake, neither biscuit nor pastry — they exist in their own category, defined by a texture that is simultaneously tender and structured, crumbly and cohesive, light and satisfying. And yet, as any experienced baker will tell you, scones are one of the most unforgiving pastries when the technique goes wrong. Too much mixing and the gluten overdevelops, producing something dense and chewy. Too much flour and they become dry and crumbly. Too warm going into the oven and they spread flat rather than rising into tall, defined wedges with distinct layers.
The genius of this recipe is that it sidesteps several of the most common scone pitfalls by eliminating butter entirely. Traditional scone recipes require the painstaking process of working cold butter into flour until it reaches the right texture — too little and the scone lacks flakiness, too much and it becomes greasy and dense. By using cold heavy cream as the sole fat source, this recipe simplifies the process dramatically while still delivering a final texture that is every bit as tender and satisfying as a butter-based scone. The cream coats the flour proteins more gently and evenly than chunks of butter do, creating a uniformly tender crumb throughout rather than the distinctly layered texture of a butter scone — and for a fruit scone like this one, that even, yielding tenderness is exactly the right result.
🛒 What You Will Need
Yield: 8 large scones | Equipment: large baking sheet, parchment paper
The Dry Ingredients
- 3 cups plus 1 tablespoon all-purpose flour, divided — the extra tablespoon is reserved specifically for tossing with the strawberries before they are folded into the dough. This light coating of flour absorbs some of the surface moisture from the cut strawberries and prevents them from releasing too much juice into the dough, which would create wet spots and uneven texture in the finished scone.
- ⅓ cup plus 2 tablespoons granulated sugar, divided — the larger portion goes into the dough to sweeten the base, while the reserved 2 tablespoons are sprinkled over the tops of the scones just before baking to create that beautiful crackling caramelized crust.
- 1 tablespoon baking powder — provides the lift that makes these scones rise tall and light in the oven. Fresh baking powder is essential — if yours has been open for more than 6 months, replace it before making this recipe, as old baking powder loses its leavening power and will give you flat, dense scones regardless of how perfect your technique is.
- 1 teaspoon fine salt — balances the sweetness and amplifies every other flavor in the scone, particularly the vanilla and the natural sweetness of the strawberries.
The Liquid
- 1½ cups plus 2 tablespoons cold heavy cream, divided — this is the ingredient that makes everything work, and the cold temperature matters as much as the fat content. Cold heavy cream keeps the dough cool during mixing, which prevents gluten from overdeveloping and ensures the scones bake up tender rather than tough. The reserved 2 tablespoons are used to brush the tops before baking, helping the sugar adhere and creating that golden, glossy finish. Do not substitute with half-and-half, whole milk, or any reduced-fat dairy — the fat content of heavy cream is specifically what creates the tenderness of this crumb, and any substitution will produce a noticeably inferior result.
- 1 teaspoon pure vanilla extract — whisked into the cream before it is added to the dry ingredients, vanilla perfumes the entire dough with a warm, aromatic sweetness that elevates these from a simple fruit scone into something that tastes genuinely special.
The Star
- 1¼ cups fresh strawberries, diced into ½-inch pieces — fresh strawberries are strongly preferred over frozen here, as frozen strawberries release significantly more moisture during baking and can make the dough wet and difficult to handle. Choose ripe, fragrant berries at their seasonal peak for the best flavor. Dice them into consistent ½-inch pieces so they distribute evenly throughout the dough and each wedge contains a similar amount of fruit.
👨🍳 Step-by-Step Method
Prep time: 30 minutes | Chill time: 15 minutes | Bake time: 14–16 minutes | Total time: under 1 hour | Yield: 8 large scones
Step 1 — Preheat and Prepare: Preheat your oven to 425°F (220°C) and line a large baking sheet with parchment paper. Set it aside — you will be forming the scones directly on this sheet later in the process.
Step 2 — Flour the Strawberries: Place the diced strawberries in a small bowl and toss them with the reserved 1 tablespoon of flour until every piece is lightly coated. Set aside. This step is quick but important — the flour coating creates a barrier that slows down the release of strawberry juice into the surrounding dough during both mixing and baking, keeping the dough cohesive and preventing soggy patches in the finished scone.
Step 3 — Combine the Dry Ingredients: In a large mixing bowl, whisk together the 3 cups of flour, the ⅓ cup of granulated sugar, the baking powder, and the salt until completely uniform and well combined. Whisking rather than simply stirring ensures the leavening is evenly distributed throughout the flour, which means consistent rise in every scone rather than uneven lift.
Step 4 — Combine the Wet Ingredients: In a separate bowl or large measuring cup, whisk together the 1½ cups of cold heavy cream and the vanilla extract until combined.
Step 5 — Bring the Dough Together: Pour approximately half of the cream mixture over the dry ingredients and stir gently with a fork or flexible spatula to begin combining. Gradually add the remaining cream, continuing to stir gently after each addition, until the dough just comes together into a shaggy but cohesive mass with no visible dry flour remaining at the bottom of the bowl. The dough will look rough and slightly uneven — this is correct and exactly what you want. Stop mixing the absolute moment no dry flour is visible. Every additional stir develops gluten and moves you further from the tender crumb you are aiming for.
Step 6 — Fold In the Strawberries: Add the floured strawberry pieces to the dough and fold them in gently using a spatula, turning the dough over itself three or four times to distribute the fruit as evenly as possible without crushing the strawberry pieces or overworking the dough. Some streaks of pink juice in the dough are beautiful and completely fine.
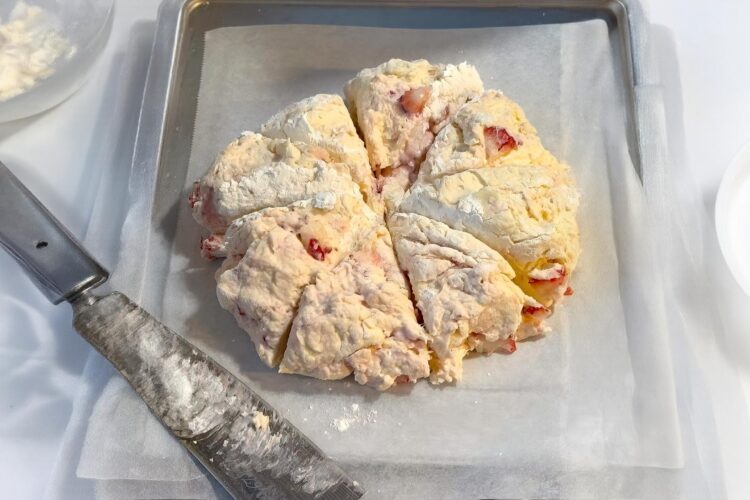
Step 7 — Shape the Dough: Turn the dough out onto a lightly floured surface and, using your hands, gently form it into a rough ball of approximately 7 inches in diameter with a reasonably even height throughout. Do not knead, do not press hard, do not try to make it perfectly smooth — just enough gentle shaping to bring it into a cohesive circle. Transfer the dough ball to your prepared parchment-lined baking sheet.
Step 8 — Cut into Wedges: Using a sharp knife or bench scraper, cut the dough circle into 8 equal wedges, like slicing a pizza into 8 slices. Gently separate the wedges and arrange them on the baking sheet with at least an inch of space between each one so they have room to expand slightly during baking without merging together.
Step 9 — Chill in the Freezer: Transfer the entire baking sheet to the freezer and chill the cut scones for exactly 15 minutes. This step is not optional and cannot be replaced with refrigerator chilling — the freezer cools the dough rapidly enough to relax the gluten, re-chill any cream that warmed during mixing and handling, and firm the scone shapes so they bake up tall and defined rather than spreading flat. This is the step that makes these look bakery-quality when they come out of the oven.
Step 10 — Top and Bake: Remove the baking sheet from the freezer. Working quickly so the scones do not warm up, brush the top of each scone generously with the reserved 2 tablespoons of cold heavy cream, then sprinkle the reserved 2 tablespoons of granulated sugar evenly over all 8 tops. Place immediately into the preheated 425°F oven and bake for 14 to 16 minutes, until the tops are lightly golden and the sugar has caramelized into a beautiful, slightly crackling crust.
Step 11 — Cool and Serve: Remove from the oven and allow to cool on the baking sheet for 5 minutes before transferring to a wire rack. Serve warm or at room temperature — both are magnificent.
🍽️ Serving Suggestions and Storage
Serve these scones warm with cold salted butter, clotted cream, or a spoonful of strawberry jam for a classic presentation that lets the fruit flavor of the scone shine fully. At a brunch spread, arrange them on a tiered stand alongside fresh fruit, whipped cream, and a pot of Earl Grey or English Breakfast tea. For storage, keep cooled scones in an airtight container at room temperature for up to 2 days. To refresh day-old scones, place them in a 350°F oven for 5 minutes — they will emerge almost indistinguishable from freshly baked. For longer storage, freeze unbaked cut wedges on the baking sheet until solid, then transfer to a freezer bag and store for up to 1 month — bake directly from frozen at 425°F for 18 to 20 minutes.
💡 Tips and Variations
For the most pronounced strawberry flavor, choose the ripest, most fragrant berries available and dice them no larger than ½ inch so the pieces distribute evenly throughout each wedge. For a lemon strawberry version, add the zest of one lemon to the dry ingredients and replace the vanilla extract with lemon extract. For a vanilla glaze drizzled over the finished scones, whisk 1 cup of powdered sugar with 2 tablespoons of cream and ½ teaspoon of vanilla until smooth and drizzle over completely cooled scones. For mini scones perfect for a tea party or brunch buffet, form the dough into a smaller, thicker circle and cut into 12 wedges, reducing the bake time to 10 to 12 minutes.