Grandma Doris’s Sweet-and-Salty Secret — A Crispy Buttered Pretzel Crust, Soft Gooey Caramel, and Swirled Chocolate That Vanishes From Every Picnic Table in Minutes
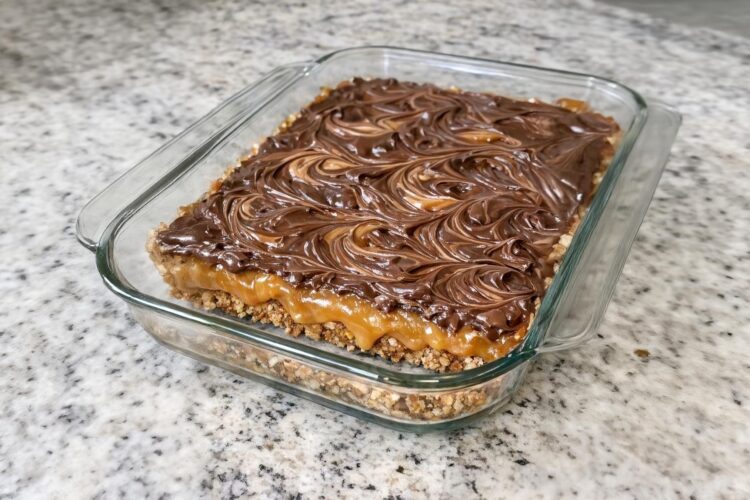
There are recipes that belong to a person so completely that you cannot think of the dish without thinking of them. Grandma Doris’s caramel pretzel bars are that kind of recipe. A pan of them appearing on a church picnic table or a neighborhood potluck spread meant one thing and one thing only — that pan would be empty before most people had finished their first plate, and the ones who missed out would spend the rest of the afternoon hearing about what they had missed. Four ingredients. A glass casserole dish. No candy thermometer, no special equipment, no technique that requires explanation. Just crushed pretzels baked in butter into a crisp, salty base, blanketed with gooey caramel that bakes and bonds and sets into a soft, chewy middle layer, then finished with a scattering of chocolate chips that melt into a glossy, beautiful swirl across the top.
This is the kind of recipe that lives in Midwestern kitchens not because it is fashionable or complicated or particularly impressive on paper, but because it works — every single time, without fail, for every kind of occasion, for every age group at the table. The sweet-and-salty combination is one of the most universally beloved flavor contrasts in all of food, and these bars execute it at its absolute simplest and most satisfying. The crunch of the pretzel crust against the yielding caramel against the snap of set chocolate is a textural sequence that makes each bite immediately compelling and impossible to stop at just one. Grandma knew exactly what she was doing, and after you make these once, you will too.
🥨 Why These Bars Will Empty the Pan at Every Gathering
- 🍫 That Sweet-and-Salty Balance: The salted pretzel base against the sweet caramel against the slightly bitter semi-sweet chocolate creates a flavor profile that hits every note simultaneously — it is one of those combinations that tastes both familiar and extraordinary at the same time.
- 🧈 Four Ingredients, Maximum Impact: Crushed pretzels, melted butter, caramel sauce, and chocolate chips. The entire ingredient list fits in one sentence, yet the finished bar looks and tastes like something from a proper dessert shop.
- ⚡ Ready With Minimal Effort: Twenty minutes of active work — crushing pretzels, pressing the crust, spreading caramel, swirling chocolate — followed by hands-off baking and a chill in the refrigerator. You can make these the day before any gathering and they will be perfectly set and ready to slice.
- 🎉 Built for Crowds: Sixteen generous squares from one 9×13 inch pan — and you can easily make two pans simultaneously for larger gatherings without doubling your effort in any meaningful way.
- ❄️ Keeps Beautifully: Stored covered in the refrigerator, these bars maintain their texture and flavor for up to five days — making them one of the most practical make-ahead desserts in any baker’s repertoire.
📖 The Sweet and Salty Flavor Combination That Science Says We Cannot Resist
The reason Grandma Doris’s pretzel bars disappeared from every potluck table so consistently and so completely has less to do with nostalgia and more to do with fundamental flavor science. The combination of sweet and salty is one of the most powerful and pleasurable flavor pairings in human sensory experience — and understanding why helps explain why these bars are so genuinely impossible to stop eating once you start.
Salt suppresses bitterness and amplifies sweetness — which means that the salt from the pretzel base makes the caramel taste sweeter and more intense than it would taste without it, while simultaneously making the chocolate taste less bitter and more complex. The caramel, in turn, makes the salt taste less harsh and more rounded, integrating it into the overall flavor rather than letting it stand out as a sharp, separate note. The result is a flavor loop — each element making the others taste better — that keeps drawing you back for another bite in a way that any single flavor alone never could.
This is not accidental cooking. It is intuitive flavor genius, refined over decades of making a recipe that always, without fail, made people reach for more.
🛒 What You Will Need
Servings: 16 bars | Equipment: 9×13 inch glass casserole dish, large zip-top bag, rolling pin or heavy pan
- 3 cups salted pretzels, crushed (about 6 oz) — the foundation of the entire bar. Salted pretzels are essential — their salt is not just seasoning but a structural flavor element that defines the entire sweet-and-salty character of the finished bar. Crush them to a coarse, irregular texture in a zip-top bag using a rolling pin or the bottom of a heavy pan — you want mostly small pieces with some larger irregular bits remaining for textural interest and visible pretzel character in the crust. A fine powder will produce a dense, uniform crust that lacks the appealing craggy texture of a properly crushed pretzel base.
- 1 cup unsalted butter (2 sticks), melted, plus extra for greasing — the binding agent that transforms loose crushed pretzels into a cohesive, press-able, bakeable crust. Every pretzel crumb should be thoroughly coated in melted butter before pressing into the pan — the butter both holds the crust together and contributes richness and a beautiful toasted, golden quality during the baking process. Unsalted butter is specified because the pretzels already provide significant salt — salted butter on top of salted pretzels would make the crust unpleasantly over-seasoned.
- 1¼ cups thick caramel sauce, store-bought or homemade, room temperature — the gooey, sweet, sticky middle layer that bonds with the pretzel crust during the second bake and sets into a soft, chewy layer that holds the bar together when sliced. Thickness matters here — a thin, loose caramel sauce will run around the pan, soak into the pretzel crust, and fail to set into a distinct layer. Choose a thick, spoonable caramel sauce rather than a thin pouring caramel. If your caramel seems loose, simmer it in a small saucepan over medium heat for 3 to 5 minutes to concentrate it before using. Room temperature is specified because cold caramel will not spread evenly over the hot pretzel crust and warm caramel may thin too much on contact with the heat.
- 1 cup semi-sweet chocolate chips — scattered over the hot caramel layer immediately after the second bake and allowed to melt from the residual heat before being swirled into the decorative finish that gives these bars their signature appearance. Semi-sweet chocolate provides the ideal balance of sweetness and slight bitterness against the sweet caramel and salty pretzel — milk chocolate would tip the whole bar too far into sweetness, while dark chocolate creates a more sophisticated, less crowd-pleasing result.
👨🍳 Step-by-Step Method
Prep time: 15 minutes | First bake: 8–10 minutes | Second bake: 10–12 minutes | Chill time: 1–2 hours | Total time: approximately 2.5 hours | Servings: 16 bars
Step 1 — Preheat and Prepare: Preheat your oven to 350°F (175°C). Lightly grease the entire inside surface of your 9×13 inch glass casserole dish with softened butter, paying particular attention to the corners and edges where bars tend to stick most stubbornly. A well-greased dish means bars that release cleanly and completely without leaving the bottom layer stuck to the glass.
Step 2 — Crush the Pretzels: Place the 3 cups of salted pretzels into a large zip-top bag and seal it, pressing out as much air as possible. Using a rolling pin or the flat bottom of a heavy saucepan, crush the pretzels by pressing and rolling over the bag until you have a mixture of mostly small, irregular pieces with some slightly larger chunks remaining. Aim for the texture of coarse breadcrumbs rather than fine powder — the varied sizes create a more interesting, texturally satisfying crust with visible pretzel character.
Step 3 — Make and Press the Crust: Transfer the crushed pretzels to a medium mixing bowl and pour the melted butter over them. Stir thoroughly until every pretzel piece is evenly and completely coated in butter and the mixture looks uniformly glossy. Pour the buttered pretzel mixture into the prepared glass casserole dish and press it firmly and evenly across the entire bottom surface using your hands, the flat bottom of a measuring cup, or a smooth glass. Press firmly enough that the crust compacts into a dense, cohesive layer — a loosely pressed crust will crumble when you try to cut and serve the finished bars. Pay particular attention to the edges and corners, ensuring they are the same thickness as the center.
Step 4 — First Bake: Slide the pan into the center of the preheated oven and bake for 8 to 10 minutes until the crust is lightly fragrant — you will smell the buttered pretzels toasting — and just beginning to set. It should not be deeply browned at this stage; it will continue to cook during the second bake with the caramel. Remove the pan from the oven and place it on a heatproof surface. Leave the oven on.
Step 5 — Add the Caramel: While the pretzel crust is still hot, pour the room-temperature caramel sauce evenly over the surface, starting from the center and working outward. Use a spatula or the back of a large spoon to gently spread the caramel all the way to the edges and into the corners, creating a smooth, even layer of consistent depth across the entire surface. Work gently to avoid disturbing the hot pretzel crust beneath — you want to spread the caramel on top of the crust, not mix it into it.
💡 Pro Tip: If the caramel is slightly stiff and difficult to spread over the hot crust, microwave it for 15 to 20 seconds before pouring to make it more fluid and easier to distribute evenly.
Step 6 — Second Bake: Return the pan to the oven and bake for an additional 10 to 12 minutes until the caramel is bubbling gently around the edges of the pan and appears slightly thicker and more set than when it went in. This second bake is what bonds the caramel to the pretzel crust — the heat causes the caramel to partially melt into the top of the crust, creating an integrated layer that holds together when sliced rather than sliding off a separate base.
Step 7 — Melt the Chocolate: Remove the pan from the oven and immediately sprinkle the cup of semi-sweet chocolate chips in an even layer over the entire surface of the hot caramel. Let the chips sit completely undisturbed for 3 to 5 minutes — do not stir, do not press, do not touch. The residual heat from the caramel and the pan will melt them from below. After 3 to 5 minutes, the chips should look glossy, slightly collapsed, and soft throughout.
Step 8 — Swirl the Chocolate: Using a small offset spatula, a butter knife, or the back of a spoon, gently spread and swirl the melted chocolate across the surface of the caramel in long, flowing strokes. Create whatever pattern appeals to you — simple parallel waves, overlapping S-curves, or more dramatic irregular swirls. The swirling both distributes the chocolate evenly and creates the beautiful, visually appealing finish that makes these bars look as good as they taste. Work relatively quickly as the chocolate will begin to set as it cools.
Step 9 — Cool and Chill: Allow the pan to cool at room temperature until the glass dish is no longer hot to the touch — approximately 30 to 45 minutes — then transfer to the refrigerator and chill for at least 1 to 2 hours until the caramel and chocolate are completely set and firm. Do not attempt to cut the bars before they are fully chilled — warm caramel will not cut cleanly and the bars will collapse rather than holding their shape.
Step 10 — Slice and Serve: Remove the pan from the refrigerator and let it sit at room temperature for 10 to 15 minutes to soften very slightly — this makes cutting significantly easier and the caramel more pleasant to eat than when it is fully cold and quite firm. Run a thin knife around the perimeter of the pan to loosen the edges, then cut into 16 squares using a sharp knife. For the cleanest possible cuts, warm the knife blade briefly under hot running water and wipe it dry between each cut — the warm blade glides through the chocolate and caramel layers cleanly rather than dragging and cracking them. Use a small spatula to lift the finished bars out of the dish and arrange on a serving platter.
🍽️ Serving Suggestions and Storage
Serve these bars slightly cool or at room temperature on a simple white platter where the swirled chocolate finish can be clearly seen and appreciated. They pair beautifully with hot black coffee or strong tea — the bitterness of both cuts perfectly through the sweetness of the caramel. A cold glass of whole milk alongside is the nostalgic and correct accompaniment for anyone who grew up eating this kind of bar at a grandmother’s table. For a more elevated dessert presentation, serve a single square over a scoop of vanilla ice cream and let the slightly warm edges of the caramel melt gently into the ice cream. A side of sliced fresh strawberries or a simple citrusy fruit salad provides a bright, acidic counterpoint that keeps the sweetness of the bars from feeling overwhelming over a full dessert course. For storage, cover the pan tightly with plastic wrap or transfer bars to an airtight container and refrigerate for up to 5 days — they maintain their texture and flavor beautifully throughout that entire window.
💡 Tips and Variations
For a more sophisticated, less sweet flavor profile, use dark chocolate chips (60–70% cacao) in place of semi-sweet — the additional bitterness creates a more complex, grown-up bar that pairs particularly well with coffee. For extra salt on top — which is never a wrong decision — scatter a small pinch of flaky sea salt over the swirled chocolate before it sets for a finishing touch that enhances every flavor in the bar. For a thicker, more substantial caramel layer, increase the caramel sauce to 1½ cups — just ensure you chill the bars fully before slicing, as the additional caramel will take longer to set completely. For cleaner layers and a firmer crust, chill the pressed pretzel crust in the refrigerator for 15 minutes before baking — the cold butter firms up slightly and helps the crust hold its structure better during the first bake. For a peanut butter variation, drizzle 3 tablespoons of melted peanut butter over the caramel layer just before scattering the chocolate chips and swirl all three together for a bar that tastes like a Snickers in pressed-pretzel form.
❓ Frequently Asked Questions
My caramel layer separated from the pretzel crust when I cut the bars — what went wrong? The caramel was likely poured over a crust that had cooled too much before the second bake, or the second bake was too short to fully bond the two layers. Make sure the caramel goes over a still-hot crust and that the second bake runs the full 10 to 12 minutes until the caramel is actively bubbling around the edges.
The chocolate cracked when I cut the bars — how do I prevent this? The chocolate was fully set and cold when sliced. Let the bars sit at room temperature for 10 to 15 minutes before cutting, and use a knife warmed under hot water and dried between each cut — the warm blade melts slightly through the chocolate surface rather than cracking it.
Can I use homemade caramel instead of store-bought? Absolutely, and homemade caramel will produce a noticeably richer, more complex result. Use a thick, spoonable caramel sauce rather than a thin pouring caramel, and allow it to cool to room temperature before using so it spreads evenly without running.
Can I freeze these bars? Yes — cut the bars into individual squares, wrap each one in plastic wrap, and freeze in an airtight container for up to 2 months. Thaw overnight in the refrigerator or at room temperature for 30 minutes before serving.
🌟 A Final Word
Four ingredients. One glass casserole dish. A recipe so simple it fits on an index card and so good it empties from every table it appears on before anyone has had the chance to go back for seconds.
That is the complete legacy of Grandma Doris’s caramel pretzel bars — and it is a legacy worth carrying forward. There is something profoundly right about a recipe this straightforward producing something this universally loved, this texturally satisfying, this perfectly balanced between sweet and salty and crispy and chewy and rich. It is the kind of cooking that reminds you that the best food has never required complexity or expense or specialized skill — only good ingredients combined with intention, baked with care, and shared generously with people you want to feed well.
Make a pan for your next gathering. Set it on the table. Watch it disappear. And understand, in that moment, exactly why Grandma never needed a more complicated recipe than this one.