The Golden, Crispy-Peaked, Butter-Pooled Mashed Potato Mounds That Made an Entire Bridge Club Go Quiet for Thirty Years
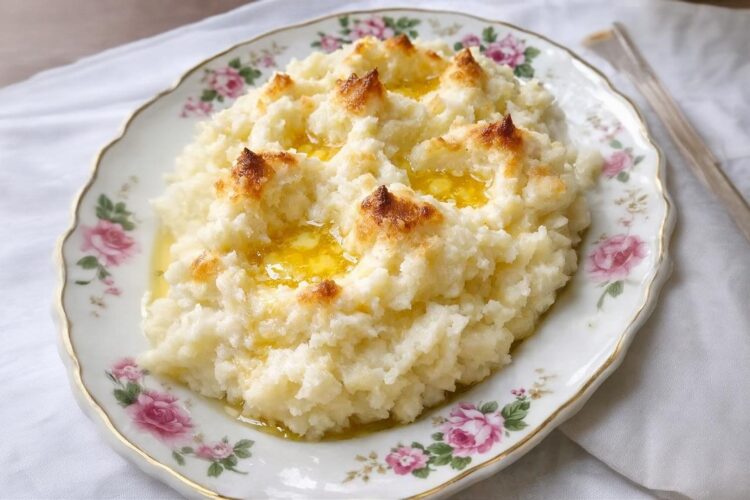
There is a particular kind of dish that earns its reputation not through complexity but through theater — the moment when something is uncovered or revealed and a room full of people pause, however briefly, to take it in before reaching for a serving spoon. For thirty years, that dish at Mrs. Patterson’s Thursday afternoon bridge club was this one: a floral china platter covered with a tea towel, and beneath it, little golden-peaked mounds of mashed potato with a pool of melted butter glistening in each center. The cards would stop. The gossip would pause. And then everyone would reach for one.
Potato Volcano Bake earns that reaction with three ingredients and a method so simple it barely qualifies as a recipe — and yet the result is genuinely transformative. Classic mashed potatoes, made rich with butter and warm milk, are mounded into individual peaks on a baking sheet, shaped with the back of a spoon into ridged little volcanoes, and finished with a shallow well pressed into each center where a final pat of butter is tucked before everything goes into a hot oven. Twenty minutes later, the peaks have turned golden and crisp, the edges have toasted, and the butter in each well has melted down into the potato, creating a dish that is simultaneously rustic and dressy, familiar and slightly theatrical — exactly the kind of thing that makes a room go quiet for a moment.
🥔 Why These Potato Volcanoes Deserve Thirty Years of Bridge Club Loyalty
- 🌋 That Crispy-Peak, Buttery-Center Contrast: The genius of this dish is entirely textural — golden, lightly crisped peaks give way to a soft, fluffy, butter-pooled interior, creating a contrast in every bite that plain mashed potatoes simply cannot offer.
- 🧈 Three Ingredients, Genuinely Dressy Results: Potatoes, butter, and milk — nothing more is required, and yet the finished presentation looks intentional and special enough for a holiday table without requiring any specialized skill or equipment.
- 🎉 Built for Entertaining: Individual mounds mean no awkward scooping or serving at the table — guests simply take their own, and the dish holds beautifully on a warm oven setting for as long as a card game or a holiday gathering requires.
- ⏰ Make-Ahead Friendly: Shape the mounds up to 24 hours in advance, refrigerate, and bake just before serving — making this one of the most practical make-ahead sides for any dinner party or holiday meal.
- 🦃 The Perfect Stand-In for Plain Mashed Potatoes: At Thanksgiving, Easter, or any holiday table where mashed potatoes are expected, these volcano bakes deliver the same comfort with considerably more visual impact and a textural element that plain mashed potatoes never achieve.
🛒 What You Will Need
Servings: 6–8 | Equipment: large pot, potato masher or ricer, large baking sheet or shallow baking dish
- 3 lbs russet potatoes, peeled and cut into chunks — russet potatoes are the correct choice for their high starch content, which produces the fluffiest, most cohesive mash that holds its shape beautifully when mounded and shaped. Cut into roughly even chunks so they cook through at the same rate during boiling.
- 1 cup salted butter, plus 2–3 tablespoons extra for greasing and topping — a generous quantity that is entirely the point of this recipe. The bulk of the butter, warmed with the milk, enriches the mash into something genuinely luxurious; the reserved extra is what creates the pooling butter in each volcano’s well as it bakes. Salted butter is traditional in this Midwestern preparation and contributes seasoning throughout.
- 1 cup whole milk — warmed with the butter before being incorporated into the mashed potatoes, producing a smoother, more evenly creamy mash than cold milk would. Whole milk’s fat content is part of what makes this version genuinely rich rather than merely creamy.
- Salt, to taste — added at the end after mashing, traditional and necessary to bring out the full flavor of the butter and potatoes.
👨🍳 Step-by-Step Method
Prep time: 20 minutes | Bake time: 20–25 minutes | Rest time: 5 minutes | Total time: approximately 1 hour | Servings: 6–8
Step 1 — Preheat and Prepare: Preheat your oven to 400°F (200°C). Lightly grease a large baking sheet or shallow baking dish with butter so the finished mounds release cleanly.
Step 2 — Boil the Potatoes: Place the peeled, chunked potatoes in a large pot and cover with cold water by about an inch, adding a generous pinch of salt if desired. Bring to a boil, then reduce to a gentle boil and cook for 15 to 20 minutes, until the potatoes are completely tender when pierced with a fork.
Step 3 — Warm the Butter and Milk: While the potatoes cook, warm the whole milk and 1 cup of salted butter together in a small saucepan over low heat, or in a microwave-safe bowl, just until the butter is melted and the milk is warm — do not let it boil. Set aside.
Step 4 — Drain and Mash: Drain the potatoes thoroughly and return them to the hot, empty pot. Let them sit undisturbed for a minute or two so excess steam escapes — this prevents a watery mash. Mash thoroughly with a potato masher or ricer until smooth and free of lumps.
Step 5 — Enrich the Mash: Pour about three-quarters of the warm butter-and-milk mixture into the mashed potatoes and mash again until creamy and smooth. Add more of the mixture gradually until the texture is thick but spoonable — firm enough to hold a mounded shape, not so loose that it spreads flat. Taste and add salt as needed.
Step 6 — Shape the Volcanoes: Spoon heaping mounds of the mashed potatoes onto the prepared baking sheet, about the size of a small orange, leaving space between each. Use the back of the spoon to create peaks and ridges on each mound — these ridges are what catch the oven heat and brown most dramatically. With the tip of the spoon, press a shallow well into the center of each mound, like a tiny crater.
💡 Pro Tip: The ridges matter more than they might seem — a smooth, rounded mound browns evenly and modestly, while a mound with pronounced peaks and valleys develops dramatic, varied golden-brown color exactly like the crispy edges everyone fights over on a baked casserole.
Step 7 — Add the Butter and Bake: Dot the tops and wells of each mound with small pieces of the reserved butter, tucking a bit into each center crater so it pools and melts down into the potato as it bakes. Bake for 20 to 25 minutes, until the peaks are golden and crisp and the edges look toasted. For deeper color, leave an additional 5 minutes, watching closely.
Step 8 — Rest and Serve: Remove from the oven and let sit for 5 minutes so the butter settles into the centers. Serve warm, right from the baking dish or transferred to a pretty platter, making sure each person gets a mound with crispy golden peaks and a buttery pool in the middle.
🍽️ Serving Suggestions and Storage
Serve alongside pot roast, baked chicken, or pork chops for a comforting Sunday supper, or in place of plain mashed potatoes at Easter ham or Thanksgiving turkey. A crisp green salad or buttered peas balance the richness nicely. For gatherings, keep warm on the lowest oven setting and let guests help themselves. For storage, refrigerate leftovers within 2 hours in a covered container for up to 3–4 days, reheating in a 350°F oven until steaming hot.
🌟 A Final Word
Three ingredients, a baking sheet, and the simple trick of a spoon-pressed well for melting butter — that is everything separating ordinary mashed potatoes from a dish dramatic enough to quiet a room of bridge players for thirty straight years. Make them once for company and you will understand exactly why Mrs. Patterson never needed a more complicated recipe than this.