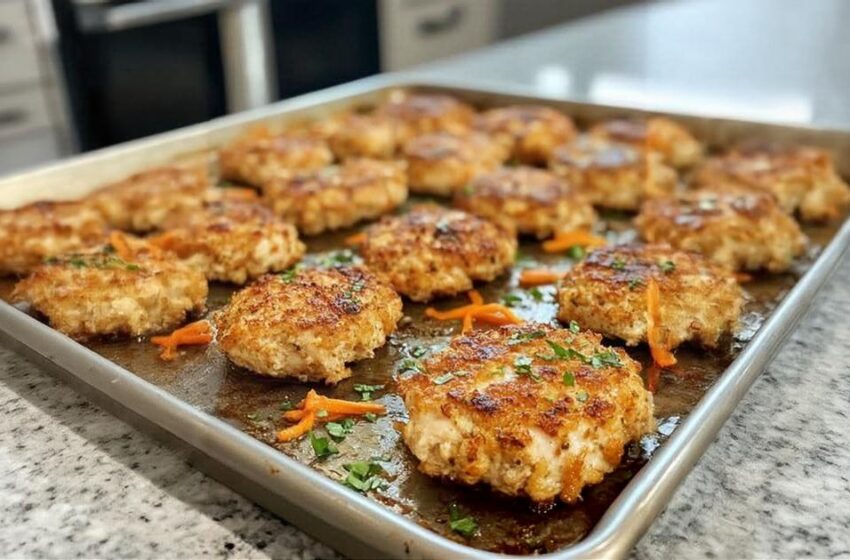
These Baked Chicken Rissoles are absolutely perfect for those busy weeknights when you want something homemade and delicious without spending hours in the kitchen. Originating as a classic comfort food, this savory chicken patty has been adapted by home cooks everywhere because it is just so incredibly versatile!
Because these are baked instead of pan-fried in heavy oil, they are wonderfully light but still pack a massive punch of flavor. The hidden grated carrots keep the ground chicken exceptionally juicy, while the fresh parsley and paprika give them a beautiful, vibrant color. You can serve them as a hearty main course or shrink them down for a delightful party appetizer!
Why You’ll Love This Recipe
- Baked, Not Fried: You get all the savory, comforting flavor of a classic rissole without the greasy mess of frying them on the stove.
- Hidden Veggies: Grated carrots blend seamlessly into the meat, adding a touch of natural sweetness and keeping the lean chicken incredibly moist.
- Highly Versatile: They are fantastic hot out of the oven for dinner, or served cold the next day in a lunchbox or tucked into a pita pocket!
- Quick Prep: There is no complicated stuffing or rolling required. Just mix, shape, and bake!
What You’ll Need
To get the best texture, make sure your onion is chopped very finely and your carrot is grated on the smallest holes of your box grater so they melt right into the chicken.
- 1 lb Ground chicken: Lean and protein-packed. (Ground turkey works beautifully, too!).
- ½ cup Breadcrumbs: To bind the patties and give them a tender texture.
- 1 small Onion: Finely chopped.
- 2 cloves Garlic: Freshly minced.
- 1 medium Carrot: Peeled and finely grated.
- ½ cup Fresh parsley: Chopped, for a bright, herbaceous pop.
- 1 large Egg: The ultimate binder to hold your rissoles together.
- The Seasonings: 1 tsp salt, ½ tsp black pepper, 1 tsp paprika, and 1 tsp dried oregano.
- Olive oil spray: For getting that perfect golden-brown exterior in the oven.
How to Make It (Step-by-Step)
Prep time: 15 minutes | Bake time: 25 minutes | Total time: 40 minutes | Yield: 4 Servings
Step 1: Prep and Preheat
Preheat your oven to 375°F (190°C). Line a large baking sheet with parchment paper to ensure the rissoles don’t stick and your cleanup takes seconds.
Step 2: The Master Mix
In a large mixing bowl, combine the ground chicken, breadcrumbs, finely chopped onion, minced garlic, grated carrot, fresh parsley, and the egg.
Step 3: Season the Chicken
Sprinkle the salt, black pepper, paprika, and dried oregano directly over the chicken mixture.
Step 4: Gently Combine
Use clean hands or a large fork to mix everything together just until it is well combined.
💡 Crucial Step: Do not overmix the meat! Overworking ground chicken will make your finished rissoles tough and dense instead of light and tender.
Step 5: Shape the Rissoles
Form the mixture into small, round patties (about the size of a golf ball, slightly flattened). Place them evenly spaced on your prepared baking sheet. (Tip: Lightly wet your hands with cold water before rolling so the meat doesn’t stick to your fingers!)
Step 6: The Golden Coat
Lightly spray the tops of all the rissoles with your olive oil spray. This mimics the frying process and gives them a gorgeous golden crust.
Step 7: The Oven Bake
Bake in the preheated oven for 20 to 25 minutes, or until the rissoles are deeply golden brown on the outside and cooked completely through (reaching an internal temperature of 165°F). Serve hot and enjoy!
💡 Expert Tips for Success
- The Sauté Hack: If you have an extra 5 minutes, sauté your diced onions and garlic in a tiny bit of olive oil and let them cool before adding them to the raw chicken. It removes the sharp “raw onion” bite and adds a sweeter flavor!
- The Chill Factor: If your mixture feels a little too wet to hold its shape, pop the bowl into the refrigerator for 15 minutes before forming your patties. This allows the breadcrumbs to absorb the moisture.
Variations and Substitutions
- The Gluten-Free Swap: You can easily make this recipe 100% gluten-free by swapping the traditional breadcrumbs for gluten-free breadcrumbs, or even finely ground quick oats!
- Middle Eastern Twist: Swap the oregano for ½ teaspoon of ground cumin and ½ teaspoon of ground coriander for a deeply fragrant, spiced flavor profile.
- Sneak in More Greens: For an extra nutritional boost, fold ½ cup of very finely chopped fresh spinach or kale into the mixture before shaping the patties.
Serving Suggestions
- The Dipping Platter: Serve these as a fun appetizer or kid-friendly dinner surrounded by small bowls of your favorite dipping sauces, like garlic aioli, tzatziki, or a sweet chili sauce.
- The Comfort Meal: Pair them with a massive scoop of creamy mashed potatoes and a side of roasted vegetables for a hearty, traditional dinner.
- The Fresh Plate: Keep things light and vibrant by serving the hot rissoles over a warm quinoa salad or a crisp garden salad dressed in a lemon vinaigrette.
Frequently Asked Questions (FAQs)
Can I make these ahead of time?
Yes! You can mix and shape the raw rissoles, place them on a tray, and cover them tightly with plastic wrap in the refrigerator for up to 24 hours before baking.
How do I freeze leftover rissoles?
These freeze exceptionally well! Let the baked rissoles cool completely, then store them in a freezer-safe bag for up to 3 months. You can reheat them straight from frozen in a 350°F oven for about 15 minutes, or pop them in the air fryer until they are crispy and warmed through.