This oven-baked green chile taco chicken is exactly the kind of weeknight dinner you can lean on when work runs late and everyone is hungry at the exact same time. You simply whisk together one creamy, cheesy mixture, pour it straight over raw chicken breasts in a baking dish, and let the oven do all the heavy lifting!
You end up with tender, saucy chicken that tastes like a brilliant mash-up of green chile enchiladas and a cheesy taco dip. It is incredibly cozy, totally crowd-pleasing, and relies entirely on simple pantry ingredients you likely already have on hand.
Why You’ll Love This Recipe
- One-Pan Wonder: Everything bakes together in a single 9×13 dish, meaning cleanup is an absolute breeze.
- Zero Pre-Cooking: There is no need to sear the chicken or sauté any vegetables. Just mix, pour, and bake!
- A Flavor Mash-Up: It delivers all the savory, zesty flavors of taco night without any of the messy assembly.
- Highly Versatile: Serve it whole over rice, shred it for tacos, or chop it up for an incredible taco salad.
What You’ll Need
- 4 Boneless, skinless chicken breasts: (About 1 ½ to 2 lbs total). Small to medium sizes work best!
- 1 cup Sour cream: The rich, tangy base for your sauce.
- 1 cup Shredded cheddar cheese: Mild or sharp, freshly grated.
- 1 can (4 oz) Chopped green chiles: Make sure to drain them well so your sauce doesn’t become watery.
- 2 tbsp Taco seasoning: Store-bought packets work great, or use your favorite homemade blend.
- 2 tbsp Fresh lime juice: (About 1 lime). This acidity is crucial to brighten up the heavy dairy!
- 1 tbsp Olive oil or cooking spray: For greasing the baking dish.
- ½ tsp Salt & ¼ tsp Black pepper: Adjust the salt depending on how salty your taco seasoning is.
- Garnish: 2 tbsp chopped fresh cilantro and extra lime wedges.
How to Make It (Step-by-Step)
Prep time: 10 minutes | Cook time: 25–35 minutes | Total time: 45 minutes | Yield: 4 Servings
Step 1: Prep and Preheat
Preheat your oven to 375°F (190°C). Lightly grease a 9×13-inch baking dish with olive oil or cooking spray so the chicken doesn’t stick to the bottom.
Step 2: Prepare the Chicken
Pat the chicken breasts completely dry with paper towels and place them in a single layer in the prepared baking dish.
💡 Crucial Step: If any of your chicken breasts are excessively thick, gently pound them with a meat mallet to an even thickness so they cook at the exact same rate!
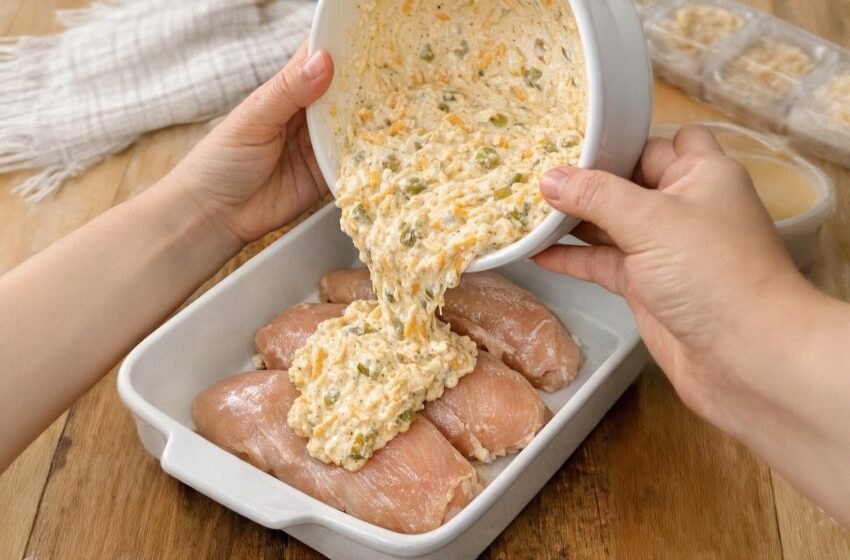
Step 3: The Creamy Topping
In a medium mixing bowl, add the sour cream, shredded cheddar cheese, drained green chiles, taco seasoning, fresh lime juice, salt, and black pepper. Stir the mixture until everything is well combined into a thick, creamy, spoonable sauce.
Step 4: Smother the Chicken
Using a rubber spatula or a spoon, pour this creamy mixture directly over the chicken breasts in the baking dish. Spread it out so each piece of chicken is completely covered. (It’s fine if some of the chicken peeks through on the sides; the sauce will melt and spread beautifully as it bakes).
Step 5: The Golden Bake
Place the baking dish on the middle rack of the preheated oven and bake for 25 to 35 minutes, or until the chicken reaches a safe internal temperature of 165°F (74°C) in the thickest part.
Step 6: Rest and Garnish
Remove the baking dish from the oven and let the chicken rest for about 5 minutes. This short pause allows the savory chicken juices to settle and the creamy sauce to thicken slightly. Sprinkle the top with chopped fresh cilantro and serve with extra lime wedges!
💡 Expert Tips for Success
- Slice Large Breasts: If your chicken breasts are massive, slice them in half horizontally to create thinner cutlets. They will cook much faster and give you a better ratio of chicken to creamy sauce!
- The Broiler Hack: If you want those gorgeous, caramelized cheese spots on top, switch your oven to broil for the final 2 to 3 minutes of baking. Just watch it very closely so it doesn’t burn!
- Dry Chicken is Key: Always pat your raw chicken dry with a paper towel. Excess moisture on the surface will water down your thick, creamy sauce.
Variations and Substitutions
- The Greek Yogurt Swap: If you prefer a slightly lighter dish with more protein, swap the sour cream for an equal amount of plain, full-fat Greek yogurt. (Note: The sauce will be slightly tangier!).
- One-Pan Fiesta: To make this a complete meal in one pan, scatter a drained can of black beans and a handful of frozen corn around the chicken before pouring the creamy mixture over the top.
- The Cheese Upgrade: Swap the standard cheddar for shredded Pepper Jack or a Mexican cheese blend for an extra layer of flavor and a slight kick of heat.
Serving Suggestions
- The Rice Bowl: Serve whole chicken breasts smothered in the sauce directly over a mound of cilantro-lime rice or plain white rice to soak up every drop.
- Taco Night: Slice the cooked chicken into strips and tuck it into warm flour or corn tortillas with shredded lettuce and diced tomatoes for a fantastic, saucy taco.
- The Low-Carb Option: Skip the heavy carbs and serve the chicken alongside freshly roasted bell peppers, zucchini, or a simple side salad tossed in a lime vinaigrette.
Frequently Asked Questions (FAQs)
Can I use chicken thighs instead of breasts?
Absolutely! Boneless, skinless chicken thighs are incredibly juicy and work perfectly in this recipe. Since thighs are usually thinner and smaller, check them for doneness around the 20 to 25-minute mark.
How do I store and reheat leftovers?
Store leftovers in an airtight container in the refrigerator for up to 4 days. They reheat beautifully in the microwave! Try slicing the leftover cold chicken and tossing it over a bed of crisp romaine lettuce for a quick taco salad, using the extra cold sauce as a creamy dressing.