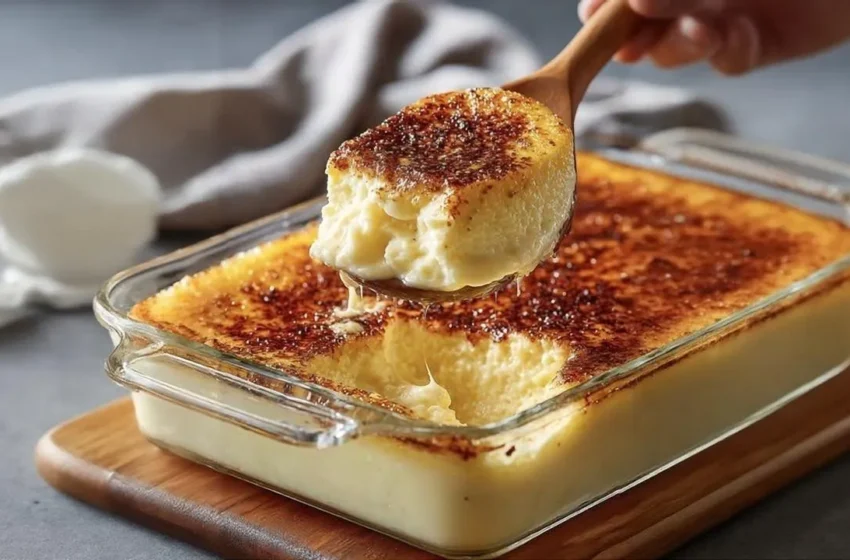
There is something undeniably magical about taking the most basic ingredients in your kitchen—milk, eggs, and sugar—and transforming them into a dessert of pure, silky elegance. This Classic Vanilla Baked Custard is the definition of old-fashioned comfort food. It tastes like a memory.
If you have ever been intimidated by making custard from scratch, this is the recipe to cure that fear. We aren’t standing over a hot stove constantly stirring a pot, praying it doesn’t curdle. Instead, we rely on the gentle, even heat of a water bath (a bain-marie) in the oven. This foolproof method guarantees a luxuriously smooth, melt-in-your-mouth texture every single time.
Finished with a traditional dusting of warm nutmeg, this custard is light enough to follow a heavy dinner, yet rich enough to feel like a truly special treat.
Why You’ll Love This Recipe
- Elegance in Simplicity: No fancy equipment, no rare ingredients, and no complicated techniques. It’s humble baking at its absolute finest.
- The Perfect Texture: The water bath ensures the eggs cook gently, resulting in a custard that is famously silky, never rubbery or grainy.
- Make-Ahead Perfection: Custard actually benefits from chilling in the fridge, making this a brilliant, stress-free dessert for hosting dinner parties.
- Naturally Gluten-Free: A fantastic dessert option when you are accommodating guests with gluten sensitivities!
What You’ll Need
This recipe is all about letting simple, high-quality ingredients shine.
- 3 cups Whole milk: This is not the time for skim milk! The fat in whole milk is essential for that creamy, luxurious mouthfeel.
- 4 Large eggs: These are the backbone of the custard, providing the structure that sets the dessert.
- ¾ cup Granulated sugar: Just enough to sweeten without being cloying.
- 1 tbsp Pure vanilla extract: Yes, a whole tablespoon! Since vanilla is the star flavor, use the best quality extract you have (or vanilla bean paste if you want those beautiful little black specks!).
- ½ tsp Salt: Absolutely crucial to balance the sweetness and enhance the vanilla.
- Ground nutmeg: For that classic, vintage dusting on top. (Freshly grated is phenomenal if you have whole nutmeg!)
- Butter: Just a little bit, for greasing the ramekins.
How to Make It (Step-by-Step)
Prep time: 15 minutes | Cook time: 40–45 minutes | Total time: 1 hour | Yield: 6 individual servings
Step 1: Prep the Ramekins and Oven Preheat your oven to 325°F (160°C). Lightly butter the inside of 6 small ramekins (about 6-ounce capacity). Place the greased ramekins into a large, deep baking dish (a 9×13-inch roasting pan works perfectly). Put a kettle of water on to boil.
Step 2: Whisk the Base In a large mixing bowl, whisk the eggs until the yolks and whites are completely blended. Add the sugar, salt, and vanilla extract. 💡 The “Gentle” Tip: Whisk this mixture gently just until combined. If you whisk too vigorously, you will create a layer of foam and bubbles that will bake into an uneven, bubbly crust on top of your custard.
Step 3: Warm the Milk Pour the whole milk into a saucepan and heat it over medium heat until it is hot and steaming, but not boiling. You should see little bubbles forming around the edges of the pan. Remove from heat.
Step 4: The Crucial Tempering Step Do not pour all the hot milk into the eggs at once, or you will end up with sweet scrambled eggs! Instead, while whisking the egg mixture continuously, slowly drizzle in about a half cup of the hot milk. Once that is mixed in, you can slowly pour in the rest of the milk, whisking gently the whole time.
Step 5: Prepare the Water Bath Divide the liquid custard evenly among your prepared ramekins. Lightly dust the top of each one with ground nutmeg. Now, carefully pour your boiling water into the large baking dish, filling it until the water reaches about halfway up the sides of the ramekins. (Be careful not to splash water into the custard!)
Step 6: Bake and Jiggle Carefully transfer the whole setup to the oven. Bake for 40–45 minutes. 💡 The Jiggle Test: You know they are done when the edges are set and firm, but the very center still has a slight, gelatin-like “jiggle” when you gently shake the pan.
Step 7: Cool and Serve Immediately (but carefully!) use tongs or an oven mitt to remove the ramekins from the hot water bath to stop the cooking process. Let them cool on a wire rack at room temperature for about 20 minutes. You can serve them warm, or cover them with plastic wrap and chill them in the fridge for a firmer, colder dessert.
Expert Tips for Success
- Strain for Perfection: For the absolute silkiest texture imaginable, pour your liquid custard mixture through a fine-mesh sieve before pouring it into the ramekins. This catches any tiny bits of cooked egg or unincorporated chalazae (the white stringy part of the egg).
- Don’t Skip the Water Bath: The water bath acts as an insulator. Water cannot exceed 212°F (100°C), so it protects the delicate eggs from the harsh 325°F oven air, preventing the custard from boiling, curdling, or cracking.
- The Towel Trick: To keep your ramekins from sliding around in the baking dish when you move it, lay a thin dish towel flat on the bottom of the baking dish before placing the ramekins on top.
Variations and Substitutions
Want to put a signature twist on this vintage classic?
- Infused Custard: While warming the milk in Step 3, add a cinnamon stick, a strip of fresh orange peel, or a tablespoon of espresso beans. Let it steep for 10 minutes, then strain the milk before tempering it into the eggs.
- Dairy-Free Vanilla Custard: Swap the whole milk for full-fat canned coconut milk or a rich oat milk. (Almond milk is often too watery to set properly).
- Maple Vanilla: Swap the granulated sugar for ½ cup of pure maple syrup for an incredibly cozy, autumnal flavor.
Serving Suggestions
While this custard is stunningly delicious completely on its own, you can dress it up!
- Fresh Berries: A few fresh raspberries or sliced strawberries on top add a beautiful pop of color and a tart contrast to the rich vanilla.
- Whipped Cream: A small dollop of lightly sweetened, soft-peak whipped cream never hurts.
- Crunchy Contrast: Serve alongside a crisp, buttery shortbread cookie or a delicate almond biscotti for a wonderful texture contrast.
Frequently Asked Questions
Why did my custard turn out grainy or “scrambled”? This is almost always a temperature issue! Either the hot milk was added to the eggs too quickly without whisking (scrambling them instantly), or the custard overbaked in the oven. Remember to pull them out while the center is still jiggly!
Do I have to use ramekins? If you don’t have individual ramekins, you can bake this as one large custard in an 8×8-inch glass baking dish (still placed inside a larger roasting pan for the water bath). You will likely need to increase the baking time by 10-15 minutes.
How long does baked custard last in the fridge? Cover each ramekin tightly with plastic wrap (ensure the wrap doesn’t touch the surface of the custard) and store in the refrigerator for up to 3 days.