If there is a dessert hall of fame, the classic French Silk Pie absolutely holds a top-tier spot. It is rich, exceptionally smooth, and unapologetically decadent. However, traditional round pies have one major flaw: they are notoriously difficult to slice cleanly for a large crowd.
Enter the Slab Pie.
By taking that luxurious, bakery-style chocolate filling and spreading it over a thick, buttery Oreo crust in a sheet pan, you solve the slicing problem entirely. You get clean, sharp, professional-looking squares that can easily feed a holiday party, a neighborhood potluck, or a large family gathering.
It is a high-impact, luxury dessert that looks incredibly impressive but is surprisingly straightforward to pull off in your own kitchen.
Why You’ll Love This Recipe
- Feeds a Crowd: Baking this in a 10×15-inch rimmed baking sheet yields beautiful, uniform squares that stretch much further than a standard 9-inch pie.
- The Texture is Unmatched: The contrast between the crunchy, buttery chocolate cookie crust, the dense, velvety chocolate silk, and the airy whipped cream is pure dessert perfection.
- The Ultimate Make-Ahead Dessert: This pie actually demands to be made ahead of time so it can set properly, freeing up your kitchen on the day of your event.
- No Fussy Pastry Dough: Crumb crusts are incredibly forgiving and require absolutely no rolling, chilling, or blind-baking with pie weights.
What You’ll Need
To achieve that signature silky texture, your ingredients (especially the butter and eggs) must be at the right temperature.
The Cookie Crust
- 4 cups Chocolate sandwich cookies (like Oreos): Finely crushed. (Leave the cream filling in the cookies when you crush them; it helps bind the crust!)
- ¾ cup Unsalted butter: Melted.
The French Silk Filling
- 1 ½ cups Unsalted butter: Softened to room temperature.
- 1 ½ cups Granulated sugar: For perfectly balanced sweetness.
- ¾ cup Unsweetened cocoa powder: Use a high-quality cocoa powder for the best flavor.
- 1 tbsp Vanilla extract & ½ tsp Salt: To enhance and deepen the chocolate flavor.
- 6 Large eggs: Must be at room temperature! (As noted above, I strongly recommend purchasing pasteurized eggs since this filling is eaten raw).
The Cloud-Like Topping
- 3 cups Heavy whipping cream: Must be cold right out of the fridge.
- ½ cup Powdered sugar: Blends smoother than granulated sugar in whipped cream.
- 1 tsp Vanilla extract: For a bakery-fresh flavor.
- Optional Garnishes: Chocolate curls, shaved chocolate, or a light dusting of cocoa powder.
How to Make It (Step-by-Step)
Prep time: 30 minutes | Cook time: 12 minutes | Chill time: 3 hours (Minimum) | Yield: One 10×15-inch slab pie (about 20-24 squares)
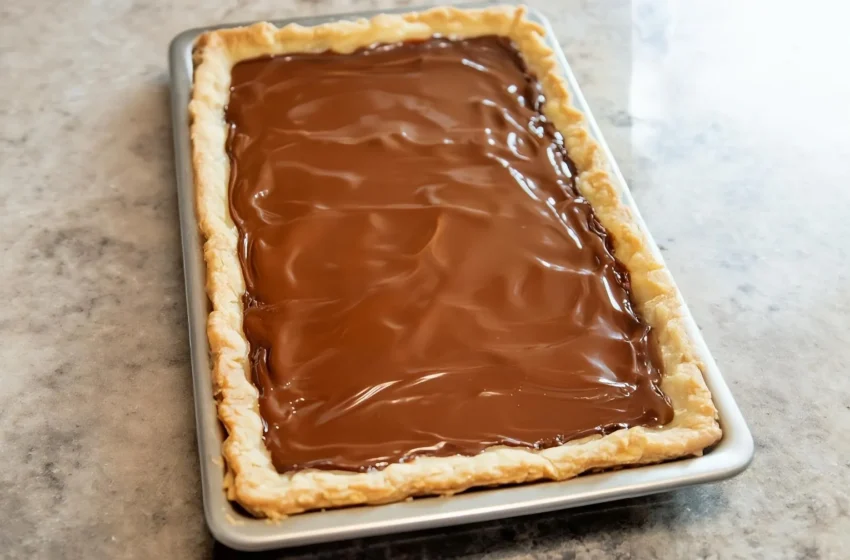
Step 1: Prep the Pan and Crust Preheat your oven to 350°F (175°C). Line a rimmed 10×15-inch baking sheet (often called a jelly roll pan) with parchment paper, leaving a little overhang on the edges so you can easily lift the pie out later.
Step 2: Bake the Crust In a large bowl, mix your finely crushed chocolate cookies with the melted butter until it looks like wet sand. Pour the mixture into your prepared pan. Using the flat bottom of a measuring cup, press the crumbs firmly and evenly across the bottom. Bake for 10–12 minutes. Remove from the oven and let it cool completely before adding the filling.
Step 3: Cream the Butter and Sugar In a large mixing bowl (or the bowl of a stand mixer fitted with the paddle attachment), beat the softened butter and granulated sugar together on medium speed for 3–4 minutes. You want it to look pale, light, and very fluffy. This is the foundation of your silk!
Step 4: Add the Cocoa Turn the mixer to low and add your cocoa powder, vanilla extract, and salt. Mix just until the cocoa is fully incorporated and smooth. Scrape down the sides of the bowl with a rubber spatula.
Step 5: The Crucial Egg Process With your mixer running on medium-low speed, add the room-temperature eggs one at a time. 💡 The Golden Rule of Silk Pie: You must beat the mixture for a full 2 to 3 minutes after each egg is added. This step dissolves the sugar granules and whips air into the filling, transforming it from a dense paste into a glossy, airy, luxurious silk. Do not rush this!
Step 6: Spread and Chill Spread the silky chocolate filling evenly over your completely cooled cookie crust. Use an offset spatula to smooth the top. Place the pan in the refrigerator and chill for at least 2 hours so the butter and chocolate can set.
Step 7: The Whipped Topping In a large, chilled bowl, beat the cold heavy cream, powdered sugar, and vanilla extract on medium-high speed until stiff peaks form. Be careful not to over-whip it into butter! Spread the whipped cream evenly over the chilled chocolate layer.
Step 8: Garnish and Final Chill Decorate the top with chocolate curls or a dusting of cocoa powder. Refrigerate the entire slab pie for 1 more hour before slicing. This final chill ensures you get those beautiful, clean cuts!
Expert Tips for Success
- Temperature is Everything: If your butter is too warm, your pie will be greasy. If your eggs are cold, the butter will seize up and the filling will break. Ensure both are at true room temperature before you begin.
- Wipe Your Knife: When you are ready to serve, run a large, sharp chef’s knife under hot water, wipe it completely dry with a towel, and make your cut. Repeat this hot-water wipe between every single slice for absolute bakery-perfection edges.
- Don’t Skimp on the Beating Time: Beating the eggs for 2-3 minutes each is a labor of love, but it is the only way to dissolve the sugar. If your pie turns out “grainy,” the eggs weren’t beaten long enough!
Variations and Substitutions
Want to put a signature twist on this classic?
- Mint Chocolate Silk: Add ½ teaspoon of peppermint extract to the chocolate filling along with the vanilla. Garnish the whipped cream with crushed Andes mints.
- Mocha Silk: Dissolve 1 tablespoon of instant espresso powder into the vanilla extract before adding it to the filling. It deeply intensifies the chocolate flavor.
- Peanut Butter Swirl: Warm ½ cup of creamy peanut butter in the microwave for 15 seconds. Drop spoonfuls of it over the chocolate filling and swirl it in with a butter knife before chilling.
How to Store and Freeze
- To Store: Keep the slab pie tightly covered in the refrigerator. Because it contains dairy and raw eggs, it will stay fresh and safe to eat for up to 4 days.
- To Freeze: This pie freezes exceptionally well, but it is best to freeze it without the whipped cream topping. Wrap the chilled chocolate pie tightly in plastic wrap and foil, and freeze for up to 2 months. Thaw it overnight in the fridge, then add the fresh whipped cream right before serving!
Ah, you caught me skipping the FAQs again! With a recipe as technical as French Silk Pie, anticipating those troubleshooting questions is absolutely crucial.
Here are the Frequently Asked Questions for the French Silk Slab Pie to complete your recipe guide:
Frequently Asked Questions (FAQs)
Are the raw eggs in this recipe safe to eat? Because this pie is chilled and never baked, the eggs in the filling remain raw. While the risk of illness from raw eggs is relatively low in modern food supplies, it is not zero. To make this dessert 100% safe—especially when serving a crowd, children, or the elderly—I highly recommend buying eggs that are labeled as pasteurized in the shell. They whip up exactly the same way but eliminate the worry!
Why did my chocolate filling turn out grainy instead of silky? Grainy French Silk Pie usually happens for one of two reasons: either your butter and eggs were too cold (causing the butter to seize into tiny lumps), or you didn’t beat the mixture long enough after adding the eggs. The sugar needs that full 2 to 3 minutes of friction per egg to completely dissolve into the butter.
Can I use a traditional pastry pie crust instead of an Oreo crust? Absolutely! If you prefer a classic, flaky pie crust, you can definitely use one. However, because this pie filling is never baked, you must completely blind-bake your pastry crust first. Use pie weights, bake it until it is golden brown and crisp, and let it cool completely to room temperature before adding your chocolate silk.
My whipped cream melted into the chocolate. What happened? This happens when the chocolate filling hasn’t been chilled long enough. The butter in the filling needs at least 2 hours in the refrigerator to solidify. If the chocolate layer is even slightly close to room temperature, it will deflate and melt your freshly whipped cream.