This clever 4-ingredient oven-baked pastry treat is the kind of recipe a Midwestern farm wife would throw together when company pulled into the driveway unannounced. By tossing roughly torn pieces of raw refrigerated pie dough directly into a baking dish, you skip the tedious rolling and crimping of a traditional pie.
Dressed up with just three simple pantry items, it transforms into a bubbling, golden, cobbler-style dessert that tastes like you fussed all afternoon. The ragged, overlapping edges bake up beautifully crisp while the pastry nestled at the bottom absorbs the sweet fruit juices, creating a magnificent contrast of textures!
Why You’ll Love This Recipe
🥧 Brilliant Pie Shortcut: No pie weights, rolling pins, or crimping skills required—just tear and bake.
⏱️ 4 Everyday Ingredients: Relies on simple, budget-friendly pantry staples to handle unannounced guests.
✨ 100% Pork-Free & Alcohol-Free: A clean, wholesome sweet treat built entirely around orchard fruits, real butter, and pastry.
📸 Rustic Cobbler Aesthetic: The golden pastry peaks poking through pockets of bubbling fruit filling create a gorgeous, comforting look perfect for family gatherings.
Recipe Overview
- Prep time: 10 minutes
- Bake time: 25 to 35 minutes
- Total time: ~45 minutes
- Yield: 6 Servings
What You’ll Need
- 1 box (14–16 oz) Refrigerated pie dough: (Contains 2 rolled crusts). Keep it well-chilled in the fridge until the moment you are ready to tear it.
- 1 cup Canned pie filling: Use your family’s favorite flavor (apple, cherry, or peach work spectacularly well).
- ⅓ cup Granulated sugar: (Adjust slightly depending on how sweet your canned filling is).
- 4 tbsp (½ stick) Unsalted butter: Melted.
How to Make It (Step-by-Step)
Step 1: Prep and Preheat
Preheat your oven to 375°F (190°C). Lightly grease an 8×8-inch or similar small oven-safe baking dish with a thin layer of butter or nonstick cooking spray.
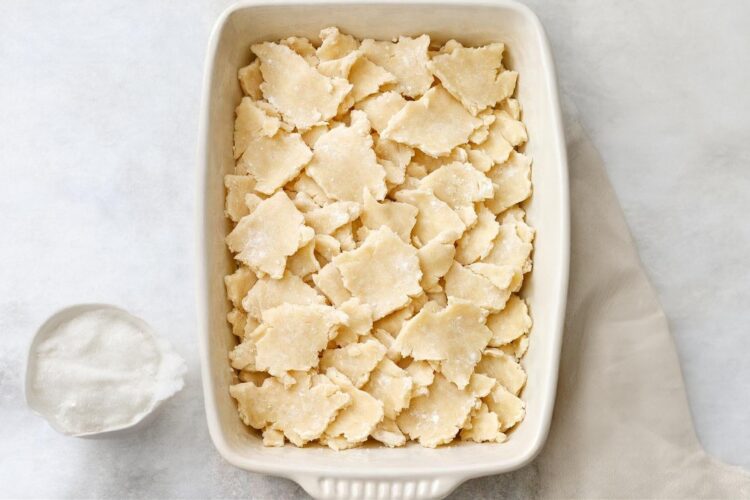
Step 2: Tear the Pastry
Unroll the cold, refrigerated pie dough sheets onto a clean work surface. Using your hands, tear the raw dough into rough, bite-sized pieces about 1 to 2 inches each. Do not worry about making them neat; the irregular, ragged edges are the secret to building those crispy, flaky peaks!
Step 3: Scatter into the Dish
Scatter the torn pieces of raw pie dough evenly across the bottom of your prepared baking dish. Let some pieces overlap flatly while others stand up slightly on their edges so you get a wonderful blend of soft, jammy dough and shatteringly crisp pastry points.
Step 4: Sweeten the Fruit Base
In a small bowl, stir together your choice of canned pie filling and the ⅓ cup of granulated sugar until well combined.
Step 5: Drizzle and Spoon
Drizzle the 4 tablespoons of melted butter evenly over the torn pie dough pieces in the baking dish, trying to coat as many raw pastry surfaces as possible. Next, spoon the sweetened fruit filling evenly over the top.
💡 Crucial Step: Do not try to completely cover every square inch of dough. Leave several pastry peaks peeking through the fruit layer so they are exposed to the direct heat of the oven, allowing them to brown and crisp up properly.
Step 6: Bake Until Bubbling
Place the baking dish on the middle rack of your preheated oven. Bake for 25 to 35 minutes. You will know it is ready when the exposed pie dough pieces are puffed, flaky, and golden brown on the edges, and the fruit filling is bubbling thickly around them.
Step 7: Rest and Serve Warm
Remove the dish from the oven and let the dessert rest completely undisturbed for 10 minutes.
💡 Crucial Step: Do not skip this rest! The hot fruit filling needs a few minutes to cool slightly and thicken up; if you scoop into it immediately, the base will be runny rather than jammy. Serve warm with a cold scoop of vanilla bean ice cream or a dollop of fresh whipped cream!
💡 Expert Tips for Success
🛑 Keep the Dough Ice-Cold: Do not let your pie dough sit on the counter to warm up before tearing. Traditional pie pastry relies on cold solid fats to create air pockets in the oven. Keeping the dough chilled until the last second ensures maximum flakiness!
🛑 Check the Doneness Deeply: Ensure you bake the dish long enough so that the dough submerged at the bottom of the pan is fully cooked through and no longer looks wet, translucent, or raw.
🍎 Apple Pie Enhancement: If you are opting for apple pie filling, stir a heavy pinch of ground cinnamon, nutmeg, or apple pie spice into the fruit and sugar mixture to infuse your kitchen with a gorgeous, old-fashioned autumn aroma.
Variations and Substitutions
🥜 Pecan Cobbler Crunch: Sprinkle 2 to 3 tablespoons of chopped, toasted pecans or walnuts over the surface of the dessert right before sliding the dish into the oven to add a rich, earthy crunch.
🥛 Creamy Richness Boost: For an extra luxurious finish, drizzle 2 tablespoons of heavy whipping cream over the assembled pastry and fruit layers immediately before baking.
📉 Lower Sugar Option: If your brand of canned pie filling is already intensely sweet, feel free to drop the granulated sugar down to ¼ cup or skip it entirely to let the natural fruit profiles take center stage.
❓ Frequently Asked Questions (FAQs)
How do I handle and store leftovers?
Once the dessert has cooled completely to room temperature, cover the baking dish tightly with plastic wrap or transfer the portions to an airtight container. Store it in the refrigerator for up to 3 to 4 days. Leftovers make an incredible rustic breakfast pastry when paired with a hot cup of morning coffee!
What is the best way to reheat this dessert?
To revive that freshly baked texture, reheat your leftovers in a 350°F (175°C) oven or toaster oven for 5 to 8 minutes until the fruit filling is sizzling and the pastry edges crisp back up. Alternatively, warm individual portions in the microwave for 30 to 45 seconds.
Can I use homemade pie dough instead of store-bought?
Absolutely! If you have leftover pie dough scraps from baking a traditional pie, this recipe is the ultimate way to utilize them. Simply tear the raw scraps into bite-sized pieces and follow the recipe exactly as written.