Subtly sweet, remarkably silky, and dusted with fragrant nutmeg, a traditional baked egg custard is the absolute pinnacle of comfort desserts. For many home cooks, achieving that flawless, velvety texture without curdling or weeping can feel like a high-stakes guessing game.
This fail-proof recipe cracks the code by focusing on precise temperatures and a gentle water-bath baking method. The result is a smooth, elegant custard that hits with a wonderful wave of vintage nostalgia, reminiscent of classic eggnog in a beautiful, spoonable form!
Why You’ll Love This Recipe
🍮 Shatteringly Silky Consistency: By tempering the eggs and utilizing a water bath, you eliminate the risk of rubbery or curdled edges.
⏱️ Basic Pantry Staples: Transforms standard eggs, milk, and sugar into a high-end, elegant dessert.
✨ 100% Alcohol-Free & Pork-Free: A clean, wholesome custard focused entirely on fresh dairy and warm spices.
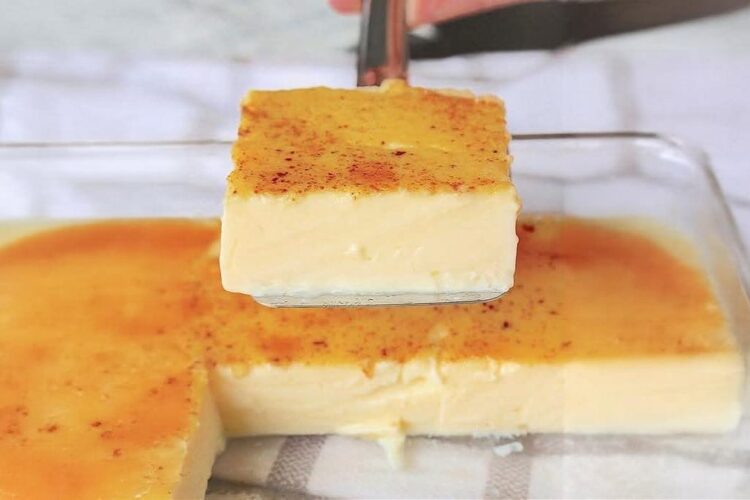
📸 Retro Bakery Aesthetic: The velvety pale yellow custard topped with a speckling of dark, warm nutmeg looks incredibly appetizing when styled in a clear glass dish or individual ramekins.
Recipe Overview
- Prep time: 20 minutes
- Cook time: 45 to 50 minutes
- Total time: ~1 hour 10 minutes (plus cooling time)
- Yield: 9 Servings
What You’ll Need
- 5 Large eggs: The core structural base of the custard.
- ½ cup Granulated sugar
- 1 ½ tsp Pure vanilla extract: For a rich, aromatic background note.
- ½ tsp Salt: Essential for cutting through the dairy and balancing the sweetness.
- 4 cups Milk: Whole milk provides the absolute creamiest results, though 2% works well too.
- Ground nutmeg: For the classic, aromatic spiced topping.
How to Make It (Step-by-Step)
Step 1: Prep Your Station
Preheat your oven to 350°F (175°C). Lightly grease an 8×8-inch baking dish (or a 1.5-quart ceramic casserole dish) with a tiny bit of butter or nonstick cooking spray.
Step 2: Whisk the Egg Base
In a large mixing bowl, combine the 5 whole eggs, granulated sugar, vanilla extract, and salt. Beat them together thoroughly with a whisk until the mixture is uniform and the sugar begins to dissolve.
Step 3: Scald the Milk
Pour the 4 cups of milk into a medium saucepan placed over medium heat. Bring the milk up to an even 180°F (82°C)—it should be steaming hot with tiny bubbles forming along the edges of the pan, but do not let it reach a rolling boil. Using a kitchen thermometer takes all the guesswork out of this step!
Step 4: Temper the Eggs
Very slowly pour a thin, steady stream of the hot milk into your egg mixture while continuously and aggressively whisking with your other hand.
💡 Crucial Step: This process is called tempering. By introducing the hot milk at a slow crawl, you gradually raise the temperature of the eggs without shocking them. If you dump the milk in all at once, you will instantly cook the whites and end up with sweet scrambled eggs! Once all the milk is in, whisk the final mixture vigorously for one full minute.
Step 5: Dust with Nutmeg
Pour the smooth custard liquid directly into your prepared 8×8-inch baking dish. If you are worried about any tiny stray bits of cooked egg, you can pour the mixture through a fine-mesh strainer as it enters the pan. Generously shake ground nutmeg across the entire top surface.
Step 6: Set Up the Water Bath (Bain-Marie)
Place your filled custard dish inside a larger, wider baking pan (such as a 9×13-inch pan or a roasting pan). Carefully pour warm water into the larger outer pan until it reaches about 1 inch deep up the sides of the custard dish.
💡 Crucial Step: Do not skip the water bath! The surrounding water acts as a heat buffer, keeping the oven’s harsh, direct heat from boiling the delicate egg proteins, ensuring the custard sets smoothly from the outside in.
Step 7: Bake to a Gentle Jiggle
Carefully slide the doubled pans into the oven. Bake for 45 to 50 minutes. To test for doneness, slide a thin knife into the center; it should come out completely clean. The custard should still have a uniform, jelly-like jiggle in the dead center when you gently nudge the pan—it will fully firm up as it cools down.
Step 8: Cool and Serve
Carefully lift the custard dish out of the hot water bath and set it on a wire rack to cool. Serve it warm, or transfer it to the refrigerator to chill completely before slicing into squares. Top with a dollop of fresh whipped cream or summer berries if desired!
💡 Expert Tips for Success
🛑 Don’t Overbake: Keep a sharp eye on the timer starting at the 40-minute mark. Because of the residual heat trapped in the dense dish, the custard will continue cooking for several minutes after it leaves the oven. If you leave it in until the center is completely rigid, it will overcook and curdle as it cools.
🛑 Watch the Stovetop Flame: When scalding your milk, monitor it closely and stir occasionally. Milk sugars burn easily on the bottom of a saucepan, which can infuse your entire custard with an unwelcome scorched flavor.
🥛 Achieving Peak Creaminess: While 2% milk creates a lovely everyday dessert, opting for full-fat whole milk (or even swapping half a cup of the milk for heavy cream) yields that ultra-luxurious, velvety texture found in high-end bakeries.
Variations and Substitutions
🍁 Warm Cinnamon Sugar: If you aren’t a fan of the traditional eggnog profile that nutmeg brings, completely swap it out for a dusting of ground cinnamon or apple pie spice before baking.
🍮 Individual Ramekins: For an elegant dinner party presentation, line up 6 to 8 individual ceramic ramekins inside your roasting pan. Pour the custard liquid evenly among them, dust with nutmeg, and drop the bake time down to 25 to 30 minutes.
❓ Frequently Asked Questions (FAQs)
How do I store leftover egg custard?
Once the custard has cooled completely to room temperature, cover the dish tightly with plastic wrap or transfer the portions to an airtight container. Keep it stored in the refrigerator for up to 3 to 4 days. It tastes absolutely magnificent served ice-cold straight from the fridge!
Can I freeze baked egg custard?
Freezing is not recommended for traditional custards. The freezing and thawing process breaks down the delicate egg and dairy emulsion, causing the liquid to separate from the proteins and leaving you with a watery, weeping texture.
Why did a watery liquid form at the bottom of my dish?
This separation is called syneresis (or weeping), and it typically happens when the egg proteins are overcooked. When the eggs get too hot, they contract tightly, squeezing out the water molecules trapped between them. Sticking strictly to the water bath and pulling the dish out while it still has a gentle jiggle prevents this completely!