This slow cooker potato and onion bake is one of those recipes that feels like a warm hug from the past. Passed down from the Depression era when money was tight but root vegetables were cheap and filling, this dish stretches a few basic pantry staples into a deeply satisfying side dish.
It is incredibly simple—relying just on layers of thinly sliced potatoes and onions, a little flour for body, and butter for richness—but somehow the slow cooker transforms them into deep, cozy, and intensely “roasty” flavors. It is the perfect set-and-forget comfort food for a busy weeknight or a lazy Sunday!
Why You’ll Love This Recipe
✨ Thrifty 4-Ingredient Magic: Transforms basic, budget-friendly pantry staples into a rich, spectacular centerpiece.
⏱️ True Set-and-Forget Braise: No tedious stovetop boiling or active oven monitoring required—the slow cooker handles the entire browning cycle.
🌿 100% Pork-Free & Vegetarian: A wholesome, clean comfort food side built entirely around fresh garden roots and real dairy fats.
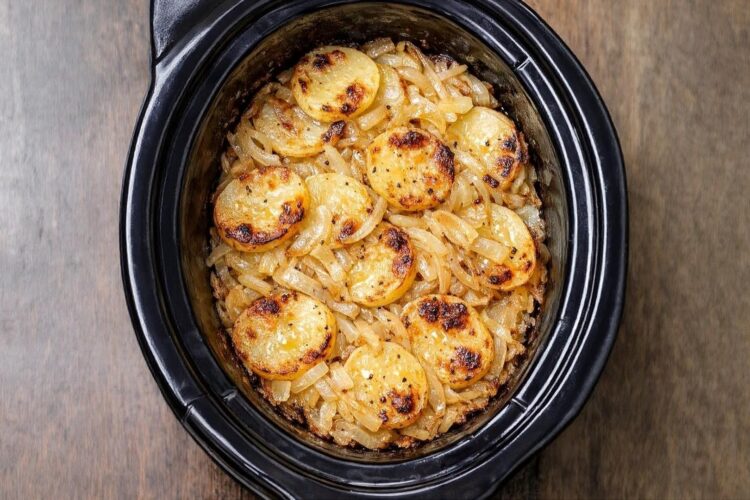
📸 Golden Shingled Edges: Finishing with an overlapping potato layer allows the top rounds to catch the trapped heat, developing beautiful, rustic browned spots and crispy edges that look stunning on the table.
Recipe Overview
- Prep time: 15 minutes
- Cook time: 3 ½ to 4 hours (on HIGH) or 6 to 7 hours (on LOW)
- Total time: ~4 to 7 hours (Highly inactive)
- Yield: 6 Servings
What You’ll Need
- 2 ½ lbs Russet or Yukon Gold potatoes: Peeled and thinly sliced into 1/8-inch rounds.
- 2 Large yellow onions: Thinly sliced into half-moons.
- 3 tbsp All-purpose flour: Crucial for building a silky, gravy-like bind.
- 3 tbsp Unsalted butter: Divided (plus a bit extra to grease the cooker walls).
- Seasonings: 1 teaspoon kosher salt and ½ teaspoon black pepper.
Step-by-Step Instructions
Step 1: Lubricate the Crock
Lightly grease the inside bottom and side walls of a 4- to 6-quart slow cooker with a small pat of butter. This forms a nonstick shield that prevents sticking while encouraging those highly coveted golden-brown edges.
Step 2: Partition the Root Vegetables
Peel your potatoes and slice them into thin rounds, roughly 1/8-inch thick, using a sharp kitchen knife or a mandoline slicer. Place the slices in a large bowl, keeping them loosely covered with a damp kitchen towel so they stay moist. Peel your 2 large yellow onions and slice them into thin half-moons, matching the thickness of the potatoes so they soften at the exact same rate.
Step 3: Mix the Starch Binder
In a small bowl, stir together the 3 tablespoons of all-purpose flour, 1 teaspoon of kosher salt, and ½ teaspoon of black pepper. This simple dust will lightly coat the vegetable layers, helping to fuse the melting butter and natural onion juices into a silky, velvet glaze during the cook.
Step 4: Build the Shingled Layers
- Layer 1: Arrange a single, compact layer of potato slices across the bottom of the slow cooker, overlapping them slightly like shingles on a roof.
- Layer 2: Scatter a generous handful of the sliced onions over the potatoes.
- Layer 3: Dust a teaspoon or so of your flour mixture evenly over the onions.
- Layer 4: Chop 1 tablespoon of your unsalted butter into tiny pieces and dot them over the surface.
Step 5: Repeat to the Crown
Repeat this exact layering sequence—potatoes, onions, flour dust, and butter dots—until you have completely exhausted your ingredients.
💡 Crucial Step: Always ensure you finish with a neat potato layer on the very top, dotting it generously with your final tablespoon of butter. This top layer is what interacts with the rising heat to create those gorgeous crispy browned spots.
Step 6: Low and Slow Simmer
Secure the lid tightly onto the slow cooker. Cook on HIGH for 3 ½ to 4 hours, or on LOW for 6 to 7 hours. You will know it is ready when the potato layers are ultra-tender when pierced with a fork and the onions have collapsed into a soft, lightly caramelized jam.
🛑 Golden Rule: Do not lift the slow cooker lid during the first few hours of cooking! Keeping 100% of the internal steam trapped is vital to ensure the dense starches soften uniformly.
Step 7: The Crisp-Up Rest
Once the potatoes are fully tender, remove the lid completely or leave it slightly ajar, letting the machine sit on its WARM setting for another 15 to 20 minutes. This lets excess surface moisture evaporate rapidly, allowing the top edges to firm up and crisp.
Step 8: Serve Family-Style
Scoop deep down through the layers using a large serving spoon so everyone gets a beautiful mix of the buttery, caramelized onions from the core and the crispy potatoes from the crown. Serve hot right from the crock!
💡 Expert Tips for Success
- Match Your Slice Thickness: Ensure your potato rounds and onion half-moons are cut to a consistent 1/8-inch thickness. If the slices are cut too thick, the potatoes will take significantly longer to lose their crunch, delaying dinner and causing the onions to over-caramelize.
- The Balancing Table Companions: Because this old-school bake delivers an incredibly rich, buttery, and savory depth, balance out your dinner plate by pairing it next to crisp steamed green beans, a fresh garden salad, or tangy condiments like pickles or sauerkraut to cut through the density beautifully.
- The Breakfast-for-Dinner Revamp: This bake is an exceptional option for meal planning. If you have leftovers, they reheat beautifully in a skillet next to scrambled eggs or folded into a morning omelet for a spectacular, hearty breakfast spread!
Variations and Substitutions
- The Smoky Campfire Lift: For a beautiful visual pop and a subtle layer of rustic depth, dust a heavy pinch of sweet smoked paprika across the final top potato layer right before locking the slow cooker lid.
- The Evaporated Milk Upgrade: If you prefer a loose, extra-velvety, almost scalloped-style potato sauce, drizzle ¼ cup of whole milk or rich evaporated milk over the assembled layers right before initializing the cook cycle.
- The Prep-Ahead Shortcut: To save time on a frantic morning, you can completely slice your onions and whisk your dry flour mix the night before, storing them sealed in the fridge. Simply slice your spuds fresh the morning of the cook to ensure they maintain their beautiful creamy color!
❓ Frequently Asked Questions (FAQs)
How should I handle and store leftover potato bake?
Transfer any leftover potatoes and onions into a shallow, airtight container and slide it into the refrigerator within 2 hours of cooking. Leftovers stay exceptionally fresh, moist, and delicious for up to 3 to 4 days, allowing the sweet onion sugars to deeply infuse into the potato starches overnight!
What is the best way to reheat leftovers to keep the crisp edges?
While the microwave works great for a quick 90-second lunch, the absolute best way to reheat this dish is to spread it into a small baking dish and warm it inside a 350°F (175°C) oven or toaster oven for 10 to 12 minutes. This rapidly evaporates any settled moisture and restores that gorgeous, roasty oven-baked texture.
Can I use red potatoes instead of Russets?
Absolutely! While high-starch Russet potatoes break down into fluffy, cloud-like textures that blend beautifully with the flour gravy, waxier varieties like Yukon Gold or Red potatoes hold their geometric round shapes much better through long cooking cycles, yielding a distinct, elegant layered look.