These southern 4-ingredient cucumber sandwiches are the kind of classic finger food that church ladies hover over before the potluck even officially starts, plucking them off the tray two at a time. Simple, cool, and beautifully creamy, with a vibrant green border peeking out from soft white bread, they look far more elegant than they are.
A staple of ladies’ circles, baby showers, and garden luncheons across the South and Midwest, a whole tray of these delicate tea sandwiches can be assembled in just a few minutes. Once you see how quickly they vanish, you will find yourself making them for every summer gathering!
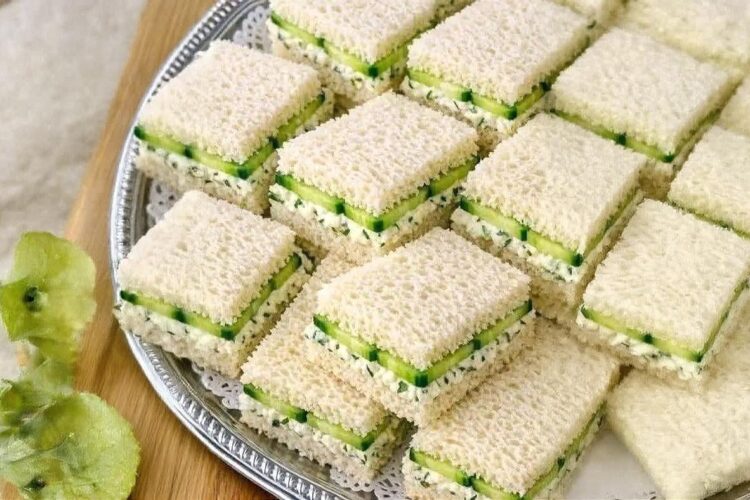
📸 The Structural Balance of a Finger Sandwich
Crafting a pristine, non-soggy tea sandwich relies on a calculated moisture barrier and meticulous knife work:
- Soft White Sandwich Bread (The Tender Frame): Acts as the delicate, pillowy vehicle. Trimming away the dense outer crusts yields a uniform, ultra-soft texture that melts in your mouth.
- Ranch-Infused Cream Cheese (The Moisture Shield): Spreading a dense layer of whipped cream cheese all the way to the bread borders fulfills two critical roles: it seals the crumb against the cucumber’s water to prevent sogginess, and acts as a savory mortar to hold the sandwich together.
- Thinly Sliced Seedless Cucumber (The Crisp Center): Utilizing an English seedless cucumber guarantees a thin, tender skin that provides a clean, acoustic snap without releasing large pockets of disruptive watery seeds.
Recipe Overview
- Prep time: 15 minutes
- Chill time (Inactive): 30 minutes
- Total time: ~45 minutes
- Yield: 24 Small Finger Sandwiches
What You’ll Need
The 4 Core Ingredients:
- 1 loaf Soft white sandwich bread: Thinly sliced (standard grocery-style bread is perfect).
- 1 container (8 oz) Plain whipped cream cheese: Softened slightly for effortless spreading.
- 1 Large seedless cucumber (English cucumber): Washed and sliced into paper-thin rounds.
- 1 packet (1 oz) Dry ranch dressing mix: Packs a massive punch of buttermilk, garlic, and herb aromatics.
Step-by-Step Instructions
Step 1: Whisk the Herbed Savory Spread
In a medium mixing bowl, add your 8 ounces of plain whipped cream cheese and pour the entire 1-ounce packet of dry ranch dressing mix directly over the top. Use a sturdy spoon or flexible spatula to fold and stir the components together vigorously until completely smooth, uniform, and lump-free.
Step 2: Initialize the Bread Grid
Arrange the slices of soft white sandwich bread out in a flat single layer across a spacious cutting board or clean countertop.
💡 Pro Tip: If your kitchen air is dry and you are worried about the bread losing its elasticity while you work, simply drape a clean, lightly damp kitchen towel over the bread slices for 2 minutes to keep them perfectly pillowy.
Step 3: Construct the Moisture Shield
Using an offset spatula or a butter knife, spread a thin, uniform layer of your prepared ranch cream cheese mixture across every single slice of bread. Ensure you push the cream cheese all the way out to the exact structural edges of the crusts—this guarantees a tight seal and blocks moisture from migrating into the crumb.
Step 4: Shingle the Cucumber Layers
Arrange your paper-thin cucumber rounds over exactly half of the cream-cheese-spread bread slices. Overlap the edges of the cucumber slices slightly like shingles on a roof to form a dense, uniform green floor. Keep the cucumbers to a strict single layer so the sandwiches remain neat and clean to bite into.
Step 5: Cap and Compress
Top the cucumber-laden bread slices with the remaining bread sheets, cream cheese side down, to assemble your sandwiches. Place the flat palm of your hand over the center of each top piece and apply a gentle, uniform downward pressure to compress the layers securely without squishing out the savory filling.
Step 6: The Clean Geometry Trim
Using a long, exceptionally sharp chef’s knife or a serrated utility knife, cleanly slice away all four outer crusts from each sandwich to create perfectly soft, square packages.
✨ The Clean-Slice Trick: Keep a damp, warm kitchen towel at your side to wipe down the blade between every single slice. This removes any clinging cream cheese paste, ensuring your geometric cuts look flawless.
Step 7: Partition and Chill
Slice each crustless square into either 2 neat rectangles or 4 delicate triangles, depending on how dainty you prefer your presentation. Arrange the sandwiches closely together on an elegant serving platter to show off the bright green cucumber borders. Cover the tray tightly with plastic wrap and refrigerate for at least 30 minutes to firm up the cream cheese matrix before serving cold.
💡 Expert Tips for Success
- Blot Your Cucumbers Bone-Dry: To completely bulletproof your sandwiches against turning soggy if they need to sit out on a church potluck table, layout your cucumber slices on a sheet of paper towels after slicing. Press a second paper towel over the top to blot away excess surface moisture before shingling them onto the bread.
- The Perishable Dairy Rule: Because whipped cream cheese is highly perishable, keep the sandwiches thoroughly chilled until the exact minute guests arrive. Never leave them at warm room temperature for more than 2 hours (or 1 hour if hosting a hot backyard summer cookout). If transporting them to a picnic or church hall, pack the tray inside an insulated cooler nested with ice packs.
- The Perfect Table Affinities: Balance out these cool, creamy finger sandwiches by setting your serving tray next to traditional Southern luncheon anchors: a plate of seasoned deviled eggs, crisp potato chips, a bowl of light chicken salad, and a giant, ice-cold pitcher of sweet lemonade.
Variations and Substitutions
- The Milder Herbal Tweak: If you prefer a more subtle flavor profile, use only half of the dry ranch packet, or swap the plain cream cheese and ranch mix for a container of whipped chive-and-onion cream cheese to pivot into a classic French herb depth.
- The Bakery Wheat Modification: For an elegant flavor contrast and a slightly sturdier bite, alternate your layers utilizing half white sandwich bread and half thin-sliced soft whole wheat bread to build a beautiful checkerboard pattern on your serving tray.
- The Crisp Radish Contrast: Tuck a few paper-thin slices of red garden radishes into the center of the cucumber layer to introduce a spectacular pepper-like bite and a gorgeous pink structural ring to the finger sandwiches.
❓ Frequently Asked Questions (FAQs)
Can I make these cucumber sandwiches the night before?
Assembling finger sandwiches too far in advance is not highly recommended, as the cucumbers will naturally continue to shed water over time. However, if you need to prep for a morning event, assemble the full sandwiches, leave the crusts on, wrap them tightly in a single layer between sheets of wax paper inside an airtight container, and store them in the fridge. Trim the crusts and slice into triangles right before serving for a pristine presentation!
Can I use a regular garden cucumber instead of an English cucumber?
Standard garden cucumbers possess exceptionally thick, bitter skins and a large inner core packed with watery seeds that will rapidly saturate your bread. If using a standard garden cucumber, you must peel the tough skin completely and cut the cucumber in half lengthwise, using a small spoon to scrape out 100% of the watery seed channel before slicing the flesh into thin half-moons!
Can I freeze leftover cucumber tea sandwiches?
Freezing is absolutely not recommended for this recipe. Raw cucumbers are composed of over 95% water. When frozen and thawed, their delicate cellular walls break down completely, converting your crisp, snappy vegetable layer into a soggy, translucent mush while causing the smooth cream cheese emulsion to curdle and separate. Always enjoy these fresh!