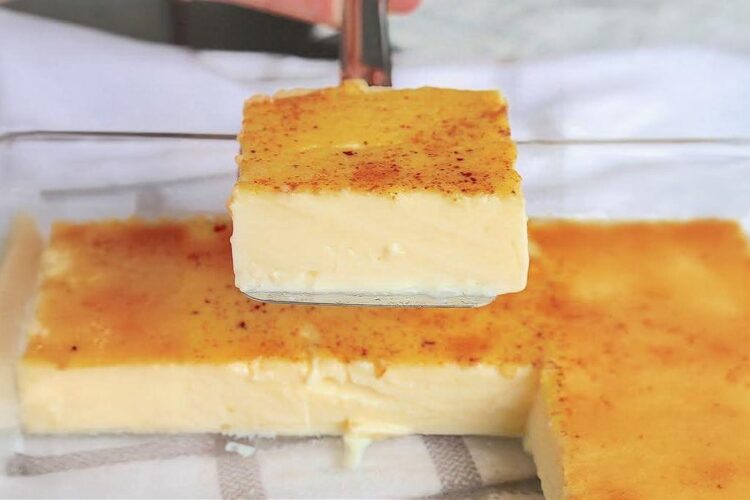
There is something deeply nostalgic about a good baked egg custard. Subtly sweet, incredibly silky, and dusted with warm nutmeg, it practically tastes like eggnog in solid form!
While the ingredient list is beautifully simple, custard has a notorious reputation for curdling or turning into sweet scrambled eggs. This recipe completely removes the guesswork. By carefully controlling the heat with a classic water bath and properly tempering the eggs, you will achieve a perfectly smooth, flawless dessert every single time—no culinary degree required.
📸 Why This Method Works
Building a dessert that sets into a smooth, jiggling gel rather than a grainy mess relies entirely on gentle temperature management:
- The Tempering Process: Egg proteins cook and scramble almost instantly when exposed to high heat. By slowly streaming hot milk into the eggs while whisking aggressively, you gradually raise their temperature. This allows the proteins to bind smoothly without shocking them into seizing.
- The Scalded Milk: Bringing the milk up to 180°F (82°C)—just before a simmer—alters the whey proteins in the dairy, which helps the final custard set up into a much firmer, creamier texture.
- The Water Bath (Bain-Marie): Baking the custard inside a larger pan of water is the ultimate insurance policy. Water cannot exceed 212°F (100°C), meaning the ambient steam creates a gentle, insulated jacket around your baking dish. This guarantees the edges won’t boil and separate before the center has time to set.
Recipe Overview
- Prep time: 20 minutes
- Cook time: 45 to 50 minutes
- Yield: 9 Servings
What You’ll Need
- 5 Large eggs: Brought to room temperature.
- ½ cup Granulated sugar
- 1 ½ teaspoons Pure vanilla extract
- ½ teaspoon Fine salt
- 4 cups Milk: (2% or whole milk provides the best texture; avoid skim milk).
- Ground nutmeg: For the classic topping.
Step-by-Step Instructions
Step 1: Prep the Oven and Pans
Preheat your oven to 350°F (175°C). Lightly grease an 8×8-inch glass or ceramic baking dish with butter or nonstick spray. Locate a second, larger baking pan (such as a 9×13-inch roasting pan) that the 8×8 dish can sit inside comfortably.
Step 2: Whisk the Base
In a large mixing bowl, vigorously beat together the 5 eggs, ½ cup of sugar, 1 ½ teaspoons of vanilla, and ½ teaspoon of salt. Whisk until the sugar is mostly dissolved and the eggs are completely pale and smooth.
Step 3: Scald the Milk
Pour the 4 cups of milk into a small saucepan. Heat it over medium-low heat until a kitchen thermometer registers exactly 180°F (82°C), or right before it starts to simmer. Do not let it reach a rolling boil!
Step 4: Temper the Eggs (The Crucial Step)
While whisking the egg mixture continuously and aggressively with your dominant hand, use your other hand to pour the hot milk into the bowl in a very slow, thin stream. Once all the milk is incorporated, continue to whisk the final mixture for one full minute to ensure it is perfectly unified.
Step 5: Strain and Top
(Optional but recommended) Pour the warm liquid custard through a fine-mesh sieve directly into your greased 8×8 baking dish. This catches any tiny bits of egg that may have cooked during tempering. Sprinkle the top of the liquid generously with ground nutmeg.
Step 6: Build the Water Bath
Place your 8×8 custard dish inside the larger baking pan. Carefully pour hot tap water into the larger bottom pan until the water reaches about 1 inch up the sides of the custard dish. Be incredibly careful not to splash any water into the custard itself!
Step 7: The Gentle Bake
Carefully transfer the nested dishes into the preheated oven. Bake for 45 to 50 minutes. You will know it is ready when a thin knife inserted near the center comes out clean, though the very center of the custard should still have a slight “jiggle” when you gently shake the pan.
Step 8: Cool and Serve
Remove the pan from the water bath immediately to stop the cooking process. Serve it warm for a deeply comforting treat, or let it chill in the refrigerator for a firmer, sliceable dessert!
💡 Expert Tips for Success
- Pull it Early: Custard holds an immense amount of residual heat and will continue to cook as it sits on the counter. If you bake it until the center is rock-solid, it will overcook and “weep” liquid as it cools. Pull it while there is still a slight wobble!
- The Strainer Insurance: Even the most experienced bakers occasionally scramble a tiny piece of egg during the tempering process. Running the unbaked liquid through a fine-mesh strainer guarantees an absolutely flawless, restaurant-quality silkiness.
Variations and Substitutions
- The Holiday Spice: While nutmeg is traditional, you can easily shift the flavor profile by adding a pinch of ground cinnamon, cardamom, or even a tiny splash of rum extract to the egg mixture.
- Individual Ramekins: For an elegant dinner party presentation, divide the liquid custard evenly between 6 to 8 individual ceramic ramekins. Place the ramekins in the water bath and reduce the baking time, starting your checks around the 30-minute mark.
- The Heavy Cream Upgrade: If you want an exponentially richer, denser dessert, substitute 1 cup of the whole milk with 1 cup of heavy whipping cream.
❓ Frequently Asked Questions (FAQs)
How should I handle and store leftover baked custard?
Allow the custard to cool completely to room temperature. Cover the baking dish tightly with plastic wrap and store it in the refrigerator. It will stay fresh and delicious for up to 3 to 4 days.
Can I freeze baked egg custard?
Freezing is absolutely not recommended. The delicate emulsion of the egg proteins and dairy will break during the freezing and thawing process. The custard will separate, resulting in a rubbery and watery texture.
Why did my custard turn out watery or separated?
“Weeping” (or syneresis) occurs when the custard is overbaked. If the internal temperature gets too high, the protein bonds tighten up too aggressively, literally squeezing the water out of the milk like a wrung-out sponge. Utilizing the water bath and pulling the dish while it still jiggles prevents this!