This oven-baked 3-ingredient chicken francaise is a brilliant, low-fuss adaptation of a timeless classic that has been a block-party favorite since 1978. It captures all the nostalgic, comforting flair of traditional restaurant chicken francaise—complete with a glossy, lemony-butter style sauce and beautifully browned edges—but reimagines it into a streamlined, one-pan weeknight victory.
By combining tender chicken pieces with thick, creamy Italian dressing and bright lemon pepper seasoning, you skip the tedious flour-and-egg dreading station entirely. It bakes up beautifully in the oven, creating a fancy-looking dish that requires only 10 minutes of hands-on effort!
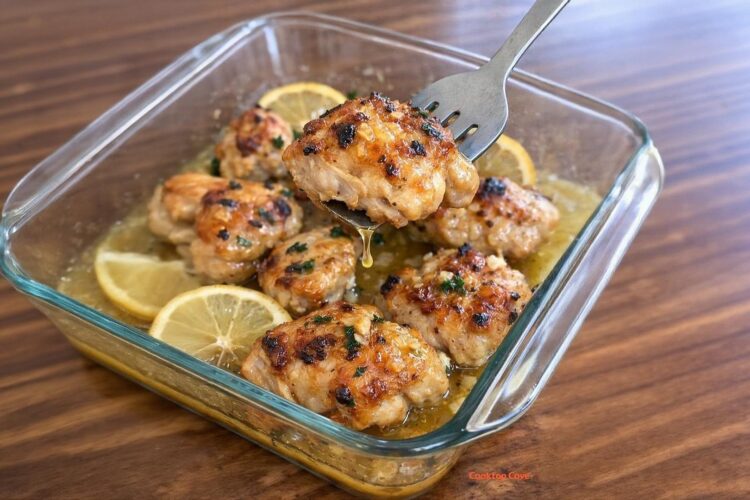
📸 The Flavor and Emulsion Dynamics
Transforming three simple ingredients into a velvety restaurant-style glaze relies entirely on heat breaking down and reconstructing a stable oil-and-herb emulsion:
- Boneless Skinless Chicken (The Foundation): Thoroughly dried beforehand to prevent escaping water from diluting the sauce, baking until juicy and tender.
- Creamy Italian Dressing (The Velvet Binder): Unlike thin vinaigrettes, a true creamy Italian dressing contains stabilized oil, egg yolk, and dairy fats. Under high oven heat, it thins out to baste the meat before reducing into a thick, luxurious pan sauce.
- Lemon Pepper Seasoning (The Energetic Lift): Infuses the creamy dressing fats with a sharp, vibrant citrus punch and a warming cracked-pepper bite, replicating the iconic, zesty Francaise profile.
Recipe Overview
- Prep time: 10 minutes
- Bake time: 35 to 40 minutes
- Resting time: 5 minutes
- Yield: 4 Servings
What You’ll Need
The 3 Core Ingredients:
- 2 lbs Boneless, skinless chicken breasts or chicken thighs (trimmed and cut into large, uniform pieces)
- 1 cup Creamy Italian salad dressing (ensure it is the thick, opaque creamy style, not a clear vinaigrette)
- 2 tablespoons Lemon pepper seasoning
Step-by-Step Instructions
Step 1: Set the Heat and Prep the Dish
Preheat your oven to 200°C (400°F). Lightly grease a 9×13-inch glass or Pyrex baking dish with nonstick cooking spray, or use a paper towel to wipe a thin film of the creamy Italian dressing along the bottom and side walls.
Step 2: Dry the Chicken Fibers
Pat the trimmed chicken pieces completely dry with paper towels.
💡 Chef’s Rule: Removing surface moisture from the raw meat is vital! This simple step allows the thick dressing to cling tightly to the chicken while preventing excess water from pooling in the pan, ensuring your sauce turns out rich and glossy rather than thin and watery.
Step 3: Toss the Creamy Marinade
In a large mixing bowl, add your dry chicken pieces. Pour in the 1 cup of creamy Italian dressing and sprinkle the 2 tablespoons of lemon pepper seasoning evenly over the top. Toss the ingredients together vigorously using tongs or a large spoon until every piece of chicken is completely blanketed. The coating should look thick, opaque, and highly seasoned.
Step 4: Arrange the Single Layer
Transfer the coated chicken into the prepared 9×13-inch baking dish, arranging the pieces in a single, snug layer. Avoid stacking the meat chunks directly on top of each other so the heat can circulate evenly. Use a flexible spatula to scrape every last drop of the seasoned dressing mixture from the bowl over the chicken.
Step 5: The First Bake and Baste
Slide the dish uncovered onto the middle rack of the preheated oven and bake for 20 minutes. The thick dressing will naturally thin out under the heat, bubbling enthusiastically around the edges of the chicken. Carefully pull the dish out and use a large spoon to scoop up the hot pan juices from the bottom, basting it generously over the tops of the chicken pieces to lock in moisture and build a shiny glaze.
Step 6: Finish and Flash-Broil
Return the dish to the oven and continue baking for another 15 to 20 minutes, or until the chicken is completely cooked through and its internal temperature registers a safe 74°C (165°F) in the thickest part.
⚡ The Golden Finish: For extra crispy, caramelized borders, switch your oven to BROIL on high during the final 2 to 4 minutes of cooking. Watch it like a hawk! You want to pull it the exact second the tops develop deep golden-brown spots and a beautiful, buttery sheen.
Step 7: Rest and Serve Hot
Let the chicken rest undisturbed in the hot pan for 5 minutes. This allows the internal juices to settle back into the meat fibers while letting the lemon-butter sauce tighten up slightly into a perfect spoonable gravy. Serve hot straight from the dish, spooning plenty of the zesty pan sauce over each portion!
💡 Expert Tips for Success
- The Ultimate Starch Companions: This zesty, velvety pan sauce is a goldmine of flavor. Serve the chicken hot over a big, steaming bed of buttered egg noodles, white rice, or fluffy mashed potatoes to catch every single drop of the lemony gravy. Pair next to a crisp garden salad or steamed green beans to balance the plate!
- Choose Your Cut Wisely: If you prefer a lean, clean presentation, choose boneless chicken breasts cut into uniform pieces. If you want a highly forgiving, incredibly juicy, and rich bake that won’t dry out even if left in the oven a few minutes too long, choose boneless, skinless chicken thighs.
- The Lunchbox Remake: This recipe is a spectacular make-ahead win. If you have any leftovers, slice the cold chicken thin the next day and fan it across a bed of mixed greens tossed in a light Italian dressing for an elite, refreshing lunch.
Variations and Substitutions
- The Extra Saucy Modification: If your family absolutely loves extra gravy to flood their pasta or rice, simply increase the creamy Italian dressing to 1 ½ cups and add an extra teaspoon of lemon pepper seasoning to the mixing bowl.
- The Creamy Caesar Pivot: For an entirely different savory angle that still keeps the 3-ingredient simplicity, swap the creamy Italian dressing for a high-quality creamy Caesar dressing. The underlying parmesan and garlic notes fuse beautifully with the lemon pepper!
- The Elegant Thin Cutlets: If you prefer delicate, thin cutlets over rustic chunks, slice your chicken breasts horizontally into thin fileted pieces. Because they are thinner, reduce the cooking time slightly, checking for doneness around the 25-minute mark total.
❓ Frequently Asked Questions (FAQs)
How should I handle and store leftover chicken francaise?
Once dinner is over, let the dish cool slightly, transfer the remaining chicken and its lemony sauce into an airtight container, and slide it into the refrigerator within 2 hours. Leftovers stay exceptionally fresh, moist, and delicious for up to 3 to 4 days!
What is the best way to reheat leftovers to keep them tender?
To prevent the chicken from turning rubbery, place the leftovers and their sauce into a small skillet over medium-low heat on the stovetop. Cover with a lid and heat for 5 to 7 minutes, stirring the sauce occasionally, until steaming hot throughout. Alternatively, microwave individual portions in 30-second bursts at medium power.
Can I use light or fat-free dressing for this recipe?
Using fat-free or highly reduced-calorie dressings is not recommended for this style of baking. Fat-free dressings rely heavily on water and chemical gums rather than real oils, meaning they will completely separate and turn into a thin, watery broth under high oven heat rather than baking down into a rich, glossy, and cohesive pan sauce. Stick to standard creamy dressings for premium results!