The Cuppa Cuppa Cake is a charming, old-fashioned dessert that feels like it came straight from a handwritten recipe card tucked inside a grandmother’s cookbook. This is the ultimate no-fuss cake to make when you want something sweet now, without pulling out electric mixers, measuring half the pantry, or overthinking a single step.
With just a handful of humble staples and one bowl, this fruit-filled dessert bakes up with a buttery, golden-brown top crust and a tender, melt-in-your-mouth center bursting with nostalgic flavor. Part cake, part cobbler, and entirely magical, it is a timeless comfort food passed down through generations.
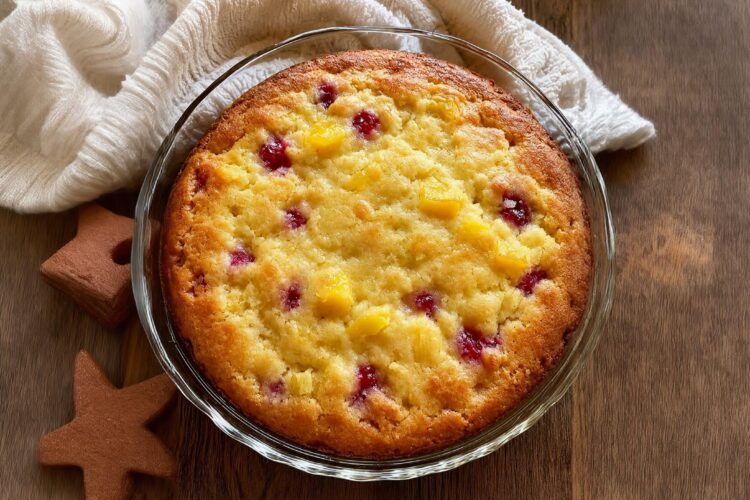
📸 The Texture and Crust Mechanics
Achieving the signature “spoonable” consistency of this vintage bake relies on a specific starch-and-sugar hydration method:
- Unheated Fruit Juices (The Liquid Binder): Because this recipe completely omits eggs, the sweet juice from the canned fruit cocktail serves as the sole hydrating agent, activating the flour starches to form a soft, moist cake batter.
- Granulated Sugar (The Moisture Lock): Mixing a full cup of sugar directly into the flour structure retains moisture during baking, guaranteeing the center stays tender and pudding-like rather than turning dry or dense.
- Surface Butter Placement (The Crisping Shield): Dotting pieces of cold butter exclusively across the top layer—rather than mixing it into the batter—allows the melting fats to fry the surface sugars as it heats. This creates a beautiful, crackly, golden-brown top crust that contrasts perfectly with the soft fruit floor.
Recipe Overview
- Prep time: 10 minutes
- Bake time: 35 to 40 minutes
- Resting time: 10 minutes
- Yield: 6 Servings
What You’ll Need
The Core Ingredients:
- ¼ cup (4 tablespoons) Unsalted butter: Divided into equal halves.
- 1 cup Self-rising flour: (See the tip below to make your own from scratch!).
- 1 cup Granulated sugar
- 1 can (15 oz) Fruit cocktail in juice: Kept completely undrained.
For Serving (Optional):
- High-quality vanilla ice cream or fresh whipped cream.
Step-by-Step Instructions
Step 1: Ignite and Prepare the Pan
Preheat your oven to 175°C (350°F). Slice 2 tablespoons of your unsalted butter and use it to generously grease the bottom and side walls of a 9-inch pie dish, round cake pan, or oven-safe cast-iron skillet. Set the remaining 2 tablespoons of butter aside.
Step 2: Whisk the Dry Foundations
In a large mixing bowl, combine your 1 cup of self-rising flour and 1 cup of granulated sugar. Give them a quick stir with a spoon or spatula to distribute the grains uniformly.
💡 No Self-Rising Flour? No Problem!
You can easily craft your own right in the bowl. Simply whisk together 1 cup of all-purpose flour, 1 ½ teaspoons of baking powder, and ¼ teaspoon of fine salt before proceeding with the recipe.
Step 3: Flood with the Fruit Cocktail
Pour the entire 15-ounce can of fruit cocktail—juice included—directly into the bowl with the flour and sugar.
Step 4: Gentle Stir
Stir the mixture gently using a large spoon or flexible spatula until the flour dissolves and a thick batter forms.
🛑 Golden Rule: Do not over-mix the batter! Stir just until the dry pockets disappear. A few small lumps are completely fine and actually help keep the cake center soft and tender during the bake.
Step 5: Pour and Scatter the Crunch Crown
Pour the fruit batter evenly into your greased baking pan, smoothing the top lightly. Cut the remaining 2 tablespoons of cold butter into small pieces and scatter them uniformly across the surface of the batter.
Step 6: Bake to a Golden Set
Slide the pan uncovered onto the center rack of your preheated oven. Bake for 35 to 40 minutes. You will know it is ready when the top crust has turned a gorgeous golden-brown color and a toothpick inserted near the center comes out with moist crumbs (not wet, runny batter).
Step 7: Rest and Serve Warm
Remove the pan from the oven and let the cake rest undisturbed on the kitchen counter for 10 minutes. This brief rest allows the hot fruit starches to settle into a spoonable structure. Scoop into bowls while still warm, top with a generous scoop of vanilla ice cream, and serve!
💡 Expert Tips for Success
- Never Drain the Canned Fruit: The sweet juice packed inside the can is the primary liquid component of this entire cake structure. Draining it away will leave your batter completely dry, chalky, and unable to rise.
- Opt for Deep Baking Dishes: If you are using a shallow tart pan or pie plate, place a sheet of aluminum foil or a baking pan on the lower oven rack beneath your cake. The fruit sugars expand enthusiastically as they boil, and this guards against any accidental spills on your oven floor.
- The Absolute Best Serving Pairs: Because this old-school treat delivers a warm, jam-like interior, it is at its absolute peak when paired next to a cold scoop of vanilla bean ice cream or a steaming cup of dark black coffee to cut through the heavy sweetness.
Variations and Substitutions
- The Spiced Peach Cobbler Turn: Swap out the fruit cocktail for an equal amount of canned sliced peaches (chopped into bite-sized pieces) and fold ½ teaspoon of ground cinnamon or nutmeg into the dry flour mix to create a beautiful autumn cobbler profile.
- The Tropical Pineapple Twist: Substitute the fruit cocktail for canned pineapple chunks in juice, and scatter a handful of sweetened shredded coconut across the buttered top layer right before baking to build a gorgeous, toasted tropical crown.
- The Plant-Based Vegan Version: To make this recipe completely vegan, simply swap out the unsalted butter for your favorite plant-based block margarine or vegan baking sticks, and double-check that your canned fruit utilizes natural juice.
❓ Frequently Asked Questions (FAQs)
What should the final texture of the cake look like?
Do not be alarmed if the center of your cake feels soft and pudding-like! This is an old-fashioned “spoon cake” profile—somewhere beautifully in between a cake and a cobbler. It is designed to be scooped out with a large spoon rather than sliced into neat, clean geometric wedges.
How should I handle and store leftover cake?
Cover the baking dish tightly with plastic wrap or aluminum foil. You can safely leave it at room temperature for 1 day, or slide it into the refrigerator to keep fresh for up to 3 days.
What is the best way to reheat individual servings?
Because this cake is best enjoyed warm, scoop an individual portion into a microwave-safe bowl and heat for 20 to 30 seconds until the fruit juices loosen back up. Alternatively, warm the entire baking pan inside a 150°C (300°F) oven for 10 minutes before serving!