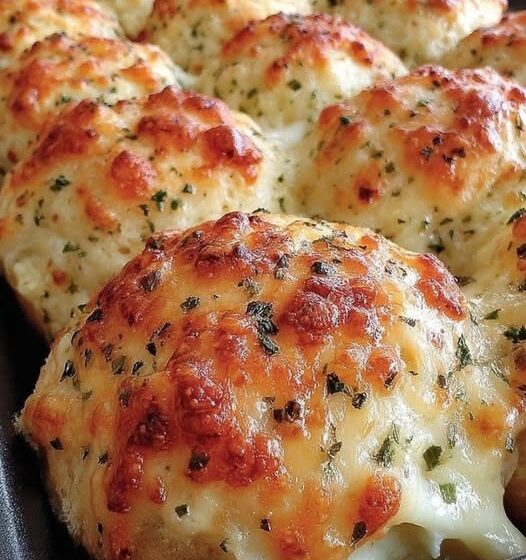
Few things disappear from a party table as fast as warm, cheesy, garlicky bread. These baked garlic butter cheese bombs take that idea and make it even better: a cube of mozzarella tucked inside a tender biscuit-dough ball, baked until golden and puffed, then brushed twice with fragrant garlic butter. Bite into one and the cheese stretches out in warm, gooey ribbons.
They start with a can of refrigerated biscuit dough, so there is no yeast to proof and no dough to knead. In just a few simple steps you have a batch of eight golden bites that work as an appetizer, a snack or a side dish. They are the kind of food people gather around, and the kind that earns requests for seconds.
In this guide, you will find the full recipe, step-by-step instructions with the reasoning behind them, cooking tips, variations, dipping sauce ideas, make-ahead and freezing advice, serving suggestions and answers to the questions cooks ask most often.
Why You Will Love These Cheese Bombs
Quick and Easy
Canned biscuit dough does most of the work for you. You flatten, fill, seal, brush and bake. From start to finish, the recipe is simple enough for beginners and fast enough for busy evenings.
Warm, Gooey, Cheesy Centers
A cube of mozzarella melts into a soft, stretchy center that is the best part of every bite. The outer dough stays tender and fluffy, with a golden surface.
Big Garlic Butter Flavor
Melted butter mixed with fresh garlic, parsley, oregano and a little salt gets brushed over the cheese bombs before and after baking. The first coat soaks in and flavors the dough as it cooks, and the second adds a glossy, fragrant finish.
Versatile for Any Occasion
Serve them as an appetizer at a party, as a snack for game day, as a side for pasta night or soup night, or as a fun addition to a family dinner. They suit holidays, potlucks and casual weeknights equally well.
Crowd-Pleasing
Cheese, garlic and bread are a combination almost everyone loves. These bites are friendly to both kids and adults, and they are easy to pick up and eat.
Make-Ahead and Freezer Friendly
You can assemble them a day in advance or freeze them unbaked for later, which makes them handy for entertaining.
Ingredients You Will Need
This recipe makes 8 cheese bombs.
For the Cheese Bombs
- 1 can (16 oz) refrigerated biscuit dough (8 biscuits)
- 8 oz mozzarella cheese, cut into 8 equal cubes
For the Garlic Butter
- 1/4 cup unsalted butter, melted
- 3 cloves garlic, minced
- 1 teaspoon dried parsley
- 1/2 teaspoon dried oregano
- 1/4 teaspoon salt
For Garnish (Optional)
- Freshly grated Parmesan cheese
Equipment
- Baking sheet
- Parchment paper
- Small bowl
- Pastry brush
- Cutting board and knife
A Closer Look at the Ingredients
Refrigerated Biscuit Dough
A 16-ounce can with 8 biscuits gives you large, fluffy rounds that are easy to flatten and wrap around the cheese. The dough bakes up soft inside with a lightly golden outside. Because the biscuits are large, they flatten into a roomy 4-inch circle that wraps neatly around a cube of cheese.
Mozzarella Cheese
Mozzarella melts smoothly and stretches beautifully, which is exactly what you want in a cheese bomb. Cutting a block of low-moisture mozzarella into 8 equal cubes gives each bomb the same amount of filling. Block mozzarella is generally easier to cube and less watery than fresh mozzarella.
Unsalted Butter
Unsalted butter lets you control the salt level in the garlic butter. Make sure it is fully melted and slightly cooled before you mix in the garlic.
Fresh Garlic
Three minced cloves give the butter a bold, aromatic flavor. Mince the garlic finely so it spreads evenly with the brush and does not leave large bits on top.
Dried Parsley and Oregano
These dried herbs bring a savory, Italian-style flavor and a bit of color. They also keep well in the pantry, so this recipe is easy to put together on short notice.
Parmesan Cheese (Optional)
A shower of freshly grated Parmesan at the end adds a salty, nutty finish. Fresh grating gives a better taste and melt than pre-grated cheese.
How to Make Baked Garlic Butter Cheese Bombs
Step 1: Prepare the Biscuit Dough
Preheat the oven to 375°F (190°C) and line a baking sheet with parchment paper. Separate the biscuit dough into 8 individual biscuits. Flatten each biscuit with your hands into a round about 4 inches wide. Try to keep the thickness even so the dough wraps smoothly.
Step 2: Fill With Cheese
Place one cube of mozzarella in the center of each dough round. Fold the edges of the dough up and over the cheese, pinching tightly to seal. Roll the sealed dough gently between your palms to form a smooth ball that completely encases the cheese. Place the cheese bombs seam-side down on the prepared baking sheet, spacing them about 2 inches apart.
Step 3: Make the Garlic Butter
In a small bowl, stir together the melted butter, minced garlic, dried parsley, dried oregano and salt until well combined.
Step 4: Brush and Bake
Brush the tops of the cheese bombs with half of the garlic butter mixture. Bake for 12 to 15 minutes, until they are golden brown and puffed. As soon as they come out of the oven, brush the tops with the remaining garlic butter.
Step 5: Garnish and Serve
Sprinkle with freshly grated Parmesan cheese if you like. Serve warm as an appetizer or side dish. They are perfect for dipping in marinara sauce or for enjoying on their own.
Recipe Card
Yield: 8 cheese bombs Oven temperature: 375°F (190°C) Baking time: 12 to 15 minutes Best for: Appetizer, snack or side dish
Quick directions
- Heat the oven to 375°F and line a baking sheet with parchment.
- Separate the biscuits and flatten each into a 4-inch round.
- Place a mozzarella cube in the center of each, then pinch the dough closed and roll into a ball.
- Arrange seam-side down, 2 inches apart.
- Mix the melted butter, garlic, parsley, oregano and salt.
- Brush with half the garlic butter and bake 12 to 15 minutes until golden and puffed.
- Brush with the remaining garlic butter right away. Top with Parmesan if desired and serve warm.
Why This Recipe Works
Butter Twice for Extra Flavor
Brushing the garlic butter on before baking allows some of it to sink into the surface of the dough as it cooks, giving the biscuit a deeper flavor. The second brushing, applied while the bombs are still hot, adds a fresh layer of garlic aroma and a glossy shine that makes them look as good as they taste.
Mozzarella Melts Smoothly
Mozzarella has a mild flavor and a smooth, stretchy melt. It will not overpower the garlic butter, and the long strings of cheese make each bite feel indulgent.
A Tight Seal Keeps the Cheese Inside
Pinching the seams closed and baking the bombs seam-side down means the cheese stays where it belongs. Even if a little cheese does ooze, the parchment paper makes cleanup easy.
Even Cubes, Even Baking
Cutting the mozzarella into equal cubes ensures every bomb gets the same amount of cheese, which helps them bake at the same rate.
Cooking Notes and Tips
Seal the Dough Tightly
Make sure to pinch the seams firmly so the cheese does not leak out while baking. Check each ball for gaps or thin spots before placing it on the pan.
Do Not Skip the Double Brush
Brushing the garlic butter both before and after baking adds extra flavor and makes these cheese bombs irresistibly buttery.
Cut the Cheese Into Neat Cubes
Use a sharp knife and cut the 8 ounces of mozzarella into 8 equal cubes. Pieces of similar size give a consistent result.
Keep the Dough Cool
Refrigerated biscuit dough is easiest to handle when it is cool. If it gets warm and sticky, return it to the refrigerator for a few minutes.
Flatten Evenly
Press the dough evenly from the center outward so the edges are not too thin and the middle is not too thick. A thin edge can tear, and a thick middle can make the dough harder to seal.
Space Them Out
Leave about 2 inches between the cheese bombs so they have room to puff and brown on all sides.
Serve Warm
The cheese is at its gooiest straight from the oven. Let the bombs rest for a couple of minutes before biting in, because the center will be very hot.
Variations
Spicy Cheese Bombs
Add a pinch of red pepper flakes to the garlic butter mixture for a spicy kick.
Herb and Garlic Cheese Bombs
Add 1 teaspoon of freshly chopped rosemary or thyme to the garlic butter for an herbaceous twist.
Bacon Cheese Bombs
Add a small piece of cooked bacon along with the cheese before sealing the biscuit dough for a smoky flavor.
Try Different Cheeses
Mozzarella works well because it melts smoothly, but you can also use cheddar, Gouda or even a mix of cheeses for a different flavor.
Pizza-Style Cheese Bombs
Tuck a slice of pepperoni or a small piece of salami beside the cheese for a pizza-inspired bite, and serve with warm marinara.
Everything Seasoning Finish
After the second brush of butter, sprinkle the tops with everything bagel seasoning for extra texture and savory flavor.
What to Serve With Cheese Bombs
Dipping Sauces
These cheese bombs pair wonderfully with:
- Marinara sauce
- Ranch dressing
- Garlic aioli
- Warm cheese sauce for extra cheesiness
As an Appetizer
Arrange the cheese bombs on a platter with a bowl of dip in the center. Add some fresh vegetables, olives or a simple salad to balance the richness.
As a Side Dish
Serve them alongside spaghetti, lasagna, baked ziti or a bowl of tomato soup. They take the place of garlic bread and add a cheesy surprise.
For Game Day or Parties
Pair them with chicken wings, sliders, nachos and other finger foods for a casual spread that everyone can enjoy.
As a Snack
Enjoy them on their own with a dip when you need a quick, warm bite.
Make-Ahead, Storing and Freezing
Making Ahead
You can prepare the cheese bombs ahead of time. Assemble them, place them on the baking sheet and cover them with plastic wrap. Refrigerate for up to 1 day before baking as directed.
Storing Leftovers
Store any leftover cheese bombs in an airtight container in the refrigerator for up to 3 days.
Reheating
Reheat them in the oven at 350°F (175°C) for 5 to 7 minutes, until warmed through. The oven keeps the outside from getting soft and brings back some of the crisp texture.
Freezing
You can freeze the cheese bombs unbaked. Place them on a baking sheet and freeze until solid, then transfer to a freezer-safe bag. Bake directly from frozen, adding about 5 extra minutes to the baking time.
Frequently Asked Questions
Can I make these cheese bombs ahead of time?
Yes. Prepare them, place them on the baking sheet and cover with plastic wrap. Refrigerate for up to 1 day before baking as directed.
How do I store leftovers?
Keep leftovers in an airtight container in the refrigerator for up to 3 days. Reheat in a 350°F (175°C) oven for 5 to 7 minutes until warmed through.
Can I freeze cheese bombs?
Yes, freeze them unbaked. Place them on a baking sheet until solid, then transfer to a freezer-safe bag. Bake from frozen, adding an extra 5 minutes.
What dips go well with cheese bombs?
Marinara, ranch dressing, garlic aioli and warm cheese sauce are all excellent choices.
What kind of biscuit dough should I use?
A can of refrigerated biscuit dough with 8 biscuits, about 16 ounces total. Choose a flaky or buttery variety for the best flavor.
Why did my cheese leak out?
The seams were probably not sealed tightly enough. Pinch the dough firmly and place the bombs seam-side down on the baking sheet.
Can I use string cheese instead of a block of mozzarella?
Yes. Cut string cheese into pieces roughly the size of the mozzarella cubes. The cheese will melt in a similar way.
Can I use fresh herbs instead of dried?
Yes. Use about three times as much fresh parsley and oregano as dried, and chop them finely.
Can I make them in an air fryer?
An air fryer should work for a small batch. Cook at a moderate temperature and watch closely, since the timing may differ from the oven.
Can I use a different cheese?
Absolutely. Cheddar, Gouda or a mix of cheeses all work well, and each gives a different flavor.
Why are my cheese bombs doughy inside?
The dough may have been rolled too thick, or the oven temperature may have been too low. Flatten each biscuit to about 4 inches and make sure your oven is fully preheated.
Final Thoughts
Baked garlic butter cheese bombs are a simple yet delicious treat that combines the flavors of buttery garlic, melty cheese and tender biscuit dough. They are fast to make, easy to customize and a hit with nearly everyone who tries them.
Whether you are hosting a party, need a quick snack or are looking for a tasty side dish, these golden, cheese-filled bites deliver. Try the variations, pick your favorite dip and enjoy every cheesy, garlicky bite.

