Chinese Chews are one of those beautiful, old-fashioned treats that make you stop and wonder how they earned their unique name. First published in Good Housekeeping magazine way back in 1917, these little sweets have been quietly appearing on holiday baking trays and in community cookbooks for over a century. Despite the moniker, there is no evidence connecting them to Chinese cuisine; rather, they are a classic American invention that relies on simple pantry elements to deliver an exceptional texture.
Operating somewhere beautifully between a dense cookie and a chewy candy, this recipe features no butter, zero oil, and no fancy extracts. Instead, it leverages the natural sugars of chopped dates and the rich fats of walnuts to create a tight, moist crumb. Baked flat, sliced warm, compressed by hand into small rustic logs, and tossed in powdered sugar, they are the perfect nostalgic addition to your family dessert collection!
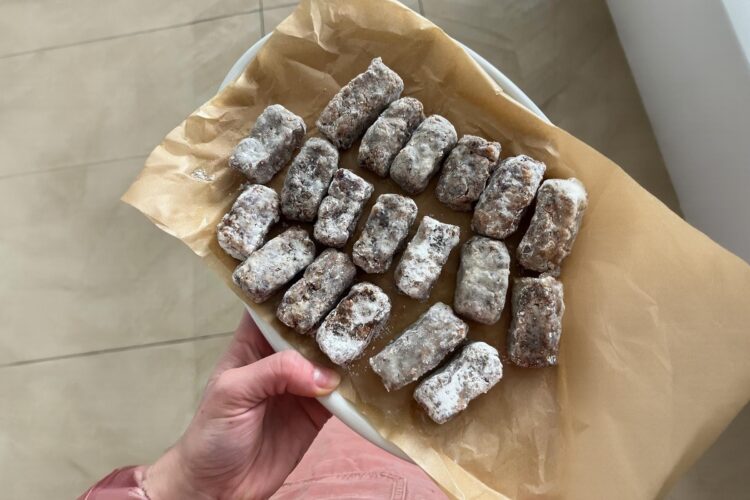
📸 The Structural Mechanics of a Butterless Chew
Baking a stable, tender bar without traditional fat components like butter or oil relies entirely on a precise protein-and-fruit emulsion:
- Whole Whisked Eggs (The Core Binder): In the complete absence of shortener fats, whole eggs act as the primary structural engine, hydrating the flour and sugar to build a thick, sticky batter.
- Chopped Dried Dates (The Natural Moisture Lock): Dates are packed with natural sugars and dense plant fibers. As they bake, they absorb heat and release structural moisture, preventing the bar from drying out while ensuring a signature chewy mouthfeel.
- Chopped Walnuts (The Lipid Contrast): Because there is no butter, the natural oils inside the walnuts provide the necessary richness to soften the crumb while introducing a beautiful acoustic crunch.
- Powdered Sugar Coating (The Protective Shield): Rolling the warm, compressed pieces in confectioners’ sugar forms a dry, velvety barrier. This blocks exterior air to keep the interior soft while preventing the sticky bars from fusing together inside your cookie tins.
Recipe Overview
- Prep time: 10 minutes
- Bake time: 24 to 28 minutes
- Cooling & Shaping time: 15 minutes
- Total time: ~50 minutes
- Yield: 12 Servings
What You’ll Need
The Dry Structural Matrix:
- ¾ cup All-purpose flour
- 1 cup Granulated sugar
- 1 teaspoon Baking powder
- ½ teaspoon Salt
The Textural & Flavor Core:
- 1 cup Dates: Cleanly chopped.
- ¾ cup Walnuts: Chopped.
- 2 Large eggs: Room temperature.
The Finishing Dust:
- 1 cup Powdered sugar: (Confectioners’ sugar) set aside in a shallow bowl for rolling.
Step-by-Step Instructions
Step 1: Kindle the Heat and Prep the Pan
Preheat your oven to 180°C (350°F). Generously grease an 8×8-inch metal baking dish with a thin layer of shortening, butter, or nonstick baking spray.
💡 Chef’s Insight: A metal baking pan is highly recommended over glass for this specific recipe. Metal conducts heat rapidly, helping the outer borders of the egg-rich batter crisp up efficiently before the interior dates over-soften.
Step 2: Sift the Dry Foundations
In a large mixing bowl, sift together the ¾ cup of all-purpose flour, 1 cup of granulated sugar, 1 teaspoon of baking powder, and ½ teaspoon of salt. Whisk them briefly to ensure the leavening agent is uniformly distributed through the flour.
Step 3: Enrobe the Fruits and Nuts
Drop your 1 cup of chopped dates and ¾ cup of chopped walnuts directly into the dry flour bowl. Use a wooden spoon or your hands to toss them until every single piece of fruit and nut is completely coated in flour. This simple trick prevents the sticky date pieces from welding together into one giant lump, ensuring an even distribution throughout the final bars.
Step 4: Form the Dense Batter
Crack your 2 large eggs directly into the mixture. Stir vigorously until the eggs hydrate the flour completely and no dry pockets remain. The batter will look incredibly thick, heavy, and packed tight with chunks—this is exactly how it should look!
Step 5: Spread and Bake
Transfer the heavy batter into your prepared 8×8-inch pan. Use an offset spatula or the back of a greased spoon to press and smooth the mixture into one flat, uniform layer. Slide the pan onto the center rack of the preheated oven and bake for 24 to 28 minutes.
🛑 Golden Rule: Do not over-bake these bars! Pull them out the exact second the top looks set and a light golden-brown. If you leave them in the oven too long, the egg proteins will tighten and dry out, making it completely impossible to shape them into logs later.
Step 6: Slice, Compress, and Roll
Let the pan cool on a wire rack for exactly 10 minutes until the bars are safe to touch but still comfortably warm and pliable.
- Use a sharp knife to slice the square into small, uniform rectangles.
- Lift a warm piece and gently press and roll it between your palms, compressing the fibers into a tight, neat log shape.
- Immediately drop the warm log into your bowl of powdered sugar, rolling it until it is heavily blanketed. Repeat with the remaining pieces.
Step 7: Final Cool and Serve
Arrange the sugar-dusted chews onto a wire rack or parchment paper to cool completely to room temperature. As they cool, the sugar will set into a gorgeous, dry, snowy finish. Serve next to a hot cup of black tea or dark espresso!
💡 Expert Tips for Success
- Shape While Warm: You must execute the slicing and rolling process while the baked slab is still warm. As the bars cool to room temperature, the sugar and egg matrix locks solid into its final shape. If you attempt to roll a cold bar, it will simply snap and crumble in your hands.
- Keep Your Hands Lightly Dusted: If the warm date mixture begins to stick to your palms while you are shaping the logs, simply dust your hands with a tiny bit of the powdered sugar or a splash of water to create a clean, nonstick barrier.
- The Perfect Gift Box Inclusion: Because these vintage sweets contain zero butter or milk fats, they are exceptionally sturdy and do not spoil easily. This makes them a spectacular choice for shipping inside holiday care packages or packing tightly into decorative gift tins!
Variations and Substitutions
- The Tropical Pecan Twist: Swap out the walnuts for an equal amount of chopped pecans, and fold ¼ cup of unsweetened shredded coconut into the dry flour mix to add a gorgeous, rich aroma.
- The Bright Citrus Lift: Grate the fresh zest of an orange directly into the egg mixture before stirring. The bright citrus oils cut through the heavy sweetness of the dates beautifully, adding a modern aromatic layer.
- The Soft Golden Raisin Swap: If your family doesn’t care for dried dates, you can seamlessly substitute them for an equal amount of plump golden raisins or dried cranberries to achieve a similarly sweet, chewy texture.
❓ Frequently Asked Questions (FAQs)
How should I handle and store leftover Chinese Chews?
Once the chews have cooled completely to room temperature, place them inside an airtight container. They store beautifully at room temperature for up to 1 to 2 weeks without losing their signature chewiness! Ensure the container is kept in a cool, dry place away from direct sunlight so the powdered sugar coating doesn’t melt.
Can I freeze these treats?
Absolutely! These chews freeze phenomenally well. Arrange the fully cooled, sugar-coated logs in a single layer inside a freezer-safe container, placing a sheet of parchment paper between any stacked layers. Freeze for up to 3 months. When ready to enjoy, simply let them sit on the counter for 10 to 15 minutes to come up to temperature.
Why did my powdered sugar coating disappear or turn wet?
This happens if you roll the chews while they are scalding hot straight out of the oven, or if you pack them into an airtight container before they have had a chance to cool completely. The escaping steam will melt the fine sugar crystals into a sticky clear glaze. For best results, let the pan cool for 10 minutes before rolling, and leave the coated chews out on a wire rack until completely cold before sealing them away!