Rich, Moist Chocolate Cake Layers Filled with Creamy Vanilla Filling and Covered in Silky Chocolate Frosting
There’s something wonderfully nostalgic about a homemade Swiss Chocolate Cake. Rich chocolate cake layers are paired with a smooth, creamy filling and finished with a generous layer of chocolate frosting, creating a dessert that’s both elegant and comforting.
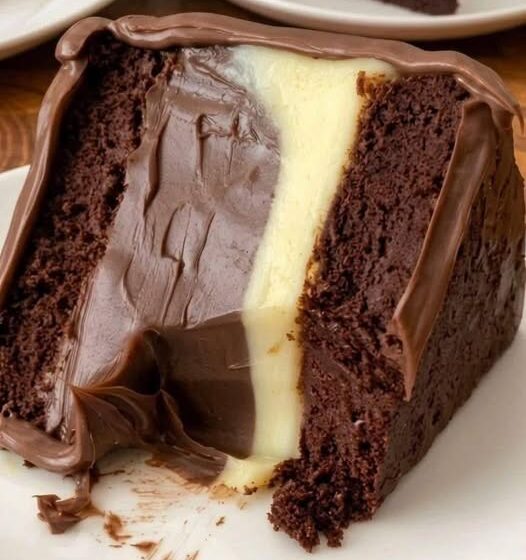
The contrast between the deep chocolate cake and light, creamy center makes every slice especially beautiful. Whether you’re making it for a birthday, holiday, family gathering, or simply because you’re craving something chocolatey, this classic-style cake is sure to impress.
Why You’ll Love This Swiss Chocolate Cake
- Rich, moist chocolate cake
- Smooth and creamy center
- Silky homemade chocolate frosting
- Beautiful contrast between the layers
- Perfect for birthdays and celebrations
- Make-ahead friendly
- Easy to customize
- Wonderful with coffee, milk, or ice cream
- Classic old-fashioned homemade flavor
Ingredients
For the Chocolate Cake
- 2 cups all-purpose flour
- 2 cups granulated sugar
- ¾ cup unsweetened cocoa powder
- 1½ teaspoons baking soda
- 1 teaspoon baking powder
- ½ teaspoon salt
- 2 large eggs
- 1 cup buttermilk
- ½ cup vegetable oil
- 2 teaspoons vanilla extract
- 1 cup hot coffee or hot water
For the Creamy Filling
- 8 ounces cream cheese, softened
- ½ cup powdered sugar
- 1 teaspoon vanilla extract
- 1 cup heavy whipping cream
- ¼ cup granulated sugar
For the Chocolate Frosting
- ½ cup unsalted butter, softened
- ½ cup unsweetened cocoa powder
- 3 cups powdered sugar
- ½ cup heavy cream or milk
- 1 teaspoon vanilla extract
- Pinch of salt
For Decorating
- Chocolate shavings or curls, optional
- Cocoa powder, optional
- Fresh strawberries or raspberries, optional
Instructions
Step 1: Prepare the Cake Pans
Preheat your oven to 350°F (175°C).
Grease two round cake pans and line the bottoms with parchment paper.
The parchment makes it much easier to remove the delicate chocolate cake layers after baking.
Step 2: Mix the Dry Ingredients
In a large mixing bowl, whisk together the flour, granulated sugar, cocoa powder, baking soda, baking powder, and salt.
Make sure the cocoa powder is evenly distributed throughout the flour mixture.
Step 3: Add the Wet Ingredients
Add the eggs, buttermilk, vegetable oil, and vanilla extract.
Mix until the batter is smooth and well combined.
Gradually pour in the hot coffee or hot water while mixing carefully.
The batter will be relatively thin, which is completely normal. The hot liquid helps dissolve the cocoa and gives the cake a deeper chocolate flavor.
Step 4: Bake the Chocolate Cake
Divide the batter evenly between the prepared cake pans.
Bake until a toothpick inserted into the center comes out with a few moist crumbs.
Avoid overbaking the cake layers, as this can make them dry.
Allow the cakes to cool in their pans for several minutes, then carefully transfer them to a wire rack.
Let both layers cool completely before assembling.
Step 5: Prepare the Creamy Filling
While the cake layers cool, prepare the filling.
Beat the softened cream cheese until smooth.
Add the powdered sugar and vanilla extract and beat until completely combined.
In a separate bowl, whip the heavy cream with the granulated sugar until medium-stiff peaks form.
Gently fold the whipped cream into the cream cheese mixture.
The finished filling should be smooth, creamy, and light enough to spread easily.
Step 6: Make the Chocolate Frosting
Place the softened butter in a mixing bowl and beat until smooth and creamy.
Add the cocoa powder and mix until combined.
Gradually add the powdered sugar, alternating with the heavy cream or milk.
Continue beating until the frosting becomes smooth and spreadable.
Add the vanilla extract and a small pinch of salt.
If the frosting is too thick, add a little more cream. If it is too thin, add a small amount of powdered sugar.
Step 7: Assemble the Cake
Place one completely cooled chocolate cake layer on a serving plate.
Spread the creamy filling evenly over the top, leaving a small border around the edge.
Place the second chocolate cake layer on top.
Press gently to make sure the layers are stable.
Step 8: Frost the Cake
Cover the entire cake with the chocolate frosting.
Use an offset spatula to create a smooth finish, or leave the frosting slightly textured for a more traditional homemade appearance.
Step 9: Decorate
For an elegant finish, sprinkle chocolate shavings or curls over the top.
You can also add a light dusting of cocoa powder or decorate the cake with fresh strawberries or raspberries.
Step 10: Chill and Serve
Refrigerate the assembled cake for about 30 minutes before slicing.
This allows the creamy center to firm up and makes it easier to create clean slices.
Use a sharp knife and wipe it clean between cuts for the neatest presentation.
Tips for the Best Swiss Chocolate Cake
Don’t overbake the cake
Overbaking is one of the easiest ways to turn a moist chocolate cake dry. Remove the layers when a toothpick comes out with a few moist crumbs.
Use room-temperature ingredients
Allow the eggs, cream cheese, and other refrigerated ingredients to come closer to room temperature before mixing. They will combine more smoothly.
Don’t skip the hot coffee
Coffee can intensify the chocolate flavor without necessarily making the cake taste like coffee. Hot water can also be used if preferred.
Cool the cake completely
Never spread the creamy filling onto warm cake layers. Heat can soften the filling and make the layers slide apart.
Level the cake layers
If the cakes rise unevenly, carefully trim the tops with a serrated knife. Flat layers make the finished cake much more stable.
Chill before slicing
A short chill helps the creamy filling firm up and makes the cake much easier to cut neatly.
Delicious Variations
Mocha Swiss Chocolate Cake
Use strong brewed coffee in the cake and add a small amount of espresso powder to the chocolate frosting for an even deeper chocolate flavor.
Chocolate Chip Swiss Cake
Fold mini chocolate chips into the cake batter before baking for extra bursts of chocolate.
Nutty Chocolate Cake
Add chopped pecans or walnuts between the chocolate cake and creamy filling for a satisfying crunch.
Chocolate Ganache Cake
Drizzle chocolate ganache over the finished frosting for an especially decadent dessert.
Strawberry Swiss Chocolate Cake
Add thinly sliced strawberries between the cake and creamy filling for a fresh fruity contrast.
Raspberry Chocolate Cake
Spread a thin layer of raspberry preserves beneath the creamy filling for a delicious chocolate-and-berry combination.
What to Serve With Swiss Chocolate Cake
This rich cake pairs wonderfully with:
- Fresh strawberries
- Fresh raspberries
- Whipped cream
- Vanilla ice cream
- Chocolate sauce
- Fresh berries
- Coffee
- Espresso
- Cold milk
- Vanilla sauce
For a classic presentation, serve a chilled slice with fresh berries and a cup of hot coffee.
Make-Ahead Instructions
The chocolate cake layers can be baked one day ahead.
Once completely cooled, wrap each layer tightly and store them until you’re ready to assemble the cake.
The fully assembled cake can also be refrigerated before serving. Chilling helps the creamy filling set and makes slicing easier.
For a birthday or holiday gathering, preparing the cake ahead of time can make serving day much less stressful.
Storage
Because this cake contains a cream cheese and whipped cream filling, it should be stored in the refrigerator.
Keep the cake covered in a cake container or loosely covered with plastic wrap.
Refrigerated leftovers are best enjoyed within several days. Allow individual slices to sit at room temperature briefly before serving if you prefer a softer frosting and creamier texture.
Frequently Asked Questions
Why is my chocolate cake dry?
The most common reason is overbaking. Begin checking the cake toward the end of the baking time and remove it when a toothpick comes out with a few moist crumbs.
Can I use milk instead of buttermilk?
Yes. You can make a simple buttermilk substitute by adding a small amount of lemon juice or vinegar to milk and allowing it to sit briefly before using.
Can I make this cake in one large pan?
You can, but the baking time will need to be adjusted. Using two round cake pans makes it easier to create the layered cake and creamy center.
Can I freeze the chocolate cake layers?
Yes. Wrap completely cooled cake layers tightly and freeze them before assembling. Thaw them in the refrigerator before adding the filling and frosting.
Can I use store-bought frosting?
Absolutely. Homemade frosting gives you more control over the flavor, but a good-quality chocolate frosting can save time when preparing the cake for a special occasion.
How do I get clean cake slices?
Make sure the cake is well chilled before slicing. Use a sharp knife and wipe it clean between cuts.
Perfect for Special Occasions
This Old-Fashioned Swiss Chocolate Cake is especially wonderful for:
- Birthday parties
- Anniversaries
- Christmas
- Thanksgiving
- Family reunions
- Sunday dinners
- Dinner parties
- Holiday celebrations
- Special family gatherings
Its dark chocolate exterior and light creamy center make it particularly attractive when sliced and displayed on a dessert table.
Final Thoughts
Old-Fashioned Swiss Chocolate Cake brings together everything that makes a homemade dessert unforgettable: moist chocolate cake, smooth creamy filling, and rich chocolate frosting.
The beautiful contrast between the dark cake and light center makes every slice feel special, while the familiar chocolate flavor keeps it wonderfully comforting and nostalgic.
Make it for a birthday, holiday, Sunday dinner, or simply when your family is craving something indulgent. One bite of this combination of rich chocolate cake, creamy filling, and silky frosting may be all it takes to make this classic cake a new family favorite.