A Simple Oven Method for Golden, Evenly Cooked Bacon with Perfectly Crisp Edges
If you love bacon that’s crisp from edge to edge, without burnt spots, chewy centers, or grease splattering all over the stovetop, the oven is one of the easiest ways to get there. Baking bacon gives the strips room to cook evenly, and a wire rack can make them even crispier by allowing rendered fat to drip away.
The real secret is simple: use a rimmed baking sheet, keep the bacon in a single layer, and don’t crowd or overlap the slices.
Why You’ll Love This Method
- Extra-crispy bacon
- Even browning
- Minimal hands-on cooking
- Less stovetop splatter
- Easy to cook a large batch
- No flipping required when using a flat baking sheet
- Easy cleanup with foil or parchment
Ingredients
- 12 slices bacon, regular or thick-cut
- Aluminum foil or parchment paper
Optional for Extra-Crispy Bacon
- 1 oven-safe wire cooling rack
Instructions
Step 1: Prepare the Baking Sheet
Preheat your oven to 400°F (200°C).
Line a large rimmed baking sheet with aluminum foil or parchment paper, making sure the lining comes slightly up the sides to contain the rendered bacon fat. A rimmed sheet is important because bacon releases a significant amount of hot grease during cooking.
For the crispiest possible bacon, place an oven-safe wire rack over the lined baking sheet.
Step 2: Arrange the Bacon
Lay the bacon slices in a single layer.
The slices can touch slightly, but don’t overlap them. Overlapping prevents the bacon from cooking evenly.
Step 3: Bake
Place the baking sheet in the oven.
For regular-cut bacon, start checking around 12–14 minutes.
Thick-cut bacon generally takes around 18 minutes, although the exact time depends on the thickness of the bacon and how crisp you like it.
If using the traditional America’s Test Kitchen approach, cook until the fat begins to render, rotate the baking sheet, and continue baking until the bacon is crisp and browned.
Step 4: Watch Closely Near the End
Once the bacon becomes golden brown, keep a close eye on it.
The difference between perfectly crisp bacon and burnt bacon can be just a couple of minutes.
Remember that the bacon will continue to firm up slightly as it cools.
Step 5: Drain
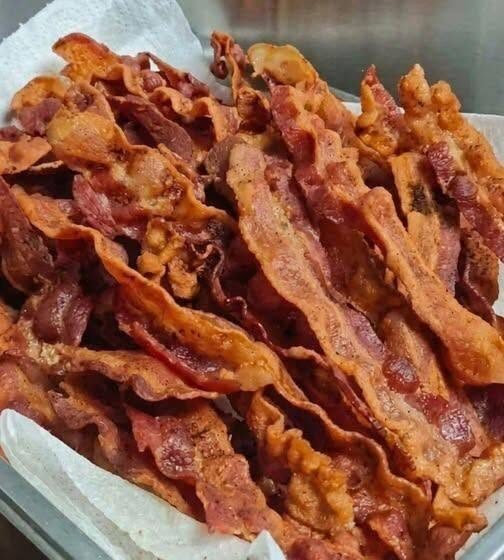
Using tongs, carefully transfer the bacon to a plate lined with paper towels.
Let it sit for a minute or two.
This removes excess grease and allows the bacon to finish crisping.
Step 6: Serve
Serve immediately while warm and crispy.
It’s perfect with scrambled eggs, pancakes, French toast, biscuits, breakfast potatoes, or tucked into a classic BLT.
The Wire-Rack Trick
If you want maximum crispiness, place the bacon on an oven-safe wire rack positioned over the baking sheet.
Elevating the bacon allows rendered fat to drip away and lets hot air circulate around more of the surface. This can produce bacon that’s especially crisp throughout.
The trade-off is cleanup: the rack can be more difficult to scrub than the sheet pan itself.
What About Starting in a Cold Oven?
You’ll find two popular approaches.
A 400°F preheated oven is a well-established method and produces consistently crisp bacon. America’s Test Kitchen’s oven-fried bacon method uses 400°F.
Some cooks prefer starting bacon in a cold oven, allowing the oven and bacon to heat together. The idea is that the fat has more time to render gradually, potentially reducing curling and uneven cooking.
For a simple, repeatable method, however, 400°F is an excellent starting point. Just adjust the cooking time according to your bacon’s thickness and your preferred level of crispness.
Tips for the Crispiest Bacon
Don’t overlap the slices
This is one of the most important rules. Keep every strip exposed so it can brown evenly.
Use a rimmed pan
Bacon grease becomes extremely hot, so a rimmed baking sheet helps contain it.
Choose the right thickness
Regular bacon becomes crisp relatively quickly, while thick-cut bacon takes longer and tends to retain more chew in the center.
Don’t rely only on the timer
Bacon thickness, pan material, oven performance, and personal preference all affect cooking time.
Let it drain
Transfer cooked bacon to paper towels immediately. It will become noticeably crisper as excess grease drains away.
Save the bacon grease
Let the grease cool slightly, strain it into a heatproof container, and refrigerate it if you want to use it later for cooking.
Delicious Ways to Use Crispy Bacon
Once you’ve mastered perfectly crisp bacon, use it in:
- BLT sandwiches
- Bacon cheeseburgers
- Breakfast sandwiches
- Loaded baked potatoes
- Macaroni and cheese
- Cobb salad
- Caesar salad
- Bacon-wrapped appetizers
- Breakfast casseroles
- Deviled eggs
- Potato salad
- Corn and bacon dishes
Storage
Cooked bacon can be refrigerated for about 1 week or frozen for up to 3 months.
For best texture, reheat refrigerated bacon briefly in the oven, skillet, or microwave rather than eating it cold.
Frequently Asked Questions
Do I need to flip bacon in the oven?
No. When bacon is baked directly on a lined baking sheet, flipping isn’t necessary.
Should bacon be cooked on parchment or foil?
Either works. Both make cleanup easier; the important thing is to line the rimmed baking sheet thoroughly.
Is a wire rack necessary?
No. Bacon becomes beautifully crisp directly on a baking sheet. A rack is simply an option when you want especially crisp results and less contact with the rendered fat.
Why isn’t my bacon crispy?
It may need a few additional minutes, especially if you’re using thick-cut bacon. Also make sure the slices aren’t overlapping and give the cooked bacon a chance to drain before serving.
Final Thoughts
The secret to the crunchiest, crispiest bacon isn’t complicated. Use a rimmed baking sheet, arrange the bacon in a single layer, bake at 400°F, and watch carefully toward the end.
For an even crispier result, elevate the bacon on an oven-safe wire rack. The result is golden, crunchy, evenly cooked bacon that’s perfect for breakfast, sandwiches, salads, and all your favorite comfort foods.