An Introduction to the Ultimate Kitchen Hack
Few kitchen habits generate as much low-grade household friction as the fate of sandwich bread crusts. Someone in the family — often a kid, sometimes an adult with strong opinions about “the good part” of a sandwich — trims off the crusts before eating, and those crusts pile up on the cutting board with nowhere to go. Most of the time, they’re pitched straight into the trash or, at best, the compost bin. It’s a small, repeated act of food waste that most of us don’t think twice about, mostly because we’ve never had a good reason to.
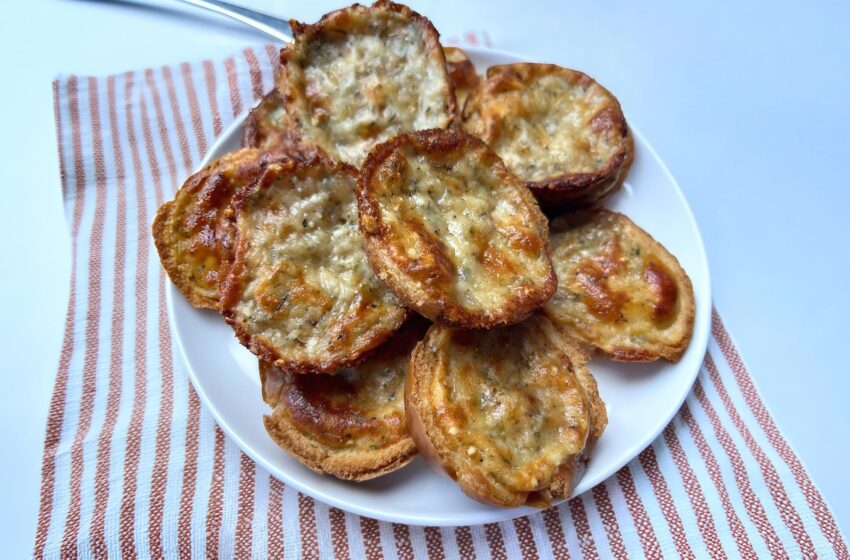
Sandwich Crust Garlic Rolls exist to change that. This clever little recipe takes those unwanted, discarded crusts — the very thing about a loaf of bread most people consider waste — and transforms them into warm, buttery, garlicky, cheese-dusted rolls that bake up golden in a muffin tin in under ten minutes. It’s a genuinely surprising trick: the crusts, which are typically the driest and chewiest part of a sandwich loaf, turn out to be perfectly suited to this treatment, crisping up around the edges while staying soft in the center, almost like a miniature garlic breadstick.
This article walks through everything you need to know about this recipe: why it works from a food-science perspective, where the zero-waste “root-to-stem” style cooking movement that inspired it comes from, tips for getting the best results, ways to customize the flavor, answers to common questions, and a complete, detailed version of the recipe itself.
Why Bread Crusts Deserve a Second Life
To understand why this recipe works so well, it helps to understand what a bread crust actually is, structurally speaking. As a loaf of sandwich bread bakes, the exterior surface loses moisture much faster than the interior, and it’s exposed to direct, intense heat from the oven walls and pan. This creates a firmer, chewier, and more deeply flavored layer through a browning reaction that also concentrates flavor compounds. The crumb — the soft, pillowy interior most people associate with sandwich bread — never develops that same texture or flavor because it’s insulated by the crust itself and never gets fully exposed to high, direct heat.
The result is that a crust, on its own, straight out of the bag, can feel like the least appealing part of the loaf: it’s tougher to chew, sometimes slightly dry, and lacks the soft, neutral quality that makes sandwich bread so versatile. But those same qualities — firmness, structural integrity, a slightly deeper flavor — actually make crusts excellent candidates for a completely different kind of preparation. When you roll a crust into a tight spiral, press it firmly into a muffin tin, and bake it again with butter and seasoning, that structural toughness becomes an asset rather than a liability. It holds its shape, crisps up nicely on the exposed edges, and soaks up flavor from the butter mixture without falling apart, in a way that a piece of soft interior bread crumb probably wouldn’t manage nearly as well.
In other words, this isn’t just a cute way to avoid throwing something away. The specific properties that make crusts less appealing eaten plain are the same properties that make them work so well in this application.
The Rise of “Waste-Not” Cooking
Recipes built around using up scraps, trimmings, and other kitchen byproducts have exploded in popularity over the past several years, part of a broader movement sometimes referred to as “root-to-stem” or “nose-to-tail” cooking, depending on whether you’re talking about produce or meat. The underlying philosophy is straightforward: almost every part of an ingredient has some culinary use, even the parts that home cooks have traditionally discarded out of habit rather than necessity.
This mindset has produced a wave of now-familiar recipes: vegetable scraps simmered into stock, citrus peels candied into sweets, stale bread transformed into croutons or bread pudding, and, in this case, sandwich crusts repurposed into an entirely new dish. Part of the appeal is environmental and economical — reducing food waste saves money and reduces the environmental footprint of grocery shopping — but part of it is simply the fun of culinary problem-solving. There’s a genuine satisfaction in looking at something you’d normally toss and figuring out a clever way to use it instead.
Sandwich Crust Garlic Rolls fit neatly into this tradition, and their popularity has grown alongside a broader online interest in creative, resourceful recipes that turn kitchen “waste” into something genuinely craveable, rather than into a joyless, virtuous-but-bland use-it-up dish.
Sandwich Crust Garlic Rolls: The Full Recipe
Yield: Makes 12 rolls Prep time: About 5 minutes Cook time: 9 to 11 minutes Category: Side dish, snack, or bread Cuisine: American
Ingredients
- Crusts from 1 loaf of sandwich bread
- ½ cup butter, melted
- ¼ cup grated Parmesan cheese
- 2 cloves garlic, minced
- 1½ teaspoons Italian seasoning
- 1 teaspoon salt
- Ground black pepper, to taste
Step-by-Step Instructions
- Preheat and prep your pan. Preheat your oven to 350°F. Generously grease a standard 12-cup muffin tin with butter, making sure to coat the bottom and sides of each cup so the rolls release easily after baking.
- Make the garlic butter. In a small mixing bowl, combine the melted butter, grated Parmesan, minced garlic, Italian seasoning, salt, and a few grinds of black pepper. Stir until everything is evenly combined into a fragrant, slightly thick sauce.
- Shape the crusts. Take the crusts saved from one loaf of sandwich bread and roll each strip into a tight spiral, similar to how you’d coil a piece of ribbon. Fit each spiral snugly into the bottom of a prepared muffin cup.
- Press to compact. Using the bottom of a small cup, a shot glass, or the back of a spoon, firmly press each spiral of crust down into the muffin cup. This step is important: it compacts the bread, helps the pieces adhere to one another, and creates a flatter surface for the butter mixture to sit on top of.
- Add the garlic butter. Spoon the prepared garlic butter mixture evenly over each pressed crust roll, making sure some of the mixture seeps down into the gaps between the coiled layers of bread.
- Bake. Place the muffin tin in the preheated oven and bake for 9 to 11 minutes, or until the tops of the rolls are lightly golden brown and the edges look slightly crisped.
- Serve warm. Let the rolls cool in the tin for a minute or two before carefully removing them with a small offset spatula or spoon. Serve immediately, while still warm, for the best texture.
Tips for the Best Results
Save crusts as you go. Rather than trying to accumulate crusts from an entire loaf of bread in one sitting, consider keeping a bag in the freezer and adding trimmed crusts to it every time you make a sandwich. Once you have enough for a batch, you can make this recipe using crusts straight from the freezer or thawed on the counter first.
Use slightly stale crusts if you have them. Bread that’s a day or two old, and slightly drier than fresh, actually holds its coiled shape a bit better during rolling and pressing, since fresh bread can be a little too soft and springy.
Don’t skip the pressing step. Pressing the rolled crusts firmly into the muffin cups isn’t optional if you want rolls that hold together as a single unit rather than falling apart into loose curls of bread once baked.
Grease the tin generously. Because these rolls are compacted tightly and coated in butter, they can still stick if the tin isn’t well greased. A light coating of nonstick spray in addition to butter can add extra insurance.
Watch closely near the end of baking. Because the crusts are thin, they can go from perfectly golden to overly browned fairly quickly in the last minute or two of baking. Check at the nine-minute mark and adjust from there.
Serve immediately for the best texture. Like most warm, buttery bread items, these rolls are at their absolute best straight out of the oven, while the exterior is still slightly crisp. They’ll soften as they cool.
Flavor Variations to Try
Because the base recipe relies on a fairly simple garlic butter mixture, it’s easy to riff on the flavor in a number of directions:
Cheesy garlic rolls. Increase the Parmesan, or add a handful of shredded mozzarella on top during the last few minutes of baking, for a gooier, more indulgent version.
Everything bagel style. Swap the Italian seasoning for an everything bagel seasoning blend, which adds sesame seeds, dried onion, dried garlic, and poppy seeds for a completely different but equally delicious flavor profile.
Spicy garlic rolls. Add a pinch of crushed red pepper flakes to the butter mixture for a subtle kick of heat that plays well against the richness of the butter and cheese.
Herb-forward version. Swap the dried Italian seasoning for a mix of fresh chopped herbs, like parsley, chives, or basil, stirred into the butter just before spooning it over the crusts.
Sweet cinnamon version. For a completely different take, skip the garlic, Parmesan, and Italian seasoning altogether and instead mix the melted butter with cinnamon and sugar for a scrap-bread take on a cinnamon roll bite.
Serving Suggestions
Sandwich Crust Garlic Rolls work well in a variety of contexts:
- As a side to soup or pasta, in place of traditional garlic bread
- As a quick appetizer or snack for a casual get-together
- Alongside scrambled eggs for a savory breakfast bite
- As a kid-friendly lunchbox or after-school snack
- As a fun way to use up bread scraps before hosting a dinner party, so nothing goes to waste
They pair particularly well with tomato-based dishes, where their garlicky, cheesy flavor echoes classic garlic bread served alongside spaghetti or lasagna.
Storage and Reheating Advice
Leftover rolls can be stored in an airtight container at room temperature for up to a day, or in the refrigerator for up to three days. Because they’re small and thin, they do tend to lose some of their initial crispness fairly quickly once cooled. To bring them back to life, reheat them in a 350°F oven or toaster oven for a few minutes, rather than in the microwave, which will make them chewy and soft rather than restoring any crispness. These rolls aren’t ideal candidates for freezing, since their thin, delicate structure doesn’t hold up especially well to the moisture changes involved in freezing and thawing.
Frequently Asked Questions
Do I need to use crusts from a specific type of bread? Standard, sliced white or wheat sandwich bread works best, since its uniform shape and thickness make it easy to roll into a neat spiral. Crusty artisan breads or very thick-cut loaves may not roll or compact as easily.
Can I use the soft interior of the bread instead of just the crusts? You can, though the texture will be noticeably different. The soft interior crumb is much more delicate and prone to becoming mushy once coated in butter, whereas the firmer crusts hold their shape and develop a pleasant chew. This recipe was specifically designed to make use of the parts of the loaf that are usually thrown away.
Why do I need to press the rolls down before baking? Pressing compacts the spiral of bread crust, helping the layers stick together during baking. Without this step, the rolls are more likely to unravel or fall apart once you try to remove them from the muffin tin.
Can I make a larger batch? Yes. If you’re saving crusts over time from multiple loaves, you can easily double or triple the butter mixture to accommodate more rolls, as long as you have enough muffin tins or bake in batches.
Is this recipe vegetarian? Yes, as written, this recipe is vegetarian, relying on butter, cheese, and standard sandwich bread crusts, none of which contain meat products.
What’s the best way to keep bread crusts on hand for this recipe? Many home cooks keep a resealable freezer bag specifically for saving crusts and other bread scraps, adding to it a little at a time until they have enough to make a batch, then pulling the bag out and using the crusts either frozen or thawed.
Final Thoughts
Sandwich Crust Garlic Rolls are a small but genuinely clever example of how a shift in perspective can turn something we habitually throw away into something worth looking forward to. The crusts that usually get trimmed off and tossed in the trash turn out to have exactly the right texture and structure to become warm, buttery, garlic-infused rolls with a satisfying chew and crisped edges — no special ingredients or techniques required, just a muffin tin, some melted butter, and a few pantry staples. It’s the kind of recipe that changes how you think about a piece of bread the very next time you find yourself trimming crusts off a sandwich, and it’s a small, painless way to waste a little less in the kitchen while gaining something genuinely tasty in return.