An Introduction to a Pie-Lover’s Shortcut
For a lot of home bakers, the single biggest obstacle standing between “I’d love a homemade pie” and actually making one isn’t the filling — it’s the crust. Cutting cold butter into flour, chilling dough, rolling it out evenly, transferring it without tearing, crimping the edges — every step is a potential point of failure, and a whole cottage industry of pie-crust tips and tricks exists because so many people find the process intimidating. Crazy Crust Blueberry Pie exists precisely to sidestep all of that.
Instead of a traditional rolled pastry crust, this recipe uses a thin, pourable batter, whisked together in one bowl in a matter of minutes, that gets poured into the pan first. A thick, jammy blueberry filling is then spooned into the center, and as the whole thing bakes, something almost magical happens: the batter rises up and around the fruit on its own, forming a tender, golden border that looks and slices remarkably like a real pie crust, without a rolling pin or pastry cutter ever entering the picture. It’s part pie, part cobbler, and entirely foolproof.
This article explores everything worth knowing about Crazy Crust Blueberry Pie: the baking science behind how the “crazy crust” actually forms, tips for the best results, ingredient substitutions and variations, answers to frequently asked questions, and the complete recipe you’ll need to make it yourself.
What Exactly Is a “Crazy Crust”?
The term “crazy crust” refers to a small but enduring category of pie recipes built around a thin, batter-style crust rather than a traditional rolled pastry dough. The name itself nods to just how unconventional the method seems on paper: rather than lining a pan with dough and then adding filling on top, you pour a loose, almost pancake-like batter into the pan first, then place the filling directly in the center of that batter, with no shaping or lining involved at all.
What makes it work is a phenomenon related to buoyancy and structure during baking. As the pie bakes, the batter around the edges of the pan, which isn’t weighed down by the heavier fruit filling, rises and sets relatively quickly, since it’s a thinner layer with more direct exposure to the pan’s heat. Meanwhile, the batter directly underneath the fruit filling is weighed down by the heavier, wetter filling sitting on top of it, so it rises more slowly and stays flatter and denser in that central area. The net effect, once everything sets and bakes through, is that the edges of the batter puff up and curl inward and upward around the fruit, forming something that looks remarkably like a crimped pie crust border, entirely on its own, with zero shaping from the baker.
This is a genuinely clever bit of food science hiding inside what looks, at first glance, like a very simple, almost lazy shortcut recipe. The batter isn’t just filler — its specific consistency and the way it interacts with the weight and moisture of the fruit filling is what produces the pie-like structure in the first place.
Pie or Cobbler? A Happy In-Between
Crazy Crust Blueberry Pie occupies an interesting middle ground between two classic dessert categories. Structurally and visually, it reads as a pie: it has a defined border, it slices into clean wedges once fully cooled, and it’s baked in a standard pie dish. But texturally, the crust itself behaves more like a cobbler topping — tender, slightly cakey, and soft rather than flaky and crisp, the way a traditional butter-and-flour pastry crust would be.
This hybrid quality is actually one of the dish’s biggest strengths rather than a compromise. People who love the fruit-forward, less fussy character of a cobbler but want the neat, sliceable presentation of a pie get the best of both worlds here. It also means the recipe is considerably more forgiving of small measurement errors or technique mistakes than a traditional pastry crust would be, since there’s no delicate dough to accidentally overwork or toughen.
Crazy Crust Blueberry Pie: The Full Recipe
Yield: About 6 to 8 servings
Prep time: 20 minutes
Cook time: 30 to 40 minutes
Inactive/cooling time: 8 hours (ideally overnight)
Category: Dessert
Cuisine: American
Allergens: Contains eggs, gluten, and wheat
Ingredients
For the filling:
- 2 tablespoons cornstarch
- ½ cup granulated sugar
- 1½ cups fresh blueberries
- 6 tablespoons water
- 1 tablespoon lemon juice
For the crust:
- 1 cup all-purpose flour
- 2 tablespoons granulated sugar
- 1 teaspoon baking powder
- ½ teaspoon salt
- ½ cup unsalted butter, melted and cooled
- ¾ cup water
- 1 large egg, room temperature, lightly beaten
Step-by-Step Instructions
To make the filling:
- Preheat your oven to 375°F. Spray a 9-inch deep pie pan with baking spray (if you don’t have a deep pie dish, an 8×8-inch baking dish will also work). Place the prepared pan on a baking tray to catch any potential overflow during baking, and set it aside.
- In a saucepan set over low heat, whisk together the cornstarch and sugar until evenly combined. Add the blueberries, water, and lemon juice.
- Continue stirring over low heat until the mixture thickens into a jammy, glossy consistency, with the cornstarch fully dissolved and no raw starchy taste remaining. Remove from the heat and set the filling aside to cool slightly while you prepare the crust batter.
To make the crust and finish the pie:
- In a large mixing bowl, combine the flour, sugar, baking powder, and salt, stirring until evenly distributed.
- Add the melted (and cooled) butter, water, and lightly beaten egg to the dry ingredients. Whisk everything together until smooth. The resulting batter should be quite thin and pourable, similar in consistency to a pancake batter, not a thick cake batter or dough.
- Pour the batter into your prepared pan, spreading it out so it evenly covers the bottom.
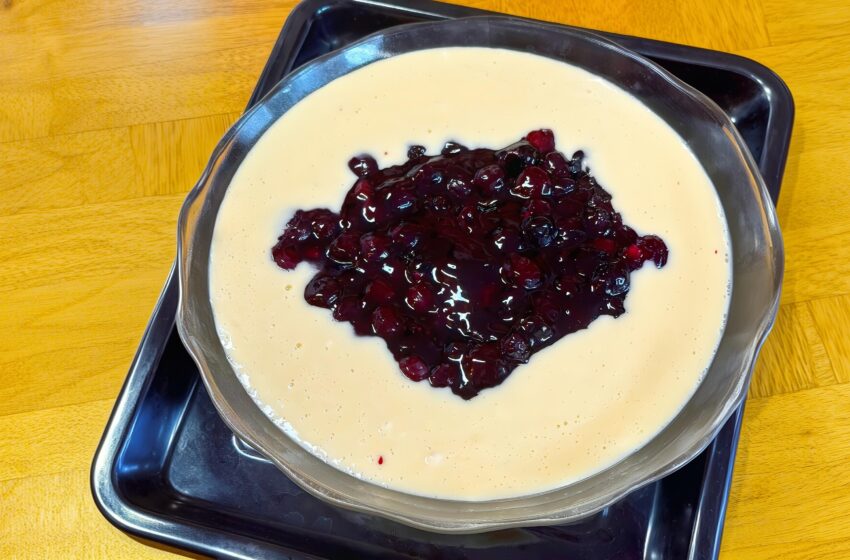
- Carefully spoon the cooled blueberry filling into the center of the batter, keeping it roughly in the middle rather than spreading it all the way to the edges of the pan. Resist the urge to stir the filling into the batter — the two layers need to stay distinct for the crust to form properly around the edges as it bakes.
- Bake for 30 to 40 minutes, or until the crust is golden brown around the edges and the filling is bubbling gently in the center.
- Let the pie cool completely before slicing — ideally overnight, or for a minimum of about 8 hours. Serve with whipped cream or a scoop of vanilla ice cream.
Tips for the Best Results
Don’t rush the cooling time. This is, without question, the single most important tip for this recipe. While the pie will smell irresistible coming out of the oven, cutting into it while it’s still warm will cause the batter crust to collapse and the filling to run, resulting in a messy, soupy slice rather than a clean wedge. The starches in both the filling and the batter need time to fully set as the pie cools, and rushing this step undoes a lot of the structural “magic” that makes this recipe work in the first place. Many bakers find it easiest to simply make the pie a full day ahead of when they plan to serve it.
Keep the filling in the center. When spooning the cooled blueberry filling onto the batter, resist the temptation to spread it all the way to the edges of the pan. Leaving a visible border of plain batter around the outside gives the crust room to rise and curl up and over the edges of the filling as it bakes, which is exactly what creates that pie-crust-like border.
Use room-temperature egg. A cold egg straight from the refrigerator can cause the melted butter to seize up slightly when whisked together, resulting in small clumps in the batter rather than a smooth, uniform mixture. Letting your egg come to room temperature first helps everything blend seamlessly.
Reheat individual slices rather than the whole pie. Because the pie is meant to be sliced only after it has fully cooled and set, if you’d like to serve it warm, the better approach is to cut individual slices first and then gently reheat each one in the microwave or a low oven, rather than trying to serve the entire pie warm straight out of the oven.
Check for doneness by color and bubbling, not just time. Because oven temperatures and pan materials vary, use the visual cues described in the recipe — golden edges and gentle bubbling in the center — as your primary guide, checking a few minutes before the earliest suggested bake time and continuing to check every few minutes after that if needed.
Use fresh, not frozen, blueberries if possible. Fresh blueberries release less excess liquid during cooking than frozen ones, which helps the filling thicken to the right jammy consistency without becoming overly watery. If you only have frozen blueberries on hand, you can still use them, but expect the filling to need a few extra minutes on the stovetop to reach the same consistency, and consider adding an extra half tablespoon of cornstarch to help compensate for the added moisture.
Flavor Variations to Try
While the classic blueberry version is a summertime favorite, the crazy crust method adapts easily to other fruits and flavor combinations:
Mixed berry crazy crust pie. Substitute a mix of blueberries, blackberries, and raspberries for the blueberries, keeping the same overall quantity, for a more complex berry flavor.
Peach crazy crust pie. Swap the blueberries for sliced fresh peaches, adjusting the sugar slightly depending on how ripe and sweet your peaches are, for a late-summer take on the same technique.
Cherry crazy crust pie. Pitted fresh or frozen cherries make an excellent filling for this style of pie, echoing the flavor of a classic cherry pie without any of the crust-rolling hassle.
Apple cinnamon version. Thinly sliced apples tossed with cinnamon and a touch of extra sugar, cooked down slightly before assembling, can stand in for the blueberry filling for a cozy, fall-inspired variation.
Lemon zest addition. Adding a teaspoon of fresh lemon zest to the batter itself, in addition to the lemon juice already in the filling, brightens the overall flavor and complements the blueberries particularly well.
Serving Suggestions
Crazy Crust Blueberry Pie is best served in modest, clean wedges once it has cooled and set completely. A few serving ideas:
- Topped with a generous dollop of freshly whipped cream
- Served alongside a scoop of vanilla or lemon ice cream, especially if the slice has been gently reheated
- Paired with a cup of coffee or tea for an afternoon treat
- As a make-ahead dessert for a dinner party, since it needs to be made in advance anyway
- Dusted lightly with powdered sugar just before serving, for a simple, elegant finishing touch
Because the pie needs significant cooling time regardless, it’s a genuinely convenient make-ahead dessert option for entertaining, allowing you to check it off your to-do list a full day before guests arrive.
Storage Advice
Once fully cooled, store any leftover pie covered in the refrigerator, where it will keep well for up to four days. The texture of the crust will remain relatively stable, though it will continue to firm up slightly the longer it sits. Individual slices can be gently reheated in the microwave for about 15 to 20 seconds, or in a low oven for a few minutes, if you prefer to serve it slightly warm. This pie can also be frozen: wrap it tightly, or wrap individual slices, in plastic wrap followed by foil, and freeze for up to two months. Thaw overnight in the refrigerator before serving.
Frequently Asked Questions
Why does my crust look thin or uneven?
This can happen if the filling is spooned too close to the edges of the pan, leaving little room for the batter to rise and curl around it, or if the batter itself is spread too thin before the filling is added. Make sure to leave a visible plain-batter border around the edges of the pan before adding the filling.
Can I use a store-bought pie crust with this recipe instead?
You could, but doing so would defeat the entire purpose of this recipe, which is specifically designed around the unique way this particular batter behaves in the oven. If you’d prefer a traditional pastry crust, this filling would work fine in a standard rolled pie crust as well, though the baking time may need to be adjusted.
Is this pie supposed to taste more like a cake or a pastry?
Neither exactly — the texture lands somewhere between a tender, slightly cakey cobbler topping and a soft pastry crust. It won’t have the flaky, layered texture of a traditional butter pie crust, but it also isn’t as dense or sweet as a true cake.
Can I skip the overnight cooling and serve it sooner?
It’s strongly recommended that you don’t, at least not for the full pie. The structure genuinely depends on a long cooling period to set properly. If you’re short on time, the better approach is to bake the pie ahead, refrigerate it to speed up cooling, and reheat individual slices later, rather than trying to serve the whole pie freshly baked.
Why is my filling too runny even after cooling?
This is usually a sign that the cornstarch didn’t fully activate during cooking, either because the mixture wasn’t heated long enough or wasn’t stirred continuously while thickening. Make sure the filling reaches a distinctly thickened, jammy consistency on the stovetop before removing it from the heat, and don’t rush that step.
Can I make this recipe dairy-free?
Substituting a plant-based butter alternative for the unsalted butter should work reasonably well in this recipe, though the exact texture of the finished crust may vary slightly depending on the specific product used.
Final Thoughts
Crazy Crust Blueberry Pie earns its slightly tongue-in-cheek name honestly — the method really does sound a little unconventional on paper, pouring a thin batter into a pan and just dropping fruit filling into the middle of it, with no rolling, shaping, or crimping involved at all. And yet, thanks to a neat bit of baking chemistry, the result looks and slices remarkably like a real, from-scratch pie, with a tender, golden border that forms entirely on its own in the oven. For anyone who’s ever wanted to make a homemade pie but felt intimidated by the crust-making process, this recipe offers a genuinely satisfying way in: minimal equipment, one bowl for the batter, a straightforward stovetop filling, and a result that looks far more impressive than the amount of effort it actually requires. The only real challenge is having the patience to let it cool completely before you cut into it — and once you taste that first clean, jammy, blueberry-studded slice, you’ll agree it was worth the wait.