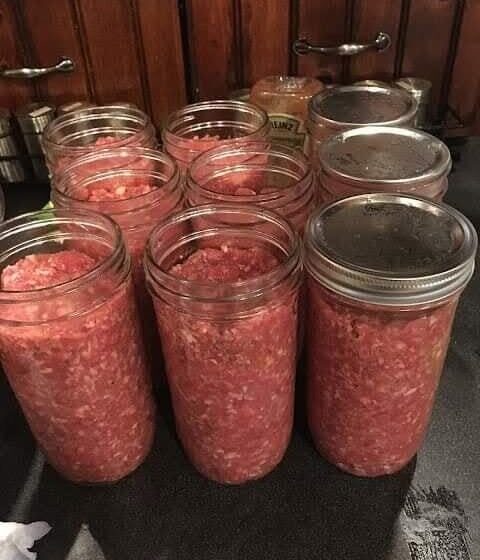
Want to preserve homemade meatloaf for later? Here’s what you need to know before putting meatloaf in a jar—and why pressure canning safety matters.
Homemade meatloaf is one of those comforting meals that is perfect for busy days. But when it comes to preserving meatloaf for long-term storage, there’s an important distinction between freezing leftovers and home canning meat safely.
Meat is a low-acid food, so it requires carefully controlled pressure-canning procedures to reduce the risk of dangerous foodborne illness. The National Center for Home Food Preservation recommends using only tested canning recipes and processes from reliable sources such as USDA and NCHFP.
Can You Can Homemade Meatloaf?
This is where you need to be careful.
While USDA/NCHFP provides tested procedures for ground or chopped meat, that does not automatically mean that every homemade meatloaf recipe is safe to can.
The tested NCHFP process covers ground or chopped beef, pork, lamb, sausage, venison, and other meats. The meat is lightly browned, excess fat is removed, and the meat is packed into jars with boiling broth, tomato juice, or water while maintaining the specified headspace.
However, a homemade meatloaf can contain additional ingredients—such as breadcrumbs, eggs, milk, vegetables, sauces, or other binders—that may change how heat moves through the food.
That means you shouldn’t simply take your favorite meatloaf recipe and invent a canning time for it.
For long-term shelf-stable storage, use a recipe and processing method that has been specifically tested for canning.
Why Pressure Canning Is Necessary
Meat is a low-acid food.
Unlike high-acid foods such as many fruits and properly formulated pickles, low-acid foods cannot safely be processed using a boiling-water canner.
Pressure canning is designed to achieve the higher temperatures necessary to destroy microorganisms that can survive ordinary boiling-water processing.
This is especially important because improperly canned low-acid foods can create conditions favorable to Clostridium botulinum, the bacterium associated with botulism.
That’s why canning meat isn’t an area where it’s safe to experiment with processing times.
A Tested Approach for Ground Meat
If your goal is to preserve ground meat for convenient future meals, NCHFP provides a tested process for ground or chopped meat.
The recommended method begins with fresh, chilled meat.
The meat can be shaped into patties or balls, or ground meat can be sautéed without shaping.
The meat is cooked until lightly browned, and excess fat is removed before it is packed into jars. Boiling meat broth, tomato juice, or water may be added, leaving 1 inch of headspace. Salt can be added if desired.
This tested process is different from saying that a complete homemade meatloaf—with all of its traditional ingredients—is automatically safe to can.
What You Need for Safe Pressure Canning
If you’re using a tested meat-canning recipe, you’ll need the appropriate equipment.
Pressure Canner
Use a true pressure canner, not a small pressure cooker.
NCHFP states that a pressure canner used with USDA processes should be large enough to hold at least four quart-size jars standing upright on a rack.
Mason-Type Canning Jars
Use appropriate home-canning jars with self-sealing lids and follow the tested recipe for the correct jar size.
Jar Lifter
A jar lifter makes it easier and safer to remove hot jars from the canner.
Accurate Pressure Gauge
If your canner uses a dial gauge, it should be checked for accuracy according to current recommendations. Pressure and processing requirements also depend on elevation.
How the Tested Ground-Meat Process Works
The general NCHFP procedure for ground or chopped meat follows several important steps.
1. Prepare the Meat
Use fresh, chilled meat.
Cook ground meat until lightly browned and remove excess fat.
2. Prepare the Jars
Use clean, appropriate canning jars and prepare the lids according to the manufacturer’s instructions.
3. Pack the Meat
Place the prepared meat into the jars.
Add boiling broth, tomato juice, or water according to the tested process and leave the required 1-inch headspace.
4. Process in a Pressure Canner
The exact processing time and pressure depend on the jar size, type of pressure gauge, and elevation.
For example, the NCHFP tested process for ground or chopped meat specifies 75 minutes for pints and 90 minutes for quarts, with pressure adjusted according to the canner type and elevation.
Do not use these numbers for an untested meatloaf recipe.
5. Allow the Canner to Depressurize Naturally
Once processing is complete, turn off the heat and allow the pressure canner to cool and depressurize naturally.
Don’t force-cool the canner.
NCHFP warns that forced cooling can contribute to liquid loss and seal failures and may affect food safety.
6. Cool the Jars
After depressurization, remove the jars carefully with a jar lifter.
Place them upright on a towel with space between the jars and allow them to cool undisturbed for 12–24 hours.
Why You Shouldn’t Guess Canning Times
One of the most important rules of home canning is also one of the easiest to overlook:
You cannot safely determine a canning time simply by looking at a recipe.
Processing time depends on factors such as:
- Food acidity
- Density of the food
- Jar size
- Amount and type of liquid
- Packing method
- Processing temperature
- Pressure
- Elevation
- Ingredients in the recipe
A dense food can heat differently from a loose food, which is why simply increasing or decreasing a processing time isn’t a reliable way to make an untested recipe safe.
NCHFP specifically recommends using tested recipes because online recipes and canning advice are not necessarily scientifically validated.
What About Breadcrumbs, Eggs, and Vegetables?
Traditional meatloaf often contains ingredients such as:
- Breadcrumbs
- Eggs
- Milk
- Onion
- Bell peppers
- Garlic
- Tomato sauce
- Seasonings
- Cheese
These ingredients can affect the density, moisture, acidity, and heat penetration of the finished product.
For that reason, don’t assume that a traditional baked meatloaf recipe can simply be placed into jars and pressure canned using the processing time for plain ground meat.
If a particular combination of ingredients has not been tested for home canning, the safer choice is to prepare the meatloaf and freeze it rather than attempting to make it shelf-stable through an untested canning method.
Pressure Canner vs. Pressure Cooker
This distinction is extremely important.
A pressure cooker is designed primarily for cooking food quickly.
A pressure canner is specifically designed and tested for processing jars of low-acid foods.
NCHFP states that USDA processes should not be transferred to small pressure cookers because their size, heating characteristics, and cooling behavior differ from those used to establish the tested processing times.
So if you’re planning to preserve meat for room-temperature storage, make sure you are using a proper pressure canner and a tested process.
Common Mistakes to Avoid
Using a Water-Bath Canner
Don’t use a boiling-water bath for low-acid meat products.
Using a Small Pressure Cooker
A pressure cooker should not automatically be treated as a pressure canner.
Guessing the Processing Time
Never create your own processing time based on another recipe.
Changing the Recipe
Adding extra ingredients or substantially changing proportions can invalidate a tested process.
Ignoring Elevation
Pressure requirements can change with elevation, so always use the pressure specified for your location and canner type.
Force-Cooling the Canner
Allow the pressure canner to depressurize naturally according to the manufacturer’s instructions and the tested process.
How to Store Canned Meat Safely
Once jars have cooled, inspect them carefully.
A properly processed jar should have a good seal.
Don’t use a jar if it shows signs of spoilage such as:
- A broken or failed seal
- Leakage
- Bulging
- Mold
- Unusual odors
- Liquid spurting from the jar when opened
- Other obvious signs of spoilage
NCHFP emphasizes that safe low-acid canned foods depend on using the correct process, appropriate pressure, accurate equipment, and current tested processing times.
A Safer Way to Enjoy Homemade Meatloaf Later
If your favorite meatloaf recipe hasn’t been specifically tested for home canning, you don’t have to give up the idea of preparing meals ahead.
Instead, consider freezing cooked meatloaf in meal-sized portions.
You can bake the meatloaf, allow it to cool appropriately, divide it into portions, package it well, and freeze it for later meals.
This gives you the convenience of make-ahead meatloaf without trying to adapt an untested recipe to pressure canning.
Frequently Asked Questions
Can homemade meatloaf be pressure canned?
Some ground-meat preparations have tested pressure-canning processes, but you should not assume that a complete homemade meatloaf recipe is safe to can. Use only a recipe and process that has been specifically tested for canning.
Can I use a pressure cooker instead of a pressure canner?
No. NCHFP does not recommend using small pressure cookers for USDA pressure-canning processes.
How long does ground meat need to be pressure canned?
The NCHFP tested process for ground or chopped meat specifies 75 minutes for pints and 90 minutes for quarts, with pressure adjusted for elevation and the type of pressure gauge.
These times should not be transferred to an untested meatloaf recipe.
Can I add breadcrumbs to canned ground meat?
Don’t add ingredients to a tested canning recipe unless the recipe specifically includes them. Changes in density and composition can affect heat penetration.
Is freezing meatloaf easier?
For a traditional homemade meatloaf containing several ingredients, freezing is often the simpler option when you don’t have a tested canning recipe for that exact preparation.
Final Thoughts
Canning homemade meatloaf may sound like a convenient way to preserve a favorite comfort food, but meat canning requires more than simply placing cooked food into jars and processing it under pressure.
The safest approach is to use a tested recipe from a trusted food-preservation authority and follow its ingredients, jar sizes, processing times, pressures, and elevation adjustments exactly.
For ground or chopped meat, tested USDA/NCHFP procedures are available. But a traditional meatloaf recipe should not automatically be treated as equivalent to plain canned ground meat.
When it comes to home-canned meat, don’t guess—use a tested process.

