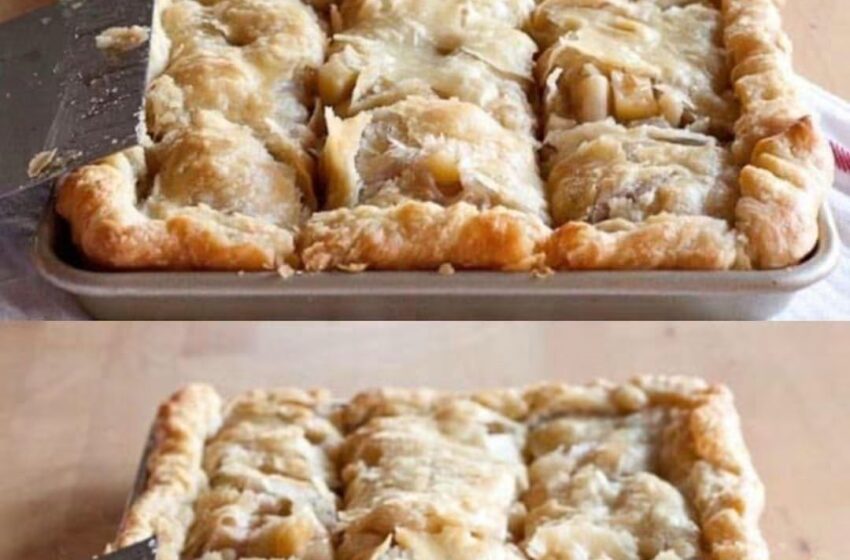
Some pies require a special dish, a lattice, and an afternoon of careful work. Yummy Apple Slab Pie skips all of that. It bakes in a large rimmed pan, so it feeds a crowd, and it relies on a box of refrigerated pie crusts instead of homemade dough. Nine sliced apples are tossed with sugar, cinnamon, nutmeg, and lemon juice, spread over a buttery crust, and baked until the filling bubbles and the edges turn golden. A simple powdered sugar glaze finishes the top.
The result is a pie with a tender, flaky base, soft and spiced apple slices that hold their shape, and a sweet glaze that sets into a thin, glossy layer. It is an easy dessert for potlucks, bake sales, holiday tables, and any gathering where you need more slices than a standard 9-inch pie can give. The recipe takes about 25 minutes of hands-on work, bakes for roughly 35 minutes, and yields generous squares. This guide covers the complete recipe, the role of each ingredient, the details that keep the crust crisp and the apples tender, and plenty of ideas for variations, storage, and serving.
What Is an Apple Slab Pie?
A slab pie is a pie baked in a large, shallow rectangular pan, usually a 15x10x1-inch jelly roll pan, rather than a round pie dish. Because the crust covers more surface area, the filling is spread thinner, which means the apples cook evenly and the crust bakes more quickly. The finished pie is cut into rectangles or squares rather than wedges.
This format is especially popular for feeding groups. A single slab pie serves roughly 15 to 24 people, depending on how the squares are cut, making it a practical choice for church suppers, office parties, and holiday open houses. It also travels well, since a sheet pan is easy to transport and easy to cut in the pan.
The apple filling in this version is simple and bright. Thinly sliced apples cook in a mixture of sugar, flour, cinnamon, and nutmeg, with lemon juice adding a clean, tangy lift. The flour thickens the juices released by the apples as they bake, so the filling bubbles into a syrupy sauce rather than running off the crust.
Why You’ll Love This Recipe
- Feeds a crowd. The large pan produces plenty of squares for a party or potluck.
- Uses refrigerated crusts. No rolling-from-scratch dough required, which makes it a fast, reliable option.
- Simple, familiar flavors. Cinnamon, nutmeg, and apple are a classic, crowd-pleasing combination.
- Tender, not mushy, apples. Thin slices cook through evenly without falling apart.
- Easy glaze finish. A quick powdered sugar drizzle adds sweetness and a polished look.
- Travels well. The pan can be covered and carried straight to a gathering.
- Forgiving technique. Small variations in apple size or oven temperature are easy to adjust for.
Ingredients You’ll Need
The ingredient list is straightforward. Each item has a clear role, and most are staples in a well-stocked kitchen.
For the Crust
1 box refrigerated pie crusts. A standard box typically contains two crusts. You will stack and roll them together into a single large sheet, so both are needed. Let them soften at room temperature according to the package directions before unrolling, since crusts that are too cold will crack when rolled out.
For the Filling
9 cups thinly sliced, peeled apples (about 9 medium). Apples are the heart of this pie. Choose firm, crisp varieties that hold their shape when baked. A mix of tart and sweet apples gives the best balance of flavor. Granny Smith, Honeycrisp, Braeburn, and Jonagold all work well. Thin, even slices, about one-eighth inch thick, cook at the same rate and layer neatly in the pan.
1 cup granulated sugar. Sugar sweetens the filling and, as it melts with the apple juices, creates a syrupy base. Its quantity is generous because it balances the tartness of the apples and the lemon juice.
3 tablespoons all-purpose flour. Flour acts as a thickener. As the apples release their juices, the flour binds with them to form a glossy, spoonable sauce instead of a watery pool at the bottom of the crust.
1 teaspoon ground cinnamon. Cinnamon is the classic warm spice for apple desserts, adding depth and an inviting aroma.
¼ teaspoon ground nutmeg. A small amount of nutmeg adds a subtle, slightly sweet warmth that complements the cinnamon. Freshly grated nutmeg has the brightest flavor, though ground works well too.
¼ teaspoon salt. A pinch of salt balances the sweetness and makes the apple flavor taste more vivid.
1½ tablespoons lemon juice. Lemon juice brightens the filling and keeps the apple slices from browning too much as they sit before baking. It also adds a tangy note that stops the pie from tasting flat or cloying.
For the Glaze
1 cup powdered sugar. Powdered sugar dissolves easily into a smooth, pourable glaze without any graininess.
2 tablespoons milk. Milk thins the powdered sugar into a drizzle. Start with the full 2 tablespoons and add more a few drops at a time if the glaze is too thick.
Equipment
- A 15x10x1-inch jelly roll or sheet pan with sides
- A rolling pin
- A lightly floured work surface
- A large mixing bowl
- A medium mixing bowl, for the glaze
- A sharp knife or a vegetable peeler and mandoline, for the apples
- A wire cooling rack
- A whisk or fork, for the glaze
How to Make Yummy Apple Slab Pie, Step by Step
Step 1: Preheat the Oven
Heat the oven to 450°F (230°C). The high starting temperature helps the bottom crust set quickly and the apples begin to soften before the top browns too much.
Step 2: Prepare the Crust
Remove the pie crusts from their pouches. Unroll them and stack one on top of the other on a lightly floured surface. Roll the stacked crusts into a rectangle about 17 by 12 inches. Working evenly, roll in one direction, then turn the dough a quarter turn, adding light pressure. A large rectangle is needed so the crust can cover the bottom of the pan and rise slightly up the sides.
Step 3: Fit the Crust into the Pan
Transfer the crust into a 15x10x1-inch pan. Press it gently into the corners and along the sides. Fold any extra pastry under itself, so it sits even with the edges of the pan, then crimp the edges with your fingers or a fork for a decorative finish.
Step 4: Prepare the Apples
Peel the apples and slice them thinly, about one-eighth inch thick. Uniform slices are important, since thick and thin pieces will cook at different rates. If you’re working with a large batch, a mandoline makes quick work of consistent slices, but use the guard to protect your fingers.
Step 5: Make the Filling
In a large bowl, mix the granulated sugar, flour, cinnamon, nutmeg, salt, and lemon juice until combined. Add the sliced apples and stir gently until every slice is coated. Make sure the spices and flour are evenly distributed so no single bite is heavy with spice or pasty with flour.
Step 6: Fill the Pan
Spoon the apple mixture into the crust-lined pan and spread it into an even layer. Mound the apples slightly in the center, if needed, so they don’t leave thin, empty areas near the edges. Any juices left in the bowl should be poured over the top.
Step 7: Bake
Bake for 33 to 38 minutes, until the crust is golden brown and the filling is bubbling around the edges. The bubbling is your cue that the apples have softened and the flour has thickened the juices. If the edges of the crust brown too quickly during baking, cover them loosely with strips of foil.
Step 8: Cool
Transfer the pan to a wire rack and let the pie cool for about 45 minutes. Cooling is essential. The filling is very hot and loose when it first comes out of the oven, and slicing too soon will cause it to run out of the squares. The cooling period lets the juices thicken into a spoonable sauce.
Step 9: Make the Glaze
While the pie cools, whisk together the powdered sugar and milk in a medium bowl until completely smooth and well blended. The glaze should be thick enough to drizzle in ribbons but still fluid. Add more milk a few drops at a time if it’s too stiff, or more powdered sugar a spoonful at a time if it’s too thin.
Step 10: Glaze and Set
Drizzle the glaze evenly over the top of the pie, moving the whisk or spoon back and forth in lines for a decorative finish. Allow the glaze to set for about 30 minutes before slicing and serving.
Recipe Card
Yummy Apple Slab Pie
- Yield: about 15 to 24 squares
- Prep time: 25 minutes
- Bake time: 33 to 38 minutes
- Cooling time: 45 minutes, plus about 30 minutes for the glaze to set
- Course: Dessert
- Cuisine: American
Crust Ingredients
- 1 box refrigerated pie crusts, softened according to package directions
Filling Ingredients
- 9 cups thinly sliced, peeled apples (about 9 medium)
- 1 cup granulated sugar
- 3 tablespoons all-purpose flour
- 1 teaspoon ground cinnamon
- ¼ teaspoon ground nutmeg
- ¼ teaspoon salt
- 1½ tablespoons lemon juice
Glaze Ingredients
- 1 cup powdered sugar
- 2 tablespoons milk
Instructions
- Heat the oven to 450°F.
- Stack the two pie crusts and roll into a 17 by 12-inch rectangle on a lightly floured surface.
- Fit the crust into a 15x10x1-inch pan, pressing into the corners. Fold extra pastry under and crimp the edges.
- Combine the sugar, flour, cinnamon, nutmeg, salt, and lemon juice. Stir in the apple slices until coated.
- Spoon the apple mixture into the crust-lined pan and spread evenly.
- Bake 33 to 38 minutes, until the crust is golden and the filling is bubbling.
- Cool on a wire rack for 45 minutes.
- Whisk the powdered sugar and milk until smooth. Drizzle over the pie and let set about 30 minutes before slicing.
Tips for the Best Apple Slab Pie
Choose Apples That Hold Their Shape
Soft apples such as McIntosh can break down into applesauce in a large, long-baking pie. Firmer varieties keep their structure and give the filling a pleasant bite.
Slice Evenly
Consistent slices bake at the same rate. Mixed thicknesses can leave some apples mushy and others still firm.
Roll the Crust to Size
Measure the rolled crust against the pan before transferring it. A slightly oversized crust is easier to fold under than one that falls short of the edges.
Keep the Crust Cool While Working
If the crust becomes soft or sticky while you fill it, refrigerate it for 10 to 15 minutes before baking. A cold crust holds its shape better in the oven.
Pour in the Juices
Any liquid left in the bowl after you have spooned out the apples is flavorful. Pour it over the filling to make sure every section is well moistened and sweetened.
Use Foil for Even Browning
If the crust edges darken faster than the center, cover only those areas with foil strips partway through baking.
Don’t Rush the Cooling
Slicing too early is the most common cause of a runny pie. Give it the full 45 minutes on the rack before cutting.
Glaze at the Right Moment
Drizzling the glaze on a slightly warm pie can make it soak in and turn translucent. Waiting until the pie has cooled to just warm, and then letting the glaze set, gives a cleaner, more visible finish.
Troubleshooting Common Problems
My Filling Was Runny
The apples may have been especially juicy, or the pie was sliced before it cooled enough. Make sure the flour is measured accurately and the pie rests for the full cooling time. Next time, let the apples sit with the sugar and flour for a few minutes before filling the pan, so they release some juice you can drain off.
My Crust Is Soggy on the Bottom
The oven may not have been fully preheated, or the filling sat in the crust too long before baking. Preheat thoroughly and bake the pie as soon as the filling is assembled. Placing the pan on the lowest rack for part of the bake can also help the bottom crisp.
My Crust Browned Too Quickly
Ovens vary. Cover the edges with strips of foil for the remainder of the baking time, and check the pie at the lower end of the suggested time range.
My Apples Are Still Firm
Thin apples usually soften within the suggested time. If they haven’t, bake the pie for another 5 to 10 minutes, watching the crust closely.
My Apples Turned Brown Before Baking
Lemon juice helps, but apples oxidize quickly once cut. Work efficiently, and if you need to slice ahead, toss the slices with a little more lemon juice and keep them covered in the refrigerator.
My Glaze Is Too Thick or Too Thin
Adjust by adding a few drops of milk to thin it or a spoonful of powdered sugar to thicken it. Small changes make a big difference, so adjust gradually.
My Glaze Didn’t Set
Allow the glaze to sit at room temperature for a full 30 minutes. If your kitchen is humid, it may take a little longer.
Variations to Try
Caramel Apple Version
Drizzle a store-bought or homemade caramel sauce over the apples before baking, or add a few tablespoons to the glaze in place of some of the milk.
Brown Sugar Filling
Replace half of the granulated sugar with packed light brown sugar for a deeper, more molasses-like sweetness.
Spiced Crumb Top
Mix ½ cup flour, ⅓ cup brown sugar, ¼ cup cold butter, and a pinch of cinnamon into crumbs. Scatter over the apples before baking, and skip the glaze.
Pecan or Walnut Addition
Sprinkle ½ cup of chopped toasted pecans or walnuts over the apples before baking for a nutty crunch.
Cranberry Apple
Replace one or two cups of the apples with fresh or dried cranberries for a tart contrast. Dried cranberries should be soaked in warm water briefly before using.
Maple Glaze
Replace the milk in the glaze with maple syrup for a warm, slightly autumnal finish.
Cream Cheese Layer
Spread a thin layer of softened cream cheese, beaten with a little sugar, over the crust before adding the apples for a tangy, creamy layer.
Mini Hand Pies
Cut the rolled crust into rounds, add a spoonful of the apple mixture, fold, seal, and bake for 15 to 20 minutes for individual pies.
What to Serve With Apple Slab Pie
- A scoop of vanilla ice cream, which melts into the warm filling
- A dollop of lightly sweetened whipped cream
- A sharp cheddar cheese wedge, a traditional pairing with apple pie in many regions
- A cup of hot coffee, black tea, or spiced cider
For a party table, arrange the squares on a platter and serve with a stack of napkins, since the glaze and filling can drip. Cutting the pie in the pan before serving makes it easy for guests to help themselves.
When to Serve It
- Thanksgiving and other fall holiday gatherings
- Church suppers and potlucks
- Bake sales and school events
- Office parties and staff appreciation days
- Weekend family dinners
- Autumn picnics and harvest festivals
Make-Ahead, Storage, and Freezing
Make ahead: The pie can be baked a day in advance. Let it cool completely, cover with foil or plastic wrap, and store at room temperature. Add the glaze just before serving for the best appearance, or glaze it the day before and keep it covered.
Storing leftovers: Store leftover pie covered at room temperature for up to 2 days, or in the refrigerator for up to 4 days. Refrigerated pie should be brought back to room temperature or warmed gently before serving for the best texture.
Freezing: The unglazed pie can be frozen, tightly wrapped, for up to 2 months. Thaw overnight in the refrigerator, then warm in a 325°F oven for 10 to 15 minutes before glazing and serving.
Reheating: Warm individual squares in a 300°F oven for 8 to 10 minutes, or in the microwave for about 20 seconds, until just warm. The crust will be crisper in the oven.
Frequently Asked Questions
Do I have to use refrigerated pie crusts?
No. A homemade double-crust recipe rolled to 17 by 12 inches also works. Refrigerated crusts are simply a convenient shortcut.
Why do I stack and roll the two crusts together?
Stacking allows you to roll them into one large sheet that covers the full pan. Each crust is thin, so two layers give a sturdy base.
What size pan do I need?
A 15x10x1-inch jelly roll or sheet pan is the standard size. A larger or smaller pan will change the thickness of the filling and the baking time.
Can I use a different type of apple?
Yes, as long as the apples hold their shape when baked. Choose firm varieties and avoid those that turn to applesauce quickly.
Can I make the filling ahead of time?
You can slice the apples and toss them with the lemon juice a few hours ahead, covering and refrigerating them. Combine them with the sugar and flour just before filling the pan, so the sugar doesn’t draw out too much juice in advance.
How many servings does this make?
Depending on how you cut it, the pie yields roughly 15 to 24 squares. Cutting smaller squares gives more servings for a party.
Why does the glaze need to set?
A brief rest lets the powdered sugar glaze firm up enough to hold its shape and prevents it from smearing when the pie is sliced and served.
Can I skip the glaze?
Yes. The pie is delicious without it, especially with ice cream or whipped cream on top.
Allergen Note
This recipe contains gluten (from the pie crust and flour), milk (from the glaze, and possibly from some refrigerated crusts), and may contain other allergens depending on the brand of pie crust used. Always check ingredient labels if you are serving guests with dietary restrictions.