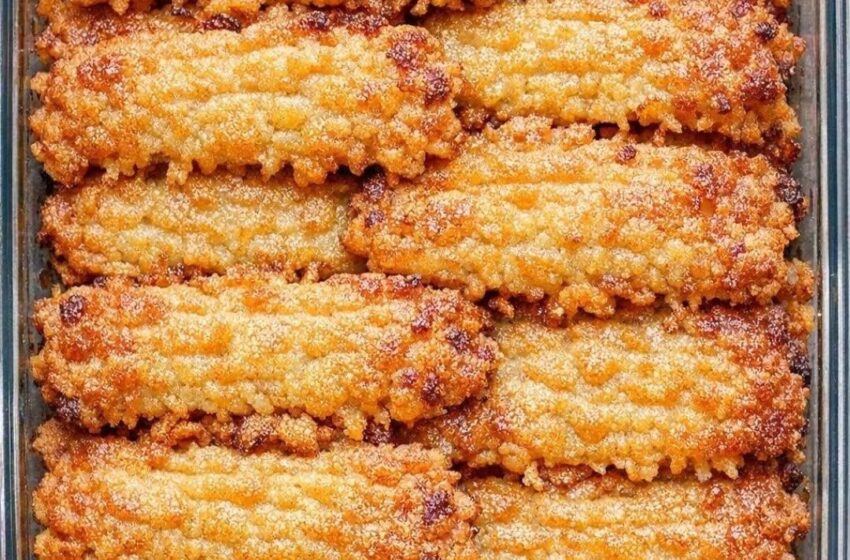
Some recipes prove that a short ingredient list is no obstacle to big flavor. Southern Cheddar Straws are exactly that kind of snack: crisp, cheesy, buttery little strips that have shown up on party tables, holiday spreads, and game-day platters across the South for generations. This version pares the classic down to just three ingredients, and it still delivers everything people love about the original, salty, rich, and impossible to stop eating.
The dough comes together in one bowl, gets piped or rolled into strips, and bakes in about 15 minutes into golden, puffed, snappy straws. The recipe makes enough for eight, though anyone who has set out a tray of these knows they tend to vanish long before the rest of the spread.
This guide covers the complete recipe, the role of each ingredient, the details that keep the straws crisp instead of soft, and plenty of ideas for variations, storage, and serving.
What Are Cheddar Straws?
Cheddar straws are a Southern savory pastry, essentially a cheese-forward shortbread piped or shaped into thin strips and baked until crisp. They belong to the same tradition as cheese biscuits and cheese wafers, dishes built on the simple, reliable combination of cheddar cheese, butter, and flour.
Traditionally served at holiday gatherings, cocktail parties, and bridge club luncheons across the South, cheddar straws are prized for being rich without being heavy, and for holding up well on a buffet table for hours. This pared-down version strips the recipe to its essentials, cheese, butter, and self-rising flour, and still captures that same crisp, cheesy character.
Why You’ll Love This Recipe
- Only three ingredients. Cheddar cheese, butter, and self-rising flour are all you need.
- No mixer required. Everything comes together by hand in one bowl.
- Quick baking time. Just 12 to 15 minutes in the oven.
- Perfect for entertaining. They travel well and hold up on a table for hours.
- Endlessly snackable. Crisp, salty, and buttery, they disappear fast.
- Make-ahead friendly. The dough can be mixed and chilled a day in advance.
- Easy to customize. A pinch of cayenne or paprika keeps them close to tradition while adding a little kick.
- Great for gifting. Packed in a tin, they make a welcome homemade gift.
Ingredients You’ll Need
The short ingredient list means each item plays an outsized role.
Shredded Sharp Cheddar Cheese
You need 2 cups of shredded sharp cheddar cheese. Cheddar is the whole point of this recipe, so a good, flavorful sharp cheddar makes a real difference. Freshly shredded cheese, grated from a block, melts more smoothly into the dough than pre-shredded cheese, which is coated in anti-caking starch that can make the texture slightly less cohesive. Pre-shredded cheese still works fine in a pinch.
Unsalted Butter
You need 1 cup of unsalted butter, softened. Butter is what gives these straws their tender, rich crumb and helps them crisp up beautifully in the oven. Using unsalted butter lets the natural saltiness of the cheddar come through without the dough tasting oversalted. Make sure it is properly softened, not melted, so it blends smoothly with the cheese.
Self-Rising Flour
You need 2 cups of self-rising flour. Self-rising flour already contains baking powder and salt, which is what gives this recipe its simplicity. It provides just enough lift to make the straws puff slightly as they bake, while still holding a crisp, sturdy structure. If you only have all-purpose flour, see the substitution note below.
Equipment
- A large mixing bowl
- Two baking sheets
- Parchment paper
- A piping bag fitted with a large star tip, or your hands for rolling
- A wire cooling rack
How to Make Southern Cheddar Straws, Step by Step
Step 1: Preheat the Oven and Prepare the Pans
Preheat your oven to 350°F (175°C). Line two baking sheets with parchment paper, which keeps the straws from sticking and makes cleanup easy.
Step 2: Combine the Butter and Cheese
In a large bowl, work the softened butter and shredded cheddar together with your hands or a sturdy spoon until they are evenly combined into a smooth, cohesive paste. Take your time with this step, since a well-blended butter and cheese mixture is the foundation for a dough that pipes or shapes smoothly.
Step 3: Add the Flour
Add the self-rising flour to the butter and cheese mixture and mix until a soft, cohesive dough forms. The dough should hold together easily without being sticky or crumbly. If it feels too soft to work with, let it rest in the refrigerator for 10 to 15 minutes to firm up slightly.
Step 4: Shape the Straws
Transfer the dough to a piping bag fitted with a large star tip for the classic ridged look, or roll small portions into thin ropes by hand for a more rustic, homemade appearance.
Pipe or shape 4- to 5-inch strips onto the prepared baking sheets, leaving a little space between each one, since they will puff slightly as they bake.
Step 5: Bake
Bake for 12 to 15 minutes, until the straws are puffed, lightly browned, and crisp around the edges. Keep an eye on them near the end, since the exact timing can vary depending on how thick they were piped or rolled.
Step 6: Cool
Let the cheddar straws cool on the baking sheet for 5 minutes, which allows them to firm up enough to move without breaking. Then transfer them to a wire rack to finish cooling and crisping completely before serving. That final cooling time on the rack is what locks in their signature snap.
Recipe Card
Southern 3-Ingredient Crispy Cheddar Straws
- Yield: 8 servings
- Prep time: 15 minutes
- Cook time: 12 to 15 minutes
- Course: Appetizer, snack
- Cuisine: Southern American
Ingredients
- 2 cups shredded sharp cheddar cheese
- 1 cup unsalted butter, softened
- 2 cups self-rising flour
Instructions
- Preheat the oven to 350°F and line two baking sheets with parchment paper.
- Work the softened butter and shredded cheddar together in a large bowl until evenly combined, then mix in the self-rising flour to form a soft dough.
- Transfer the dough to a piping bag fitted with a large star tip, or roll into ropes by hand.
- Pipe or shape 4- to 5-inch strips onto the prepared baking sheets, leaving space between them.
- Bake 12 to 15 minutes, until puffed, lightly browned, and crisp around the edges.
- Cool 5 minutes on the pan, then transfer to a rack to finish cooling and crisping before serving.
Tips for the Best Cheddar Straws
Use Freshly Shredded Cheese
Shredding your own cheddar from a block gives a smoother dough and a better melt than pre-shredded cheese, which is coated in starch to prevent clumping.
Make Sure the Butter Is Properly Softened
Butter that is too cold will not blend smoothly into the cheese, while butter that is too warm or melted can make the dough greasy. Room temperature butter, soft enough to press easily with a finger, is ideal.
Pipe Them Thin for Extra Crispness
Thinner strips crisp up more fully than thick ones. If you like a very crunchy straw, pipe them on the slimmer side.
Don’t Skip the Cooling Time
Letting the straws cool completely on a wire rack is what allows the exterior to firm up properly. Straws that are stored while still warm can turn out softer than expected.
Chill the Dough if It’s Too Soft to Pipe
If your kitchen is warm or the butter was very soft, the dough may feel too loose to hold its shape. A short 10- to 15-minute rest in the refrigerator firms it up without making it too stiff to work with.
Watch the Baking Time Closely
Because there is no liquid to speak of in this dough, the straws can go from perfectly golden to overly browned fairly quickly near the end of baking. Start checking at the 12-minute mark.
Troubleshooting Common Problems
My Dough Is Too Sticky to Pipe
The butter may have been too soft, or the kitchen too warm. Chill the dough for 10 to 15 minutes before piping.
My Dough Is Too Stiff to Pipe
If the dough firmed up too much in the refrigerator, let it sit at room temperature for a few minutes until it softens enough to pipe smoothly.
My Straws Turned Out Soft Instead of Crisp
They may not have cooled long enough on the rack, or they were piped too thick. Let them cool completely before storing, and try piping thinner strips next time.
My Straws Spread Too Much in the Oven
The butter may have been too warm when the dough was shaped. Chill the piped or rolled straws for a few minutes before baking if this happens.
My Straws Tasted Bland
Use an extra-sharp cheddar for a more pronounced cheese flavor, and make sure you’re using a full 2 cups, well packed.
I Don’t Have Self-Rising Flour
You can make a substitute by whisking together 2 cups of all-purpose flour with 1 tablespoon of baking powder and ½ teaspoon of salt.
Variations to Try
Extra Sharp Flavor
Use extra-sharp or aged cheddar for a more pronounced, tangy cheese bite.
Spiced Version
Stay close to the traditional Southern recipe by adding a pinch of cayenne pepper or a little paprika to the dough. This keeps the ingredient list nearly as simple while adding warmth and a hint of color.
Herby Cheddar Straws
Mix in a teaspoon of dried herbs, such as thyme or rosemary, for a savory, aromatic twist.
Garlic Cheddar Straws
Add a pinch of garlic powder to the dough for extra savory depth.
Pepper Jack Version
Swap in shredded pepper jack for some or all of the cheddar for a spicier, more piquant straw.
Bite-Sized Straws
Pipe shorter, 2-inch pieces for smaller, poppable bites that are easy to grab at a party.
What to Serve With Cheddar Straws
These straws are endlessly versatile on a spread.
Party Pairings
- Pimento cheese
- Deviled eggs
- Marinated olives
- A simple veggie tray
- Cheese boards
Soups and Mains
- Tomato soup, for dipping
- Chili
- A crisp green salad
Drinks
A cold sparkling drink, sweet tea, or a light beer all pair nicely with the rich, salty flavor of these straws.
Make-Ahead, Storage, and Freezing
Make ahead: The dough can be mixed and chilled up to a day in advance. If it becomes too firm in the refrigerator, let it sit at room temperature for a few minutes until it softens enough to pipe or shape easily.
Storage: Once fully cooled, store the cheddar straws in an airtight container at room temperature for up to 4 days. If they soften slightly over time, a few minutes in a low oven will bring back their crisp texture.
Freezing: The unbaked dough can be shaped, frozen on a tray until firm, then transferred to a freezer bag and baked straight from frozen, adding a few extra minutes to the baking time. Baked straws also freeze well in an airtight container for up to a month; thaw at room temperature and re-crisp in a low oven if needed.
Frequently Asked Questions
Can I use pre-shredded cheese?
Yes, it works in a pinch, though freshly shredded cheese from a block melts more smoothly into the dough and gives a slightly better texture.
Do I need a piping bag?
No. You can roll small portions of dough into thin ropes by hand for a more rustic, homemade look if you don’t have a piping bag or star tip.
Can I make these without self-rising flour?
Yes. Whisk together 2 cups of all-purpose flour with 1 tablespoon of baking powder and ½ teaspoon of salt as a substitute.
Why is my dough too soft to work with?
The butter was likely too warm. Chill the dough for 10 to 15 minutes before piping or rolling.
How do I get the crispiest possible straws?
Pipe them thinner, and be sure to let them cool completely on a wire rack before storing, since that final cooling period is what locks in the crisp texture.
Can I make the dough ahead of time?
Yes. It can be mixed and refrigerated for up to a day before piping and baking.
How long do they stay fresh?
Stored in an airtight container at room temperature, they stay fresh for up to 4 days.
Allergen Note
This recipe contains milk (from the cheese and butter) and gluten (from the flour). Always check ingredient labels if you are serving guests with dietary restrictions.